Difference between revisions of "Configuring a Privacy Switch"
IVSWikiBlue (talk | contribs) (Created page with "{{Article - Manual | content = {{Aside | hue = 170 | content = This page uses {{img - tooltip | text = image examples | file = VALT_6.3_Manual-Home_00.png | width = 1000px}}...") |
IVSWikiBlue (talk | contribs) |
||
| (One intermediate revision by the same user not shown) | |||
| Line 2: | Line 2: | ||
{{Aside | hue = 170 | content = This page uses {{img - tooltip | text = image examples | file = VALT_6.3_Manual-Home_00.png | width = 1000px}} }} | {{Aside | hue = 170 | content = This page uses {{img - tooltip | text = image examples | file = VALT_6.3_Manual-Home_00.png | width = 1000px}} }} | ||
| − | <includeonly> | + | <onlyinclude> |
| − | <h1> | + | <includeonly><h1>Configuring a Privacy Switch</h1></includeonly> |
| − | + | <h2>Prepare all Cameras</h2> | |
| − | |||
| − | |||
| − | </includeonly> | ||
| − | |||
| − | < | ||
On each camera in the room: | On each camera in the room: | ||
#[[#Set the I/O Ports|Set the I/O Ports]] | #[[#Set the I/O Ports|Set the I/O Ports]] | ||
| Line 16: | Line 11: | ||
| − | {{Manual lvl | + | {{Manual lvl 3 | title = Set the I/O Ports | content = |
The Input/Output (I/O) ports will be wired to the Privacy Switch. These are used to determine which mode the camera should be in and outputs power to the Privacy Switch to light up the LED. | The Input/Output (I/O) ports will be wired to the Privacy Switch. These are used to determine which mode the camera should be in and outputs power to the Privacy Switch to light up the LED. | ||
| Line 54: | Line 49: | ||
{{hr}} | {{hr}} | ||
| − | {{Manual lvl | + | {{Manual lvl 3 | title = Set the PTZ Presets | content = |
If there are any PTZ cameras in the room, you will need to set the preset positions on those cameras. These locations will help drive the camera to its Privacy Position and Home Position. | If there are any PTZ cameras in the room, you will need to set the preset positions on those cameras. These locations will help drive the camera to its Privacy Position and Home Position. | ||
| Line 83: | Line 78: | ||
{{hr}} | {{hr}} | ||
| − | {{Manual lvl | + | {{Manual lvl 3 | title = Set the Privacy Mask | content = |
The Privacy Mask will be used to block the view | The Privacy Mask will be used to block the view | ||
| Line 100: | Line 95: | ||
{{hr}} | {{hr}} | ||
| − | < | + | <h2>Add Recipients</h2> |
The privacy switch is driven by custom rules/events created on the camera. These rules are sent to all cameras through Recipients. | The privacy switch is driven by custom rules/events created on the camera. These rules are sent to all cameras through Recipients. | ||
| − | {{Manual lvl | + | {{Manual lvl 3 | title = Add Self | content = |
<ol> | <ol> | ||
<li>Go to {{img - tooltip | text = <b>System</b> → <b>Events</b> | file = Privacy rules 12x 04.png}} → {{img - tooltip | text = <b>Recipients</b> | file = Privacy rules 12x 07.png}}.</li> | <li>Go to {{img - tooltip | text = <b>System</b> → <b>Events</b> | file = Privacy rules 12x 04.png}} → {{img - tooltip | text = <b>Recipients</b> | file = Privacy rules 12x 07.png}}.</li> | ||
| Line 124: | Line 119: | ||
{{Manual lvl 3 | title = All Remote Recipients | content = Repeat the steops from [[#Add Self|Add Self]], but change the <strong>Name</strong> to <b>Remote</b>.}} | {{Manual lvl 3 | title = All Remote Recipients | content = Repeat the steops from [[#Add Self|Add Self]], but change the <strong>Name</strong> to <b>Remote</b>.}} | ||
| − | {{Manual lvl | + | {{Manual lvl 4 | title = Remote PTZ Recipients | content = |
For remote PTZ cameras, separate PTZ Control recipients need to be made alongside the standard recipient of the form: | For remote PTZ cameras, separate PTZ Control recipients need to be made alongside the standard recipient of the form: | ||
:<pre>http://CAMERA_IP/axis-cgi/com/ptz.cgi</pre> | :<pre>http://CAMERA_IP/axis-cgi/com/ptz.cgi</pre> | ||
| Line 140: | Line 135: | ||
{{hr}} | {{hr}} | ||
| − | < | + | <h2>Add Privacy Event Rules</h2> |
| − | {{Manual lvl | + | {{Manual lvl 3 | title = Privacy On | content = |
<ol> | <ol> | ||
<li>Go to {{img - tooltip | text = <b>System</b> → <b>Events</b> | file = Privacy rules 12x 04.png}} → {{img - tooltip | text = <b>Rules</b> | file = Privacy rules 12x 06.png}}.</li> | <li>Go to {{img - tooltip | text = <b>System</b> → <b>Events</b> | file = Privacy rules 12x 04.png}} → {{img - tooltip | text = <b>Rules</b> | file = Privacy rules 12x 06.png}}.</li> | ||
| Line 204: | Line 199: | ||
{{Top of Page}} | {{Top of Page}} | ||
{{hr}} | {{hr}} | ||
| − | {{Manual lvl | + | {{Manual lvl 3 | title = Privacy Off | content = |
<ol> | <ol> | ||
<li>Go to {{img - tooltip | text = <b>System</b> → <b>Events</b> | file = Privacy rules 12x 04.png}} → {{img - tooltip | text = <b>Rules</b> | file = Privacy rules 12x 06.png}}.</li> | <li>Go to {{img - tooltip | text = <b>System</b> → <b>Events</b> | file = Privacy rules 12x 04.png}} → {{img - tooltip | text = <b>Rules</b> | file = Privacy rules 12x 06.png}}.</li> | ||
| Line 273: | Line 268: | ||
{{hr}} | {{hr}} | ||
| − | {{Manual lvl | + | {{Manual lvl 3 | title = LED Toggle | content = |
On the <b>Host Camera</b>: | On the <b>Host Camera</b>: | ||
<ol> | <ol> | ||
| Line 292: | Line 287: | ||
{{hr}} | {{hr}} | ||
| − | {{Manual lvl | + | {{Manual lvl 3 | title = PTZ Rules | content = The following rules will be used to move the camera to a privacy location when privacy is enabled, and then move to a home location once privacy is disabled.}} |
| − | {{Manual lvl | + | {{Manual lvl 4 | title = PTZ Privacy | content = |
<ol> | <ol> | ||
<li>Go to {{img - tooltip | text = <b>System</b> → <b>Events</b> | file = Privacy rules 12x 04.png}} → {{img - tooltip | text = <b>Rules</b> | file = Privacy rules 12x 06.png}}.</li> | <li>Go to {{img - tooltip | text = <b>System</b> → <b>Events</b> | file = Privacy rules 12x 04.png}} → {{img - tooltip | text = <b>Rules</b> | file = Privacy rules 12x 06.png}}.</li> | ||
| Line 310: | Line 305: | ||
{{hr - 2}} | {{hr - 2}} | ||
| − | {{Manual lvl | + | {{Manual lvl 4 | title = PTZ Home | content = |
<ol> | <ol> | ||
<li>Go to {{img - tooltip | text = <b>System</b> → <b>Events</b> | file = Privacy rules 12x 04.png}} → {{img - tooltip | text = <b>Rules</b> | file = Privacy rules 12x 06.png}}.</li> | <li>Go to {{img - tooltip | text = <b>System</b> → <b>Events</b> | file = Privacy rules 12x 04.png}} → {{img - tooltip | text = <b>Rules</b> | file = Privacy rules 12x 06.png}}.</li> | ||
| Line 327: | Line 322: | ||
{{Top of Page}} | {{Top of Page}} | ||
| + | </onlyinclude> | ||
}} | }} | ||
Latest revision as of 08:04, 30 July 2025
 🖼️
🖼️
Prepare all Cameras
On each camera in the room:
Set the I/O Ports
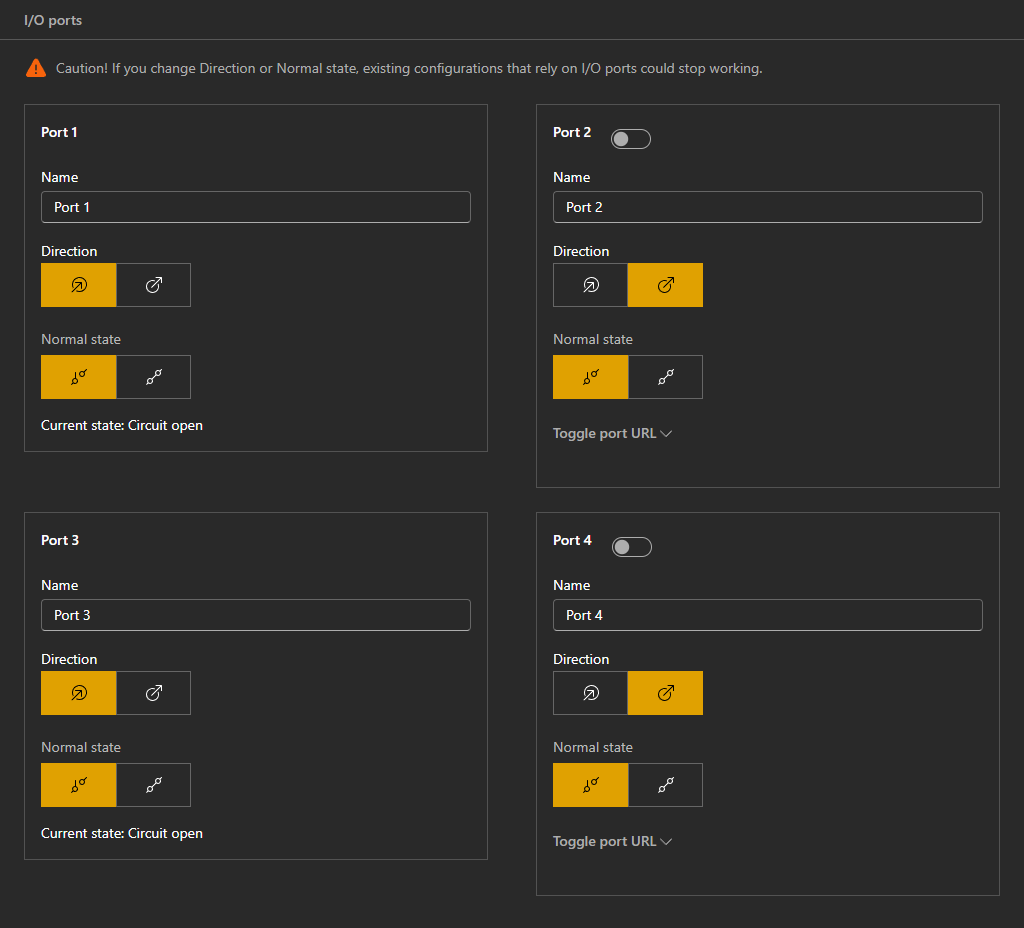
The Input/Output (I/O) ports will be wired to the Privacy Switch. These are used to determine which mode the camera should be in and outputs power to the Privacy Switch to light up the LED.
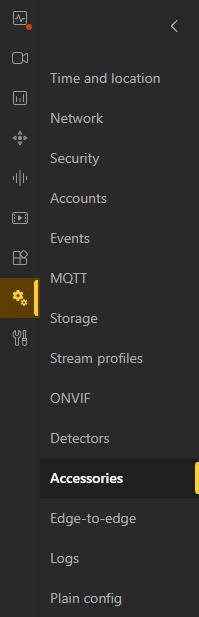
- Go to System → Accessories
 🖼️.
🖼️. - Ensure that Ports 1 & 3 are set as Input and 2 & 4 are set as Output.

| Port 1 | Input | Port 2 | Output | |
|---|---|---|---|---|
| Port 3 | Input | Port 4 | Output | |
Set the PTZ Presets
If there are any PTZ cameras in the room, you will need to set the preset positions on those cameras. These locations will help drive the camera to its Privacy Position and Home Position.
- Pan/Tilt/Zoom your camera to the desired angle.
- Go to PTZ → Preset Positions
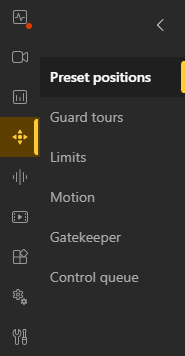 🖼️.
🖼️. - Select Preset Positions → Create preset position
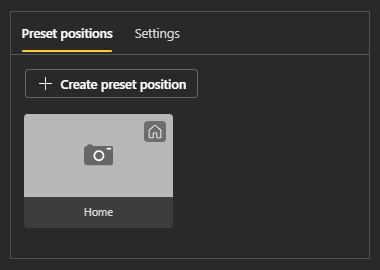 🖼️.
🖼️. - Home
- Set a typical angle that would capture the room normally.
- In the Name field enter Home.
- Privacy
- Typically, this involves having the PTZ face the wall.
- In the Name field enter Privacy.


Set the Privacy Mask
The Privacy Mask will be used to block the view
While your camera is in the Privacy Position:
- Video → Privacy Masks
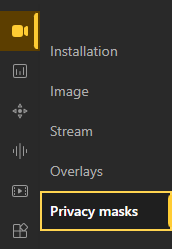 🖼️ → Hit the plus (+) button to add a Mask.
 - Have the mask cover the entire view.
- Name the mask Privacy.
- Make sure this is the first/only mask.

Add Recipients
The privacy switch is driven by custom rules/events created on the camera. These rules are sent to all cameras through Recipients.
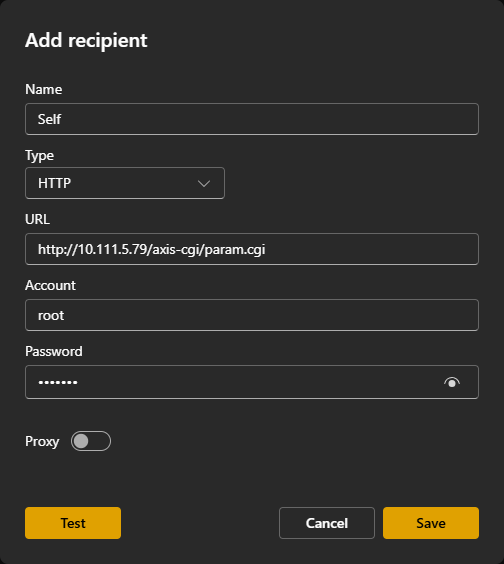
Add Self
- Go to System → Events
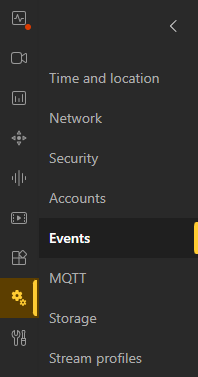 🖼️ → Recipients
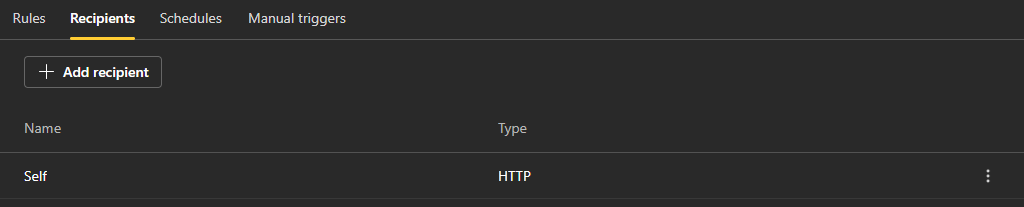 🖼️.
🖼️. - Select Add Recipient.
- In the Name field, enter Self as the name of the camera.
- In the Type
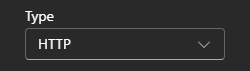 🖼️ field, select HTTP.
 - The URL
 🖼️ of the recipient will be in the form:
 http://CAMERA_IP/axis-cgi/param.cgi


Add Remote Cameras
If there is more than one camera in thme setup, be sure to add additional recipients. This will allow you to create additional rules later to tell thme remote cameras what to do when privacy is enabled/disabled.
All Remote Recipients
Repeat the steops from Add Self, but change the Name to Remote.
Remote PTZ Recipients
For remote PTZ cameras, separate PTZ Control recipients need to be made alongside the standard recipient of the form:
http://CAMERA_IP/axis-cgi/com/ptz.cgi
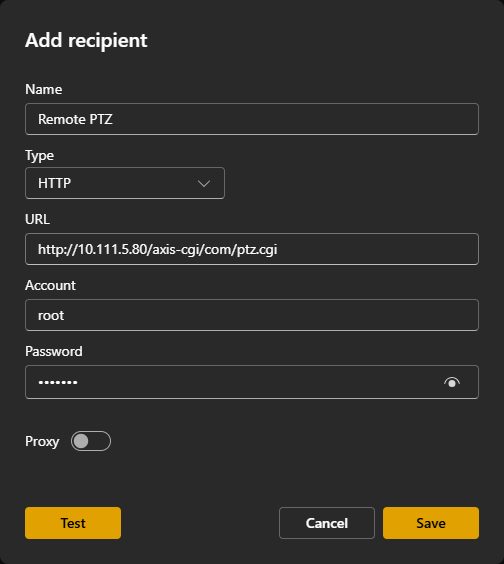
- Enter in the corresponding Username and Password for the recipient camera.
- Hit the Test button.
- If the camera responds that everything is okay, hit the Save button to save your recipient.
Add Privacy Event Rules
Privacy On
- Go to System → Events🖼️ → Rules
 🖼️.
🖼️. - Select Add a rule.
- Set Name to Privacy On.
- Set Condition to Digital input is active or I/O → Digital input. (Firmware Dependent)
- In the Port section, select the port the privacy switch trigger is connected to (white wire).
- Set Action to Send notification through HTTP.
- Set the Recipient.
- The Query string suffix will be of the form
name=valuefor each parameter name and value, with an ampersand (&) between each name/value pair.

The suffix should be composed of the following pairs:
| Fixed & PTZ | |
|---|---|
| Name | Value |
| action | update |
| Image.I0.Overlay.MaskWindows.M0.Enabled | yes |
| AudioSource.A0.InputGain | mute |
| PTZ Only | |
| Name | Value |
| PTZ.Various.V1.PanEnabled | false |
| PTZ.Various.V1.TiltEnabled | false |
| PTZ.Various.V1.ZoomEnabled | false |

The completed suffix should be (ignore word wrapping):
action=update&Image.I0.Overlay.MaskWindows.M0.Enabled=yes&AudioSource.A0.InputGain=mute&PTZ.Various.V1.PanEnabled=false&PTZ.Various.V1.TiltEnabled=false&PTZ.Various.V1.ZoomEnabled=false
Privacy Off
- Go to System → Events🖼️ → Rules🖼️.
- Select Add a rule.
- Set Name to Privacy Off.
- Set Condition to Digital input is active or I/O → Digital input. (Firmware Dependent)
- Check the box Invert this condition.
- In the Port section, select the port the privacy switch trigger is connected to (white wire).
- Set Action to Send notification through HTTP.
- Set the Recipient.
- The Query string suffix will be of the form
name=valuefor each parameter name and value, with an ampersand (&) between each name/value pair.
The suffix should be composed of the following pairs:
| Fixed & PTZ | |
|---|---|
| Name | Value |
| action | update |
| Image.I0.Overlay.MaskWindows.M0.Enabled | no |
| AudioSource.A0.InputGain | 0 |
| PTZ Only | |
| Name | Value |
| PTZ.Various.V1.PanEnabled | true |
| PTZ.Various.V1.TiltEnabled | true |
| PTZ.Various.V1.ZoomEnabled | true |
| autofocus | on |
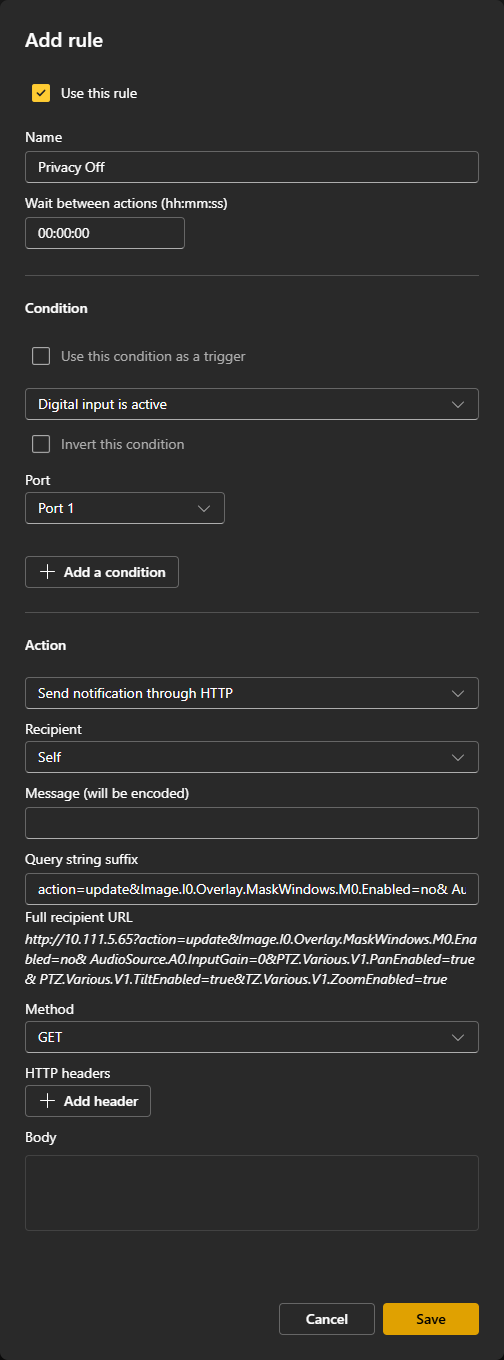
The completed suffix should be (ignore word wrapping):
action=update&Image.I0.Overlay.MaskWindows.M0.Enabled=no&AudioSource.A0.InputGain=0&PTZ.Various.V1.PanEnabled=true&PTZ.Various.V1.TiltEnabled=true&PTZ.Various.V1.ZoomEnabled=true
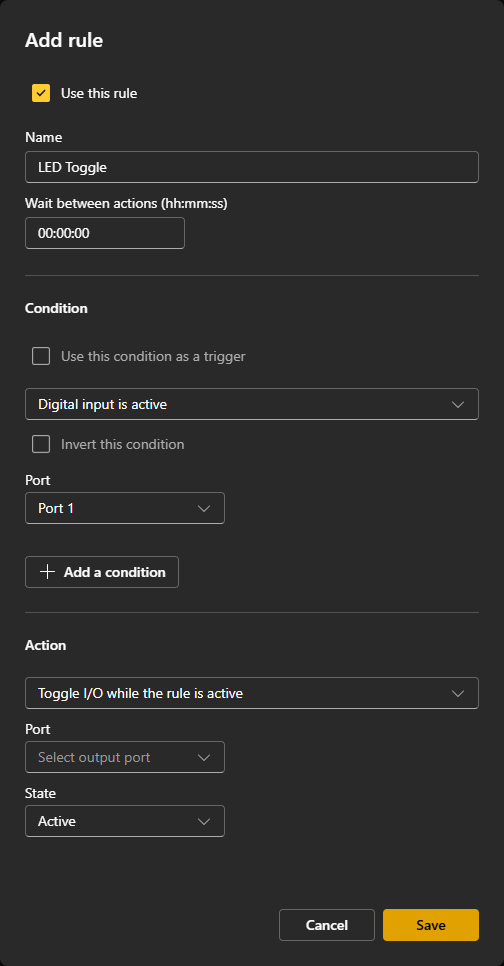
LED Toggle
On the Host Camera:
- Go to System → Events🖼️ → Rules🖼️.
- Select Add a rule.
- Set Name to LED Toggle.
- Set Condition to Digital input is active or I/O → Digital input. (Firmware Dependent)
- In the Port section, select the port the privacy switch trigger is connected to (white wire).
- Set Action to Toggle I/O while the rule is active.
- Set the Action Port to the port the privacy switch LED is connected to (black wire).
- Set the Action State to Active.
PTZ Rules
The following rules will be used to move the camera to a privacy location when privacy is enabled, and then move to a home location once privacy is disabled.
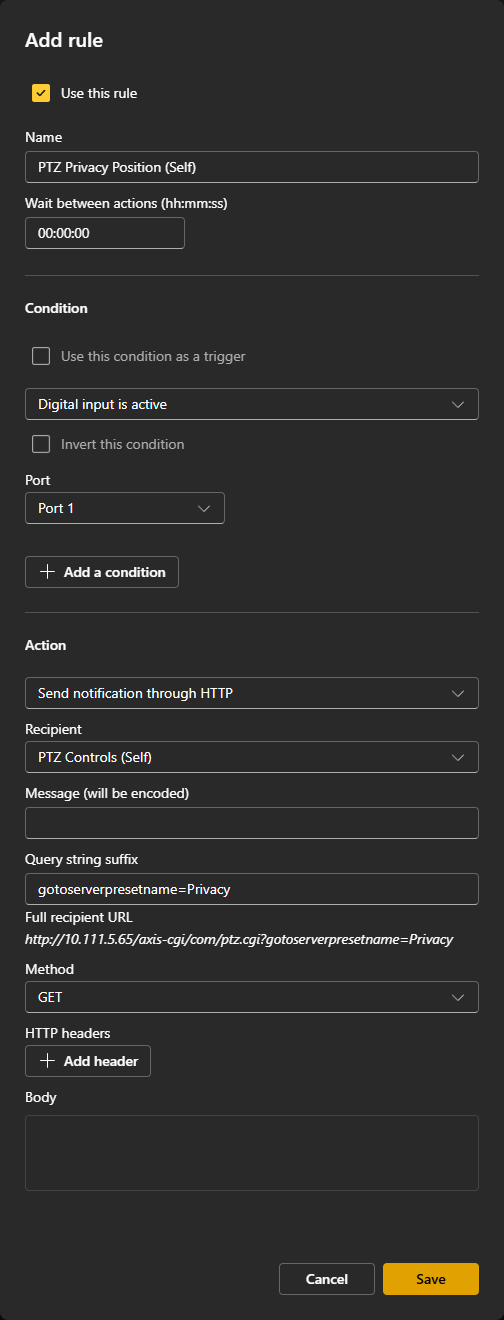
PTZ Privacy
- Go to System → Events🖼️ → Rules🖼️.
- Select Add a rule.
- Set Name to the camera name with PTZ Privacy Position.
- Set Condition to Digital input is active or I/O → Digital input. (Firmware Dependent)
- In the Port section, select the port the privacy switch trigger is connected to (white wire).
- Set Action to Send notification through HTTP.
- Set the Recipient to be the proper PTZ Controls Recipient.
- The Query string suffix should be:
gotoserverpresetname=Privacy
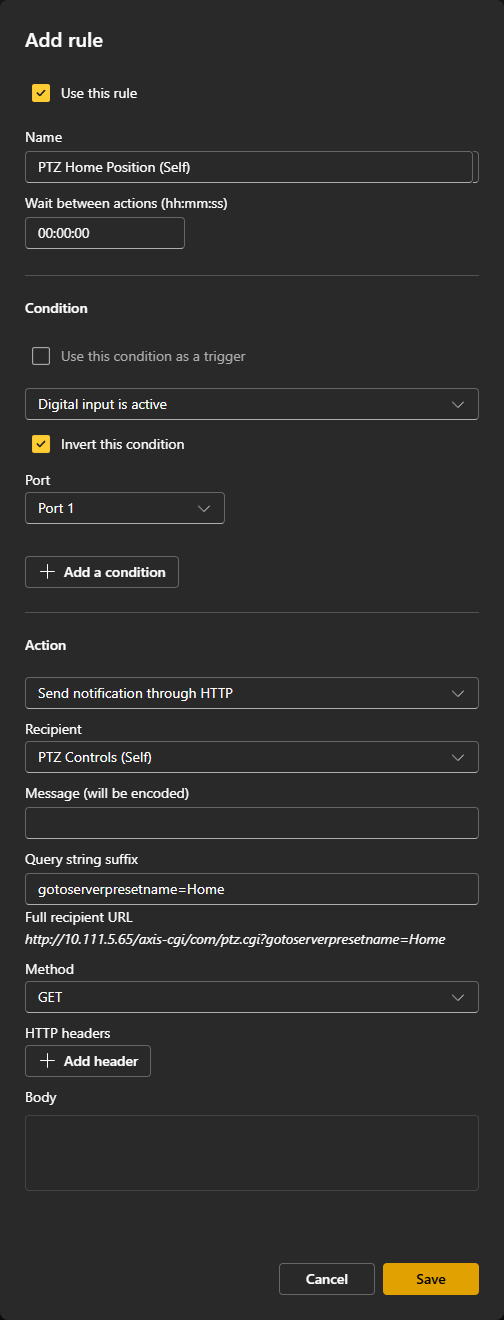
PTZ Home
- Go to System → Events🖼️ → Rules🖼️.
- Select Add a rule.
- Set Name to the camera name with PTZ Home Position.
- Set Condition to Digital input is active or I/O → Digital input. (Firmware Dependent)
- Check the box Invert this condition.
- In the Port section, select the port the privacy switch trigger is connected to (white wire).
- Set Action to Send notification through HTTP.
- Set the Recipient to be the proper PTZ Controls Recipient.
- The Query string suffix should be:
gotoserverpresetname=Home