Difference between revisions of "Bluetooth Talkback"
IVSWikiBlue (talk | contribs) (→Installation Instructions) |
IVSWikiBlue (talk | contribs) (→Required Parts and Tools) |
||
| Line 4: | Line 4: | ||
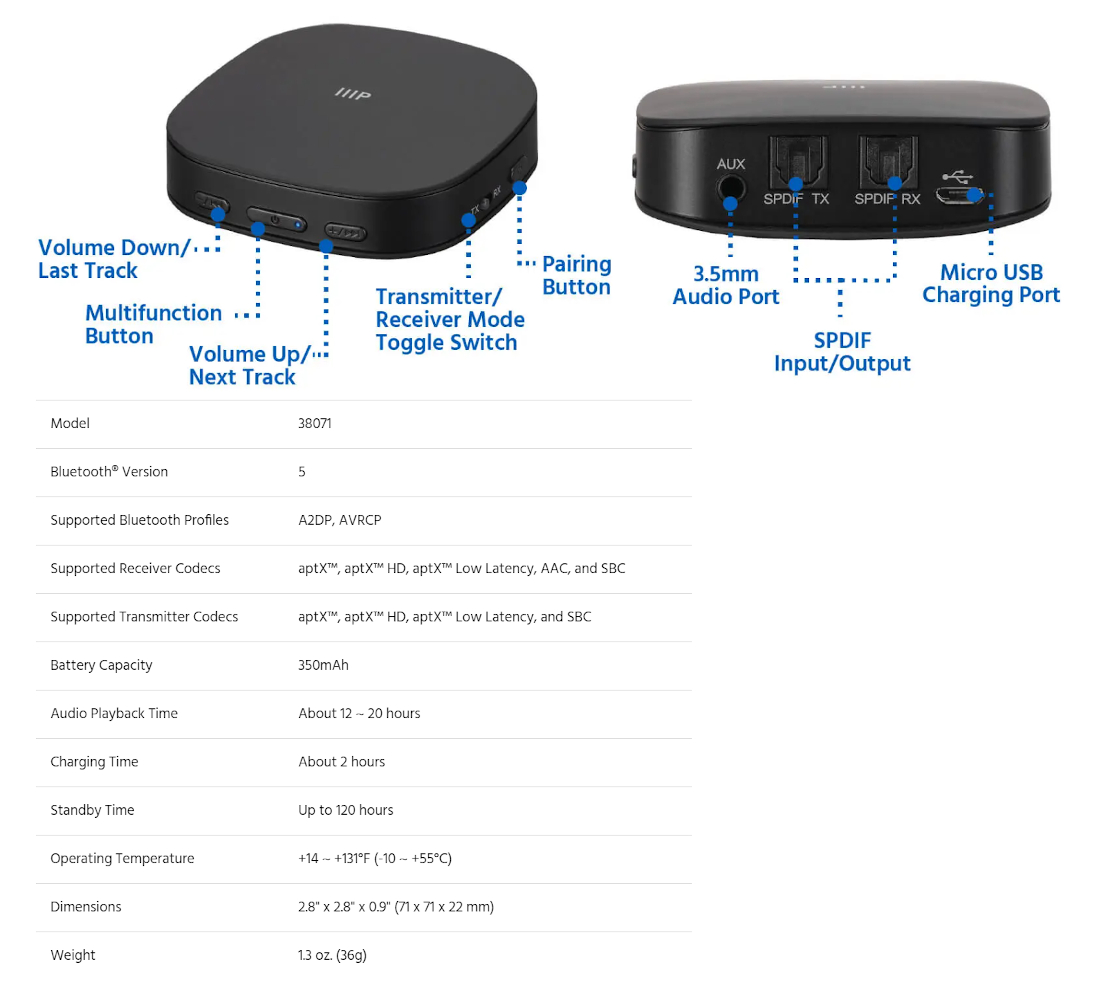
* Monoprice Premium Bluetooth 5 Transmitter & Receiver | * Monoprice Premium Bluetooth 5 Transmitter & Receiver | ||
* RDL 24V DC power supply | * RDL 24V DC power supply | ||
| + | * Single gang mud ring | ||
| + | * Blank single gang face plate | ||
* 22/2 audio cable | * 22/2 audio cable | ||
* 18/2 low voltage cable | * 18/2 low voltage cable | ||
| Line 10: | Line 12: | ||
* Electrical Tape | * Electrical Tape | ||
* Wire Stripper | * Wire Stripper | ||
| − | + | ||
==Installation Instructions== | ==Installation Instructions== | ||
===Mounting the Device=== | ===Mounting the Device=== | ||
Revision as of 14:09, 12 May 2020
Contents
Required Parts and Tools
- Monoprice Premium Bluetooth 5 Transmitter & Receiver
- RDL 24V DC power supply
- Single gang mud ring
- Blank single gang face plate
- 22/2 audio cable
- 18/2 low voltage cable
- B Connectors
- Fish Tape or Glow Rods
- Electrical Tape
- Wire Stripper
Installation Instructions
Mounting the Device
- Determine the location where the Bluetooth transmission device. It will need to be mounted within the reach of its power cable.
- Note: A USB power block will be needed to connect to a power outlet.
- Using a stud finder, scan the mounting location of the Bluetooth device is not mounted on a stud.
- Cut a hole into the drywall, large enough to fit the mud ring into it securely
- Cut a length of 22/2 long enough to reach from the camera to the Bluetooth device.
- Using fish tape or glow rods, pass the 22/2 through the drywall.
- At the camera, connect the 22/2 to the Audio Out port/terminal.
- Using the face plate that will have the Bluetooth device mounted, measure 3/4" to the right of the top screw hole and drill a hole (3/16") for the 3.5mm cable to pass through.
- Connect the 3.5 to the 22/2 cable using B connectors. Use electrical tape to cover the splice and ensure that the splice occurs on the side of the face plate that will be in the wall.
- Using a Velcro, attach a 1' square to the back of the device and to the face plate.
