Difference between revisions of "NodeJS is not working"
IVSWikiBlue (talk | contribs) (→Re-issue the certificate with a SAN) |
IVSWikiBlue (talk | contribs) |
||
| (28 intermediate revisions by the same user not shown) | |||
| Line 1: | Line 1: | ||
=Symptoms= | =Symptoms= | ||
| − | If NodeJS is not working properly you may experience one or more of the following symptoms: | + | If NodeJS is not working properly, you may experience one or more of the following symptoms: |
| − | * When starting or stopping a recording the buttons do not update. | + | * When starting or stopping a recording, the buttons do not update. |
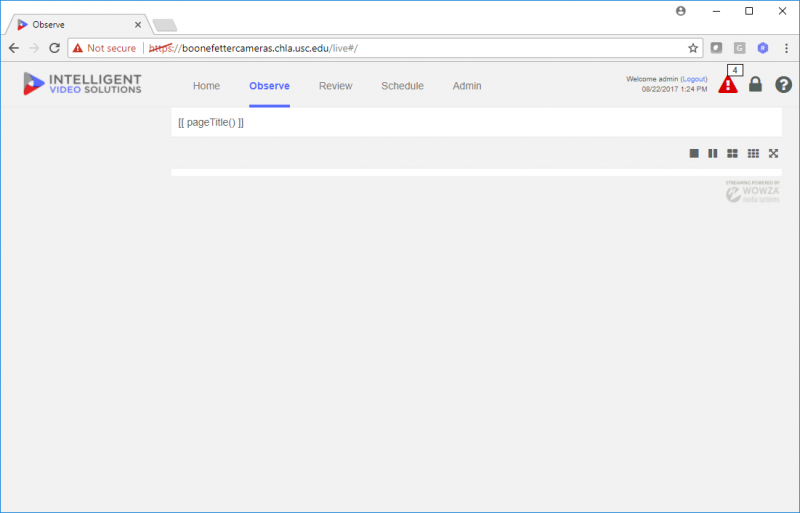
| − | * When opening the Observe tab, only the following message is displayed: | + | * When opening the Observe tab, only the following message is displayed: |
| − | + | :::{{img | file = nodejs.png | width=800px}} | |
| + | |||
=Diagnosis= | =Diagnosis= | ||
There are several possible causes for these issues, but all are related to NodeJS. | There are several possible causes for these issues, but all are related to NodeJS. | ||
==Check Connection== | ==Check Connection== | ||
To check the connection to NodeJS from the client computer do the following: | To check the connection to NodeJS from the client computer do the following: | ||
| − | # Open the | + | # Open the VALT application in Google Chrome. |
| − | #: | + | #: {{img | file = nodejs6.png | width=800px}} |
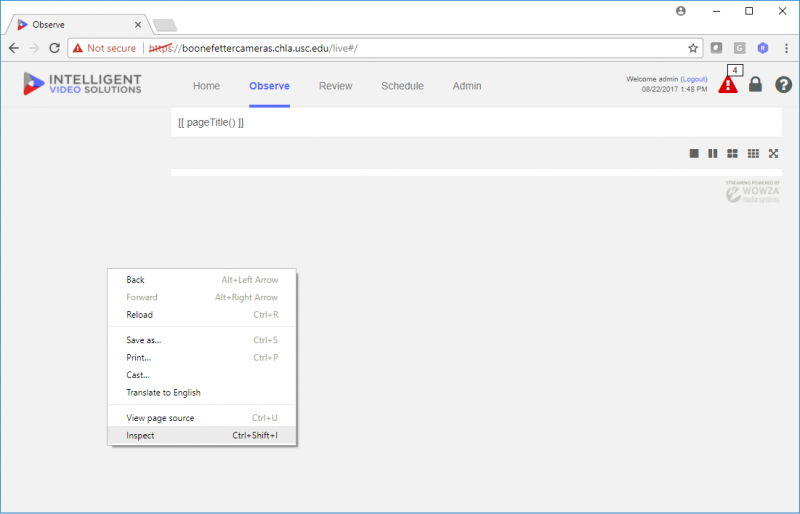
| − | # Right click on the page and select '''Inspect''' from the menu | + | # Right click on the page and select '''Inspect''' from the menu. |
| − | #: | + | #: {{img | file = nodejs7.png | width=800px}} |
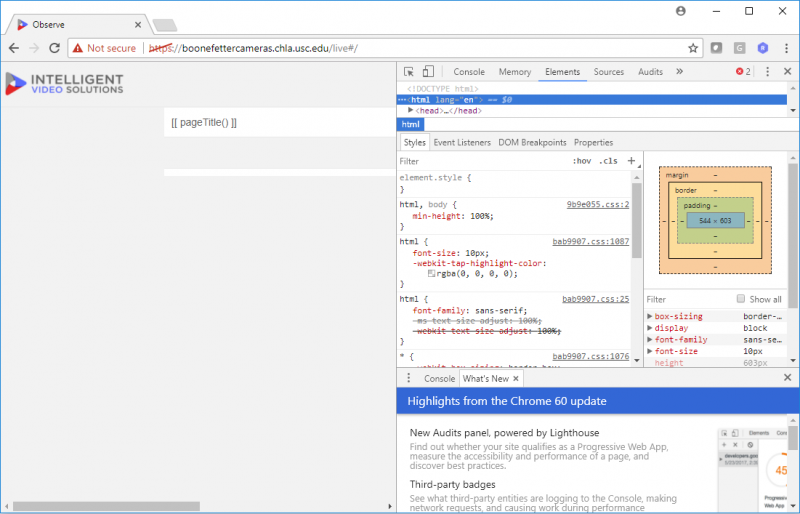
| − | # Click on the '''Console''' tab | + | # Click on the '''Console''' tab. |
| − | #: | + | #: {{img | file = nodejs8.png | width=800px}} |
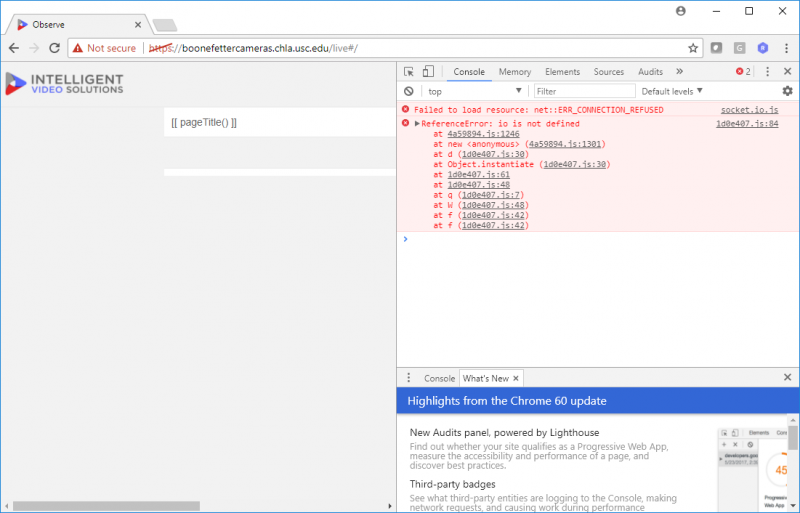
| − | #: If the client computer is unable to connect to NodeJS you will receive an error message like the one above. | + | #: If the client computer is unable to connect to NodeJS, you will receive an error message like the one above. |
| + | |||
==NodeJS stopped== | ==NodeJS stopped== | ||
| − | The | + | The NodeJS service may be stopped or may have crashed. |
To check this do the following: | To check this do the following: | ||
| − | # Connect to the | + | # Connect to the VALT appliance via SSH. |
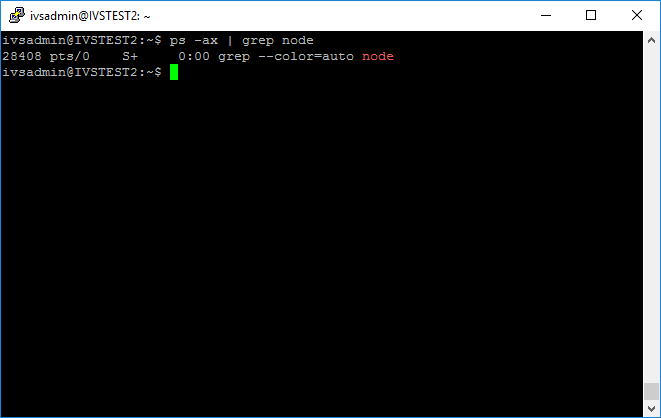
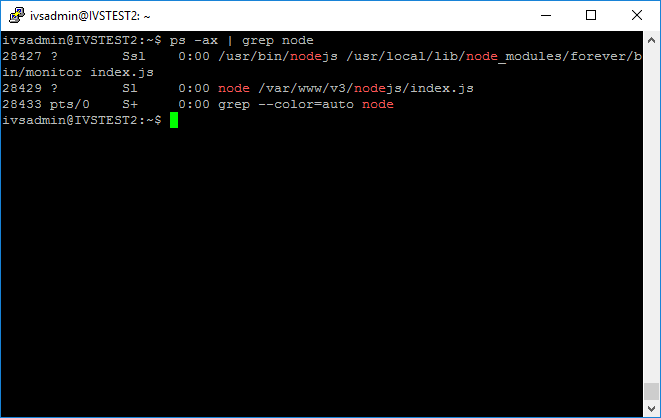
| − | # | + | # Type in the following, and then press Enter: <pre>ps -ax | grep node</pre> |
| − | {| | + | :::{| |
| − | | | + | |{{img | file = nodejs2.png}} |
| − | | | + | |{{img | file = nodejs3.png}} |
|- | |- | ||
|align="center"|This is a system where NodeJS is not running. | |align="center"|This is a system where NodeJS is not running. | ||
|align="center"|This is a system where NodeJS is running. | |align="center"|This is a system where NodeJS is running. | ||
|} | |} | ||
| − | If NodeJS is not currently running, you can attempt to start it using the following command: | + | If NodeJS is not currently running, you can attempt to start it using the following command: <pre>sudo service valtcontrols start</pre> |
| − | + | This command will only work on VALT appliances with the command line menu installed. On older VALT systems, or those that were upgraded without installing the command line menu, use the following command: | |
| − | This command will only work on | + | <pre>sudo /usr/local/bin/forever start /var/www/v3/nodejs/index.js</pre> |
| − | + | ||
==NodeJS is not listening== | ==NodeJS is not listening== | ||
| − | To check to see if NodeJS is listening for inbound connections do the following: | + | To check to see if NodeJS is listening for inbound connections, do the following: |
| − | # Connect to the | + | # Connect to the VALT appliance via SSH. |
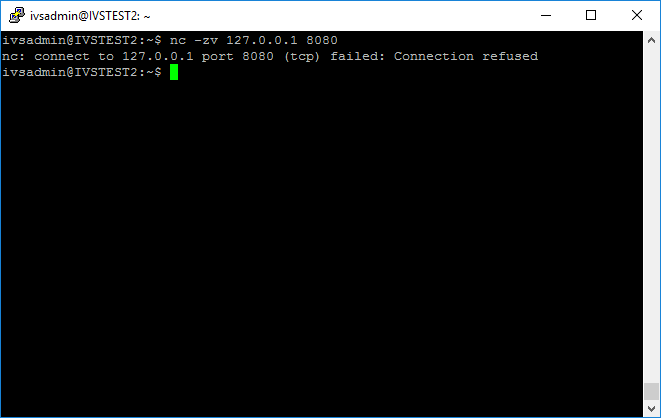
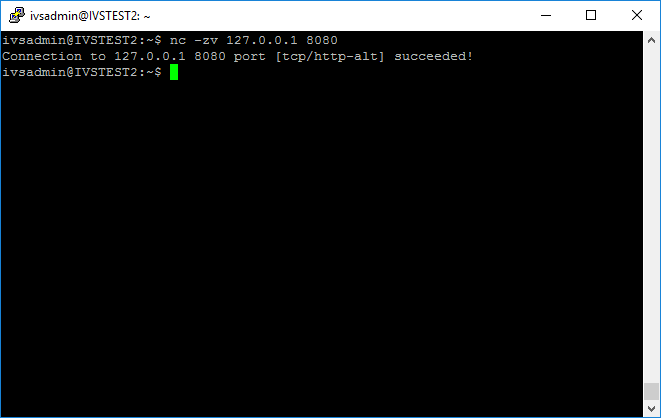
| − | # | + | # Type in the following, and then press Enter: <pre>nc -zv 127.0.0.1 8080</pre> |
| − | {| | + | :::{| |
| − | | | + | |{{img | file = nodejs5.png}} |
| − | | | + | |{{img | file = nodejs4.png}} |
|- | |- | ||
|align="center"|This is a system where NodeJS is not listening. | |align="center"|This is a system where NodeJS is not listening. | ||
|align="center"|This is a system where NodeJS is listening. | |align="center"|This is a system where NodeJS is listening. | ||
|} | |} | ||
| + | |||
==Start NodeJS in the Shell== | ==Start NodeJS in the Shell== | ||
| − | # cd /var/www/v3/nodejs | + | # Type in the following, and then press Enter: <pre>cd /var/www/v3/nodejs</pre> |
| − | # sudo node server.js | + | # Type in this afterwards, and then press Enter: <pre>sudo node server.js</pre> |
=Causes= | =Causes= | ||
==Firewall== | ==Firewall== | ||
| − | Issues connecting to NodeJS can be caused by a firewall on the network between the client PC and the | + | Issues connecting to NodeJS can be caused by a firewall on the network between the client PC and the VALT appliance. If port 8080 is not open between the PC and the VALT appliance, the client will be unable to connect to NodeJS. If this is the cause of the issue, you will be unable to connect to NodeJS from the client PC, but NodeJS will be running and will be listening for inbound connections. |
| + | |||
==Antivirus== | ==Antivirus== | ||
| − | Issues connecting to NodeJS can be caused by a local antivirus on the client PC. If | + | Issues connecting to NodeJS can be caused by a local antivirus on the client PC. If Port 8080 is not open between the PC and the VALT appliance, the client will be unable to connect to NodeJS. If this is the cause of the issue, you will be unable to connect to NodeJS from the client PC, but NodeJS will be running, and will be listening for inbound connections. |
| + | |||
==Server.js Config Error== | ==Server.js Config Error== | ||
| − | If the server has been configured to utilize SSL, but an error was made in the configuration of the | + | If the server has been configured to utilize SSL, but an error was made in the configuration of the Server.js file, the NodeJS service may fail to start or may start, but may not listen for connections. This is most likely to occur if the SSL configuration has been performed manually instead of utilizing the provided scripts through the command line menu. This can also occur if a typo is made when entering the key and certificates into the command line menu. |
| − | # Connect to the | + | # Connect to the VALT appliance via SSH. |
| − | # | + | # Type in the following, and press Enter: <pre>sudo nano /var/www/v3/nodejs/server.js</pre> |
| − | #: | + | #: {{img | file = nodejs9.png}} |
#: The file should appear similar to the picture above. Specifically the following section: | #: The file should appear similar to the picture above. Specifically the following section: | ||
| − | + | <pre>var PORT_SSL = 8080; //working https port | |
| − | + | var sslOptions = { | |
| − | + | key: fs.readFileSync('/etc/apache2/ssl/boonefettercameras.chla.usc.edu.key'$ | |
| − | + | cert: fs.readFileSync('/etc/apache2/ssl/boonefettercameras.pem'), //path to$ | |
| − | + | ca: fs.readFileSync('/etc/apache2/ssl/boonefettercameras.pem') // path to ca | |
| − | + | }; </pre> | |
:: This should specify the path to the key file and the certificates. If there is a typo here, you can manually correct it. | :: This should specify the path to the key file and the certificates. If there is a typo here, you can manually correct it. | ||
| − | :: If the certificate was installed using the command line, the easiest solution may be to disable SSL and reinstall the certificate. | + | :: If the certificate was installed using the command line, the easiest solution may be to disable SSL, and reinstall the certificate. |
==Untrusted Certificate== | ==Untrusted Certificate== | ||
| − | If the server has been configured to utilize SSL and the certificate used was a self signed certificate or a certificate signed by an internal CA, you may encounter this error because the browser does not trust the certificate. The issue can be overcome in a variety of ways: | + | If the server has been configured to utilize SSL, and the certificate used was a self-signed certificate or a certificate signed by an internal CA, you may encounter this error because the browser does not trust the certificate. The issue can be overcome in a variety of ways: |
| − | # Use a different browser | + | # Use a different browser. |
| − | # Install the certificate and any required intermediate certificates on the computer | + | # Install the certificate and any required intermediate certificates on the computer. |
| − | # Reissue the certificate with a SAN (can correct issues with | + | # Reissue the certificate with a SAN (can correct issues with Google Chrome when using an internal CA that is already trusted). |
# Issue a certificate from a publicly trusted CA. | # Issue a certificate from a publicly trusted CA. | ||
===Re-issue the certificate with a SAN=== | ===Re-issue the certificate with a SAN=== | ||
| − | # Connect to the | + | # Connect to the VALT appliance via SSH. |
| − | # | + | # Type in the following, and press Enter: <pre>nano csr_details.conf</pre> |
| − | # Copy and paste the following into nano | + | # Copy and paste the following into nano: |
| − | + | <pre>[req] | |
| − | + | default_bits = 2048 | |
| − | + | prompt = no | |
| − | + | default_md = sha256 | |
| − | + | req_extensions = req_ext | |
| − | + | distinguished_name = dn | |
| − | + | [ dn ] | |
| − | + | C=US | |
| − | + | ST=New York | |
| − | + | L=Rochester | |
| − | + | O=End Point | |
| − | + | OU=Testing Domain | |
| − | + | emailAddress=your-administrative-address@your-awesome-existing-domain.com | |
| − | + | CN = www.your-new-domain.com | |
| − | + | [ req_ext ] | |
| − | + | subjectAltName = @alt_names | |
| − | + | [ alt_names ] | |
| − | + | DNS.1 = your-new-domain.com | |
| − | + | DNS.2 = www.your-new-domain.com</pre> | |
# Update the information to match your installation. This is the same information you would normally put in a CSR. | # Update the information to match your installation. This is the same information you would normally put in a CSR. | ||
| − | # Press ''' | + | # Press '''Ctrl + X'''. |
| − | # Enter '''Y''' | + | # Enter '''Y'''. |
| − | # Press Enter | + | # Press Enter. |
| − | # | + | # Type in the following, and press Enter: <pre>openssl req -new -sha256 -nodes -out your-new-domain.com.csr -newkey rsa:2048 -keyout your-new-domain.com.key -config csr_details.conf</pre> |
| − | #: ''Make sure to update the | + | #: ''Make sure to update the CSR and key path for your installation.'' |
==Wrong Key== | ==Wrong Key== | ||
| − | If you enter the incorrect key or make a typo when specifying the path to the key file during configuration of SSL, NodeJS will not start. Typically this will also prevent apache from starting. The best solution to this is to disable SSL | + | If you enter the incorrect key or make a typo when specifying the path to the key file during configuration of SSL, NodeJS will not start. Typically this will also prevent apache from starting. The best solution to this is to disable SSL, re-enable it, and enter the correct key. |
| + | |||
==Certificate Error== | ==Certificate Error== | ||
A problem with the certificate will cause NodeJS to fail to start. The most likely cause of this is incorrect encoding on the certificate. The certificate should be PEM encoded. If this is the case, the following will occur: | A problem with the certificate will cause NodeJS to fail to start. The most likely cause of this is incorrect encoding on the certificate. The certificate should be PEM encoded. If this is the case, the following will occur: | ||
| − | # Apache will display the site in SSL | + | # Apache will display the site in SSL. |
| − | # NodeJS may appear to be running | + | # NodeJS may appear to be running. |
# NodeJS will not be listening. | # NodeJS will not be listening. | ||
| − | # Manually starting NodeJS with node /var/www/v3/nodejs/server.js | + | # Manually starting NodeJS will result in an error with the following: <pre>node /var/www/v3/nodejs/server.js</pre> |
You can test the certificate by doing the following: | You can test the certificate by doing the following: | ||
| − | : | + | :Type in the following, and press Enter: <pre>openssl x509 -in certificate.cer -text -noout</pre> |
| − | + | :::{{img | file = nodejs10.png}} | |
: An error similar to the picture above indicates the certificate is not PEM encoded. | : An error similar to the picture above indicates the certificate is not PEM encoded. | ||
| − | : | + | :Type in the following, and press Enter: <pre>openssl x509 -text -inform DER -in certificate.cer</pre> |
:This command should cause the certificate to display. If it does, the certificate is DER encoded instead of PEM encoded. | :This command should cause the certificate to display. If it does, the certificate is DER encoded instead of PEM encoded. | ||
:You can convert the certificate from DER to PEM using the following command: | :You can convert the certificate from DER to PEM using the following command: | ||
| − | : | + | :<pre>openssl x509 -inform der -in certificate.cer -out certificate.pem</pre> |
Once this is complete, reinstall the new certificate. | Once this is complete, reinstall the new certificate. | ||
Latest revision as of 14:50, 11 May 2022
Contents
Symptoms
If NodeJS is not working properly, you may experience one or more of the following symptoms:
- When starting or stopping a recording, the buttons do not update.
- When opening the Observe tab, only the following message is displayed:
Diagnosis
There are several possible causes for these issues, but all are related to NodeJS.
Check Connection
To check the connection to NodeJS from the client computer do the following:
- Open the VALT application in Google Chrome.
- Right click on the page and select Inspect from the menu.
- Click on the Console tab.
NodeJS stopped
The NodeJS service may be stopped or may have crashed. To check this do the following:
- Connect to the VALT appliance via SSH.
- Type in the following, and then press Enter:
ps -ax | grep node
sudo service valtcontrols start
This command will only work on VALT appliances with the command line menu installed. On older VALT systems, or those that were upgraded without installing the command line menu, use the following command:
sudo /usr/local/bin/forever start /var/www/v3/nodejs/index.js
NodeJS is not listening
To check to see if NodeJS is listening for inbound connections, do the following:
- Connect to the VALT appliance via SSH.
- Type in the following, and then press Enter:
nc -zv 127.0.0.1 8080
Start NodeJS in the Shell
- Type in the following, and then press Enter:
cd /var/www/v3/nodejs
- Type in this afterwards, and then press Enter:
sudo node server.js
Causes
Firewall
Issues connecting to NodeJS can be caused by a firewall on the network between the client PC and the VALT appliance. If port 8080 is not open between the PC and the VALT appliance, the client will be unable to connect to NodeJS. If this is the cause of the issue, you will be unable to connect to NodeJS from the client PC, but NodeJS will be running and will be listening for inbound connections.
Antivirus
Issues connecting to NodeJS can be caused by a local antivirus on the client PC. If Port 8080 is not open between the PC and the VALT appliance, the client will be unable to connect to NodeJS. If this is the cause of the issue, you will be unable to connect to NodeJS from the client PC, but NodeJS will be running, and will be listening for inbound connections.
Server.js Config Error
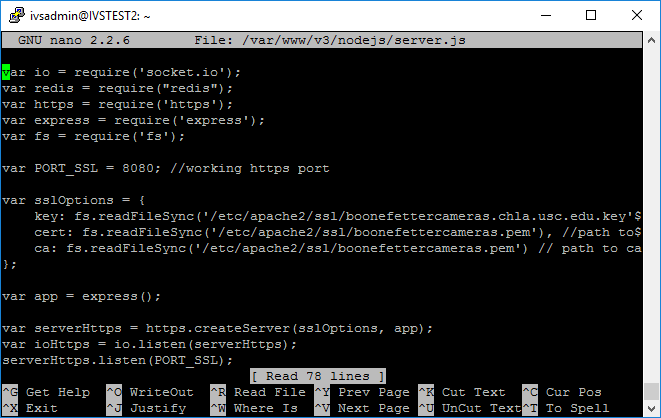
If the server has been configured to utilize SSL, but an error was made in the configuration of the Server.js file, the NodeJS service may fail to start or may start, but may not listen for connections. This is most likely to occur if the SSL configuration has been performed manually instead of utilizing the provided scripts through the command line menu. This can also occur if a typo is made when entering the key and certificates into the command line menu.
- Connect to the VALT appliance via SSH.
- Type in the following, and press Enter:
sudo nano /var/www/v3/nodejs/server.js
var PORT_SSL = 8080; //working https port

var sslOptions = {
     key: fs.readFileSync('/etc/apache2/ssl/boonefettercameras.chla.usc.edu.key'$
     cert: fs.readFileSync('/etc/apache2/ssl/boonefettercameras.pem'), //path to$
    ca: fs.readFileSync('/etc/apache2/ssl/boonefettercameras.pem') // path to ca
};
- This should specify the path to the key file and the certificates. If there is a typo here, you can manually correct it.
- If the certificate was installed using the command line, the easiest solution may be to disable SSL, and reinstall the certificate.
Untrusted Certificate
If the server has been configured to utilize SSL, and the certificate used was a self-signed certificate or a certificate signed by an internal CA, you may encounter this error because the browser does not trust the certificate. The issue can be overcome in a variety of ways:
- Use a different browser.
- Install the certificate and any required intermediate certificates on the computer.
- Reissue the certificate with a SAN (can correct issues with Google Chrome when using an internal CA that is already trusted).
- Issue a certificate from a publicly trusted CA.
Re-issue the certificate with a SAN
- Connect to the VALT appliance via SSH.
- Type in the following, and press Enter:
nano csr_details.conf
- Copy and paste the following into nano:
[req]
default_bits = 2048
prompt = no
default_md = sha256
req_extensions = req_ext
distinguished_name = dn
[ dn ]
C=US
ST=New York
L=Rochester
O=End Point
OU=Testing Domain
emailAddress=your-administrative-address@your-awesome-existing-domain.com
CN = www.your-new-domain.com
[ req_ext ]
subjectAltName = @alt_names
[ alt_names ]
DNS.1 = your-new-domain.com
DNS.2 = www.your-new-domain.com
- Update the information to match your installation. This is the same information you would normally put in a CSR.
- Press Ctrl + X.
- Enter Y.
- Press Enter.
- Type in the following, and press Enter:
openssl req -new -sha256 -nodes -out your-new-domain.com.csr -newkey rsa:2048 -keyout your-new-domain.com.key -config csr_details.conf
- Make sure to update the CSR and key path for your installation.
Wrong Key
If you enter the incorrect key or make a typo when specifying the path to the key file during configuration of SSL, NodeJS will not start. Typically this will also prevent apache from starting. The best solution to this is to disable SSL, re-enable it, and enter the correct key.
Certificate Error
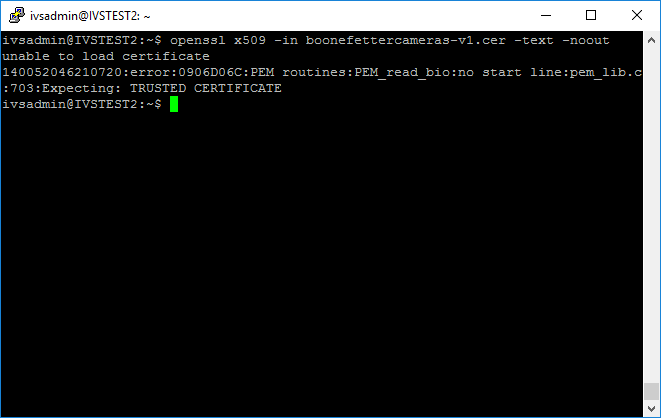
A problem with the certificate will cause NodeJS to fail to start. The most likely cause of this is incorrect encoding on the certificate. The certificate should be PEM encoded. If this is the case, the following will occur:
- Apache will display the site in SSL.
- NodeJS may appear to be running.
- NodeJS will not be listening.
- Manually starting NodeJS will result in an error with the following:
node /var/www/v3/nodejs/server.js
You can test the certificate by doing the following:
- Type in the following, and press Enter:
openssl x509 -in certificate.cer -text -noout
- An error similar to the picture above indicates the certificate is not PEM encoded.
- Type in the following, and press Enter:
openssl x509 -text -inform DER -in certificate.cer
- This command should cause the certificate to display. If it does, the certificate is DER encoded instead of PEM encoded.
- You can convert the certificate from DER to PEM using the following command:
openssl x509 -inform der -in certificate.cer -out certificate.pem
Once this is complete, reinstall the new certificate.
