Difference between revisions of "VALT Manual Schedule"
IVSWikiBlue (talk | contribs) (→Schedule) |
IVSWikiBlue (talk | contribs) m |
||
| (13 intermediate revisions by the same user not shown) | |||
| Line 1: | Line 1: | ||
| − | = | + | {{Article - Manual | content = |
| − | < | + | |
| − | + | <h1>Overview</h1> | |
| − | {{img | + | The Schedule section is used to automate future recordings. Schedules can automatically start and stop recordings on a one-time or recurring basis with information that you enter in advance. |
| − | < | + | |
| − | + | {{img - resize | file = VALT 6.3 Manual-Schedule 00.png}} | |
| − | < | + | |
| − | + | {{hr}} | |
| − | < | + | |
| − | < | + | <h1>Adding a New Schedule</h1> |
| − | + | #Click the {{Add Button}} <strong>Add</strong> icon in the upper right corner. | |
| − | + | #Select a room to record in. | |
| + | #Fill in the [[#Information|information]] for your session. | ||
| + | #Fill out the schedule information under [[#Date and Time|Date and Time]]. | ||
| + | #Click <strong>Create</strong> | ||
| + | |||
| + | |||
| + | While creating a schedule, you have the ability to modifying any of the following: | ||
| + | |||
| + | #{{img - icon | file = Information.png | width = 14px}} [[#Information|Information]] | ||
| + | #{{img - icon | file = Sharing.png | width = 16px}} [[#Sharing|Sharing]] | ||
| + | #{{img - icon | file = Author.png | width = 18px}} [[#Author|Author]] | ||
| + | #{{img - icon | file = Delete.png}} [[#Retention|Retention]] | ||
| + | #{{img - icon | file = Control.png | width = 16px}} [[#Control|Control]] | ||
| + | |||
| + | |||
| + | {{Aside - Helpful | hue = 260 | content = Want to see <b>Adding a Schedule</b> in action? {{Try it out | link = https://app.storylane.io/share/5yrcew4cwujr}} }} | ||
| + | |||
| + | {{hr - 2}} | ||
| + | |||
| + | {{Manual lvl 2 | title = Information | content = The {{img - icon | file = Information.png | width = 14px}} <strong>Information</strong> section allows you to select the Room for the Schedule and fill out the [[VALT Manual - Templates#Information_Templates|Information Template]].}} | ||
| + | |||
| + | {{img - resize | file = VALT 6.3 Manual-Schedule 01.png}} | ||
| + | |||
| + | {{Manual lvl 3 | title = Information Template | content = Fill out your information template with the appropriate information for the schedule. | ||
| + | {{Aside | content = The template will be applied to all recordings in the series.}} | ||
| + | {{hr}} | ||
}} | }} | ||
| − | {{ | + | {{Manual lvl 3 | title = Date and Time | content = Use this section to define the time(s) that the scheduled recording should run. |
| − | + | <center>{{img - no click | file = VALT 6.3 Manual-Schedule Date and Time.png}}</center> | |
| − | |||
| − | |||
| − | |||
| − | |||
| − | |||
| − | |||
| − | |||
| − | < | ||
}} | }} | ||
| − | {{ | + | {{Manual lvl 4 | title = Date | content = This field defines the date of the first instance of the Schedule. |
| − | < | + | {{hr}} }} |
| − | < | + | |
| − | < | + | {{Manual lvl 4 | title = Time | content = This field defines the time of day for the schedule. |
| + | {{hr}} }} | ||
| + | |||
| + | {{Manual lvl 4 | title = Duration | content = This field defines how long the Scheduled recording runs. | ||
| + | {{hr}} }} | ||
| + | |||
| + | {{Manual lvl 4 | title = Repeat | content = This option defines whether the Schedule runs once or multiple times as part of a series of recordings occurring at the same time in the same room. | ||
| + | |||
| + | <center>{{img - no click | file = VALT 6.3 Manual-Schedule Date and Time Repeat.png}}</center> | ||
| + | |||
| + | <dl> | ||
| + | <dt>Daily</dt> | ||
| + | <dd>Selecting this option will cause the schedule to run <b>every day</b> at the specified time.</dd> | ||
| + | {{hr - 2}} | ||
| + | <dt>Weekly</dt> | ||
| + | <dd>Selecting this option will cause the schedule to run each <b>week</b> on the same day of the week. You can select additional days of the week if the schedule should occur on multiple days of the week.</dd> | ||
| + | {{hr - 2}} | ||
| + | <dt>Monthly</dt> | ||
| + | <dd>Selecting this option will cause the schedule to run each <b>month</b> on the specified date.</dd> | ||
| + | <dd><em>(e.g. the 1st of every month)</em></dd> | ||
| + | </dl> | ||
}} | }} | ||
| − | |||
| − | |||
| − | {{img | + | {{Top of Page}} |
| − | < | + | {{hr}} |
| − | < | + | |
| − | < | + | {{Manual lvl 2 | title = Sharing | content = The {{img - icon | file = Sharing.png | width = 16px}} <strong>Sharing</strong> section allows users to select additional users who can see the scheduled recordings.}} |
| − | < | + | |
| − | < | + | {{img - resize | file = VALT 6.3 Manual-Schedule 02.png}} |
| + | |||
| + | |||
| + | {{Top of Page}} | ||
| + | {{hr}} | ||
| + | |||
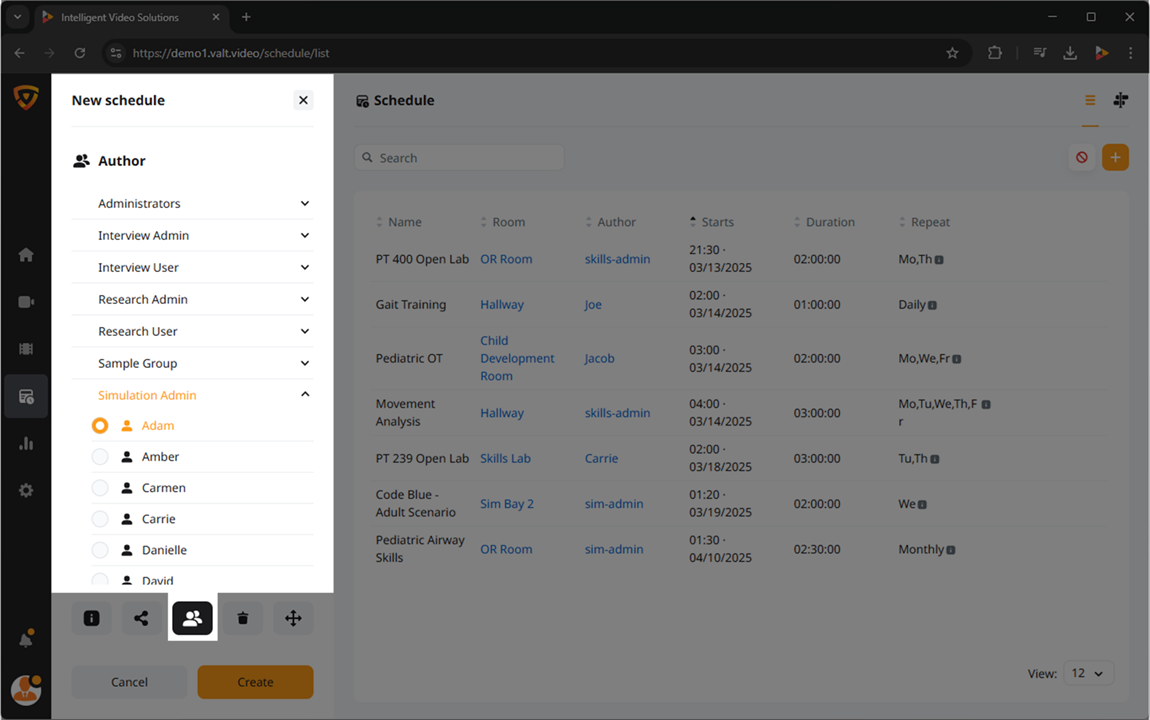
| + | {{Manual lvl 2 | title = Author | content = The {{img - icon | file = Author.png | width = 18px}} <strong>Author</strong> section allows users to change the author of the scheduled recordings. | ||
| + | {{Aside | content = By default, the user creating the schedule will be set as the author.}} }} | ||
| + | |||
| + | {{img - resize | file = VALT 6.3 Manual-Schedule 03.png}} | ||
| + | |||
| + | |||
| + | {{Top of Page}} | ||
| + | {{hr}} | ||
| + | |||
| + | {{Manual lvl 2 | title = Retention | content = The {{img - icon | file = Delete.png}} <strong>Retention</strong> sections allows users to change the retention policy for the recordings that are part of the schedule. | ||
| + | |||
| + | {{Aside | content = By default, the Schedule's retention policy will mirror the author's retention policy.}} }} | ||
| + | |||
| + | {{img - resize | file = VALT 6.3 Manual-Schedule 04.png}} | ||
| + | |||
| + | |||
| + | {{Top of Page}} | ||
| + | {{hr}} | ||
| + | |||
| + | {{Manual lvl 2 | title = Control | content = The {{img - icon | file = Control.png | width = 16px}} <strong>Control</strong> section allows users to specify a [[VALT_Manual_Observe#Presets|preset]] location for the camera to move to at the start of the schedule, if you are utilizing [[VALT_Devices#PTZ_Cameras|PTZ cameras]].}} | ||
| + | |||
| + | {{img - resize | file = VALT 6.3 Manual-Schedule 05.png}} | ||
| + | |||
| + | |||
| + | {{Top of Page}} | ||
| + | {{hr}} | ||
| + | |||
| + | <h1>Exceptions</h1> | ||
| + | |||
| + | Clicking the {{img - icon color | file = Exceptions.png | width = 14px}} <strong>Exceptions</strong> button will pull up the exception menu. Exceptions are days where all regularly scheduled recordings will not occur <em>(example: holidays)</em>. | ||
| + | |||
| + | {{img - resize | file = VALT 6.3 Manual-Schedule 06.png}} | ||
| + | {{hr - 2}} | ||
| + | |||
| + | {{Manual lvl 2 | title = View All | content = View all exceptions currently in place. Clicking the X next to an exception will remove it from the list.}} | ||
| + | |||
| + | |||
| + | {{Top of Page}} | ||
| + | {{hr}} | ||
| + | |||
| + | {{Manual lvl 2 | title = Add to Exceptions | content = Select a date, insert a name, and click this button to add the date to your exceptions list. | ||
| + | |||
| + | |||
| + | {{Aside - Helpful | hue = 260 | content = Want to see <b>Adding an Exception</b> in action? {{Try it out | link = https://app.storylane.io/share/mwxsgcjbe1dm}} }} | ||
| + | }} | ||
| + | |||
| + | |||
| + | {{Top of Page}} | ||
| + | {{hr}} | ||
| + | |||
| + | <h1>Navigation</h1> | ||
| + | |||
| + | {{Manual lvl 2 | title = Table View | content = View the scheduled recordings in a grid with the following columns: | ||
| + | |||
| + | |||
| + | <dl> | ||
| + | <dt>Name</dt> | ||
| + | <dd>This field shows the Title of the Schedule.</dd> | ||
| + | <dt>Room</dt> | ||
| + | <dd>This field shows what Room the Schedule will occur in.</dd> | ||
| + | <dt>Author</dt> | ||
| + | <dd>This field shows who is the Author of the scheduled Recordings.</dd> | ||
| + | <dt>Starts</dt> | ||
| + | <dd>This field shows when the Schedule will run next.</dd> | ||
| + | <dt>Duration</dt> | ||
| + | <dd>This field shows how long the Scheduled recording will run.</dd> | ||
| + | <dt>Repeat</dt> | ||
| + | <dd>This field shows what days the Schedule will occur, if it has multiple occurrences.</dd> | ||
| + | </dl> | ||
}} | }} | ||
| − | |||
| − | {{img | + | {{Manual lvl 3 | title = Sortable Column Headers | content = Clicking on any of the column titles will sort results alphabetically or chronologically on the selected column. Click again to invert the order.}} |
| − | < | + | |
| − | < | + | {{img - resize | file = VALT 6.3 Manual-Schedule 07.png}} |
| − | < | + | |
| − | < | + | {{hr - 2}} |
| − | < | + | |
| + | {{Manual lvl 3 | title = Reading the Table View | content = Scheduled recordings will display in the following ways:}} | ||
| + | |||
| + | |||
| + | {{Manual lvl 4 | title = Scheduled Recordings | content = Recordings that are scheduled with no overlap will show in <b>white</b>.}} | ||
| + | |||
| + | |||
| + | {{Manual lvl 4 | title = Conflicting Schedules | content = Schedules that are scheduled to occur in the same space at the same time will appear in yellow or red with an alert icon on the right side. When two schedules overlap, the second one chronologically will only start once the first one has been stopped. | ||
| + | |||
| + | |||
| + | {{Aside - Warning | hue = 0 | content = Schedules in <b>red</b> will have the error: | ||
| + | |||
| + | <center><em>"This recording will not start.<br>There is another recording planned at this time."</em></center>}} | ||
| + | {{img - resize | file = VALT 6.3 Manual-Schedule 08.png}} | ||
| + | |||
| + | {{hr}} | ||
| + | |||
| + | {{Aside - Warning | hue = 50 | content = Schedules in <b>yellow</b> will have the error: | ||
| + | |||
| + | <center><em>"This recording overlaps another one.<br>It will only start when the previous recording stops."</em></center>}} | ||
| + | {{img - resize | file = VALT 6.3 Manual-Schedule 09.png}} | ||
}} | }} | ||
| − | {{ | + | |
| − | < | + | {{Manual lvl 4 | title = Exceptions | content = Any scheduled recordings on days that are marked as exceptions will display in <b>red</b> and be crossed out.}} |
| − | < | + | |
| − | + | ||
| − | < | + | {{Manual lvl 4 | title = In-Progress Schedules | content = If a scheduled recording is in progress, the <b>Starts</b> field will display a timer showing how long the recording has been running. Additionally, if you hover over the in-progress schedule you will see a few options.}} |
| + | |||
| + | |||
| + | {{Manual lvl 5 | title = Stop Schedule | content = Select this option to end the schedule early. }} | ||
| + | |||
| + | |||
| + | {{Manual lvl 5 | title = Schedule Time | content = Select this option to change the amount of time the schedule will run. Use the <b>+/-</b> toggle to define whether you will add or subtract time from the schedule. Click the +/- <b>x</b> min to add or subtract that amount of time. You may select an option multiple times for a stacking effect. The <b>Duration</b> field will update to reflect the additional time.}} | ||
| + | |||
| + | {{hr - 2}} | ||
| + | |||
| + | {{Manual lvl 3 | title = Edit a Schedule | content = Hover over a scheduled recording and click the pencil icon to modify the pre-defined Information, Sharing, Author, Retention, or Control settings.}} | ||
| + | |||
| + | {{hr - 2}} | ||
| + | |||
| + | {{Manual lvl 3 | title = Delete a Schedule | content = Hover over a scheduled recording and click the trash can icon to delete future occurrences of the schedule.}} | ||
| + | |||
| + | |||
| + | {{Manual lvl 4 | title = Delete all instances | content = This option <b>permanently</b> deletes the remaining instances of the schedule.}} | ||
| + | |||
| + | |||
| + | {{Manual lvl 4 | title = Delete next occurrence | content = This option will cause the system to skip <b>only the next instance</b> of the schedule, picking back up with the following scheduled occurrence.}} | ||
| + | |||
| + | {{hr - 2}} | ||
| + | |||
| + | {{Manual lvl 3 | title = Search | content = Search for any scheduled recording by typing in text from the Name, Room, or Author.}} | ||
| + | |||
| + | {{hr - 2}} | ||
| + | |||
| + | {{Manual lvl 3 | title = Pagination | content = In the bottom right corner, select how many schedules you want to appear per page. }} | ||
| + | |||
| + | |||
| + | {{Top of Page}} | ||
| + | {{hr}} | ||
| + | |||
| + | {{Manual lvl 2 | title = Timeline View | content = View the scheduled recordings in a daily calendar format, sorted by Room and Time of Day. }} | ||
| + | |||
| + | |||
| + | {{Manual lvl 3 | title = Add New Schedule | content = While in the Timeline View, click the plus button next to any room name on the left side to create a new schedule specifically for that room.}} | ||
| + | |||
| + | {{hr - 2}} | ||
| + | |||
| + | {{Manual lvl 3 | title = Date | content = Select the date you wish to view in the upper left corner.}} | ||
| + | |||
| + | {{hr - 2}} | ||
| + | |||
| + | {{Manual lvl 3 | title = Reading the Timeline View | content = Scheduled recordings will display in the following ways:}} | ||
| + | |||
| + | |||
| + | {{Manual lvl 4 | title = Scheduled Recordings | content = Recordings that are scheduled with no overlap will show in <strong>blue</strong>. | ||
| + | |||
| + | |||
| + | Click on a recording to view the: | ||
| + | *Name | ||
| + | *Author | ||
| + | *Start time | ||
| + | *End times | ||
}} | }} | ||
| − | {{ | + | |
| − | < | + | {{Manual lvl 4 | title = Conflicting Schedules | content = Schedules that are scheduled to occur in the same space at the same time will appear in <strong>orange</strong>. When two schedules overlap, the second one chronologically will only start once the first one has been stopped.}} |
| + | |||
| + | |||
| + | {{Manual lvl 4 | title = Exceptions | content = Any scheduled recordings on days that are marked as exceptions will display in <strong>red</strong> and be crossed out.}} | ||
| + | |||
| + | |||
| + | {{Top of Page}} | ||
}} | }} | ||
| + | |||
| + | [[Category:VALT]] | ||
| + | [[Category:VALT 6.3]] | ||
| + | [[Category:User Training]] | ||
Latest revision as of 11:18, 17 March 2025
Overview
The Schedule section is used to automate future recordings. Schedules can automatically start and stop recordings on a one-time or recurring basis with information that you enter in advance.
Adding a New Schedule
- Click the + Add icon in the upper right corner.
- Select a room to record in.
- Fill in the information for your session.
- Fill out the schedule information under Date and Time.
- Click Create
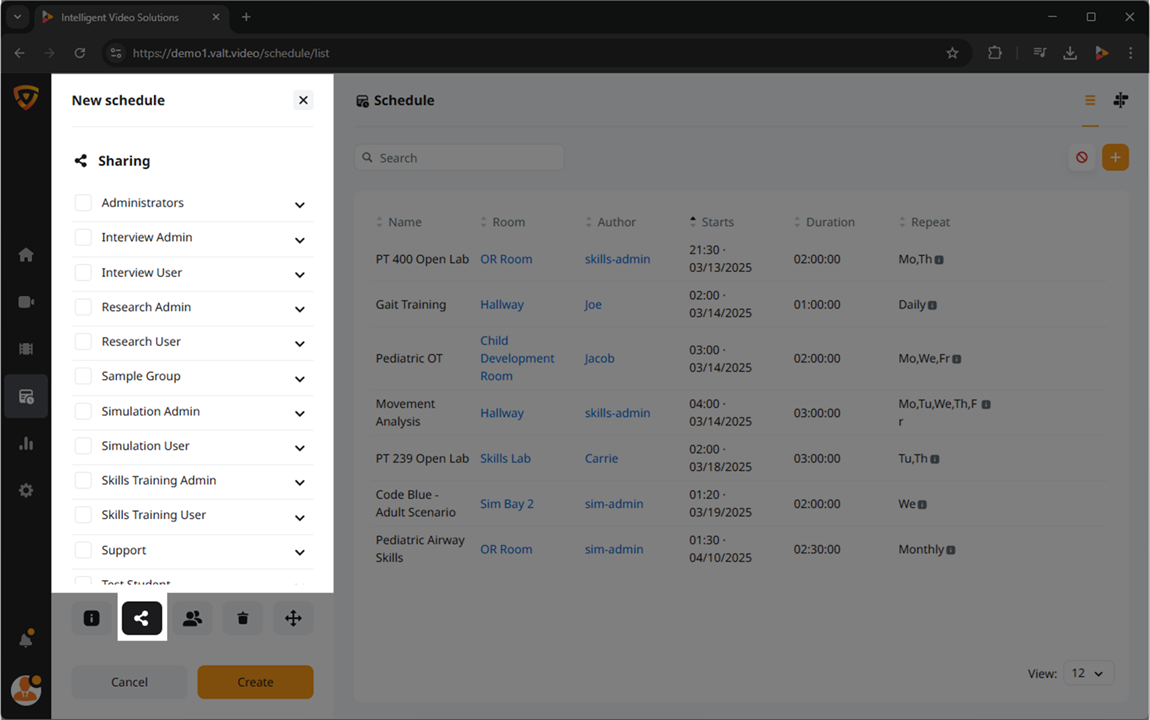
While creating a schedule, you have the ability to modifying any of the following:

Try it out!
Information
The ![]() Information section allows you to select the Room for the Schedule and fill out the Information Template.
Information section allows you to select the Room for the Schedule and fill out the Information Template.

Information Template
Fill out your information template with the appropriate information for the schedule.
Date and Time
Use this section to define the time(s) that the scheduled recording should run.
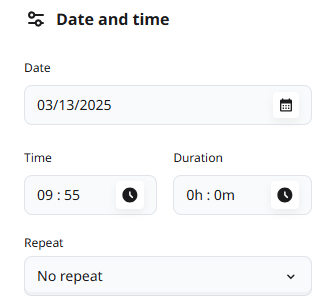
Date
This field defines the date of the first instance of the Schedule.
Time
This field defines the time of day for the schedule.
Duration
This field defines how long the Scheduled recording runs.
Repeat
This option defines whether the Schedule runs once or multiple times as part of a series of recordings occurring at the same time in the same room.
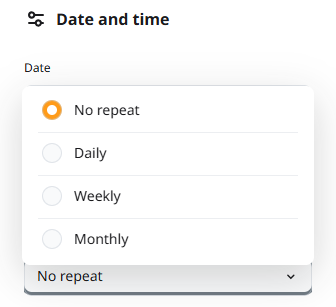
- Daily
- Selecting this option will cause the schedule to run every day at the specified time.
- Weekly
- Selecting this option will cause the schedule to run each week on the same day of the week. You can select additional days of the week if the schedule should occur on multiple days of the week.
- Monthly
- Selecting this option will cause the schedule to run each month on the specified date.
- (e.g. the 1st of every month)
Sharing
The ![]() Sharing section allows users to select additional users who can see the scheduled recordings.
Sharing section allows users to select additional users who can see the scheduled recordings.
Author
The ![]() Author section allows users to change the author of the scheduled recordings.
Author section allows users to change the author of the scheduled recordings.
Retention
The ![]() Retention sections allows users to change the retention policy for the recordings that are part of the schedule.
Retention sections allows users to change the retention policy for the recordings that are part of the schedule.

Control
The ![]() Control section allows users to specify a preset location for the camera to move to at the start of the schedule, if you are utilizing PTZ cameras.
Control section allows users to specify a preset location for the camera to move to at the start of the schedule, if you are utilizing PTZ cameras.

Exceptions
Clicking the ![]() Exceptions button will pull up the exception menu. Exceptions are days where all regularly scheduled recordings will not occur (example: holidays).
Exceptions button will pull up the exception menu. Exceptions are days where all regularly scheduled recordings will not occur (example: holidays).
View All
View all exceptions currently in place. Clicking the X next to an exception will remove it from the list.
Add to Exceptions
Select a date, insert a name, and click this button to add the date to your exceptions list.
Try it out!
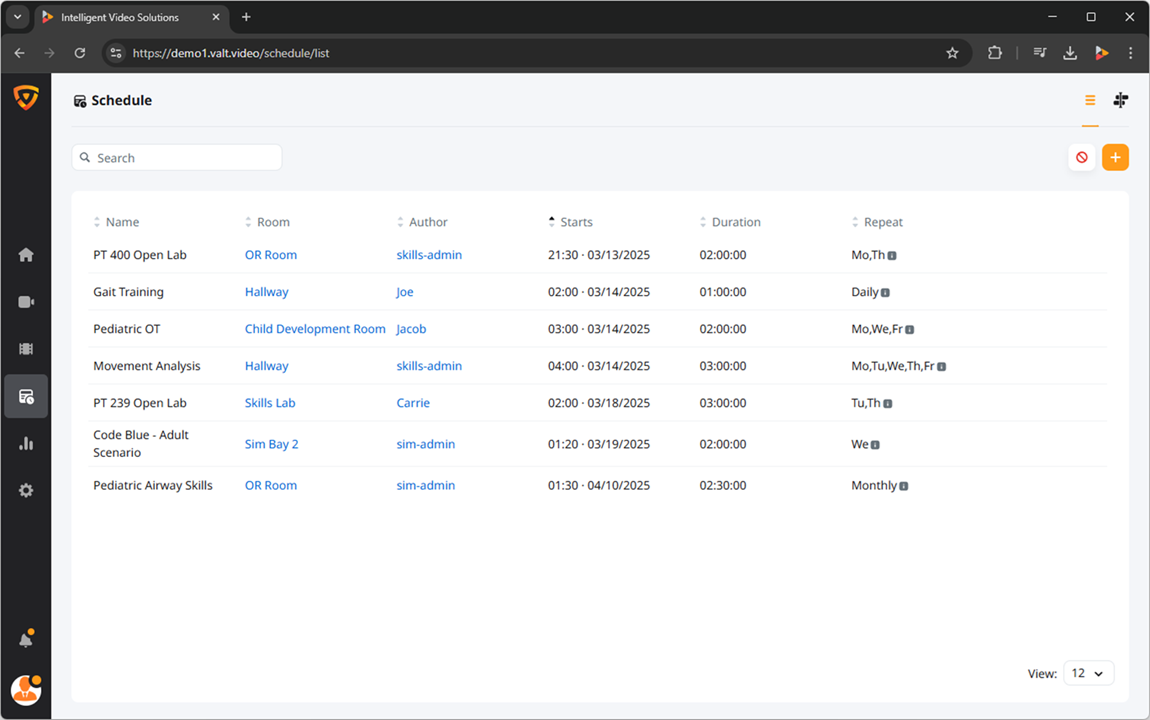
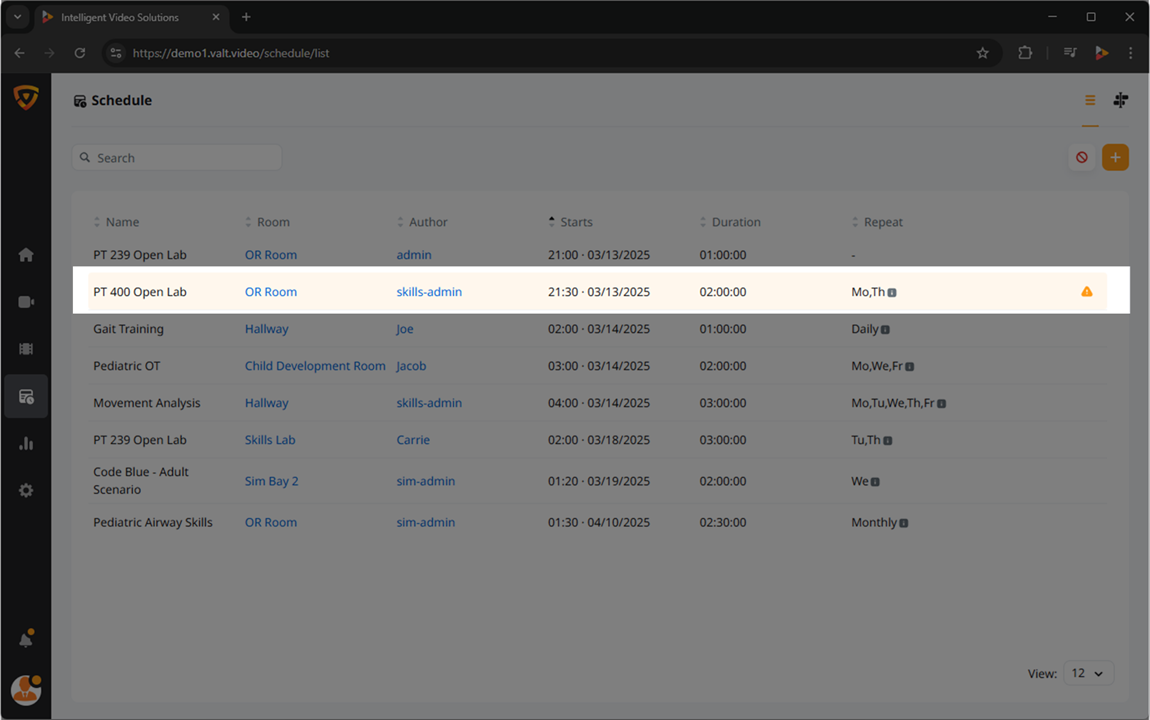
Table View
View the scheduled recordings in a grid with the following columns:
- Name
- This field shows the Title of the Schedule.
- Room
- This field shows what Room the Schedule will occur in.
- Author
- This field shows who is the Author of the scheduled Recordings.
- Starts
- This field shows when the Schedule will run next.
- Duration
- This field shows how long the Scheduled recording will run.
- Repeat
- This field shows what days the Schedule will occur, if it has multiple occurrences.
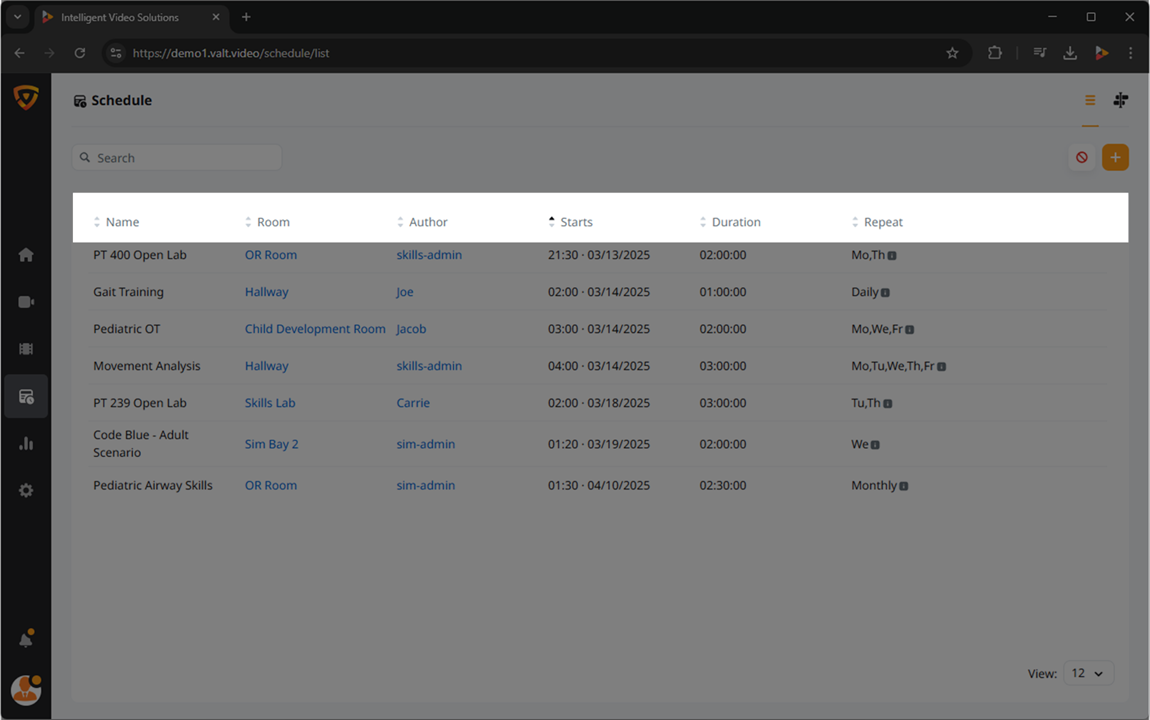
Sortable Column Headers
Clicking on any of the column titles will sort results alphabetically or chronologically on the selected column. Click again to invert the order.
Reading the Table View
Scheduled recordings will display in the following ways:
Scheduled Recordings
Recordings that are scheduled with no overlap will show in white.
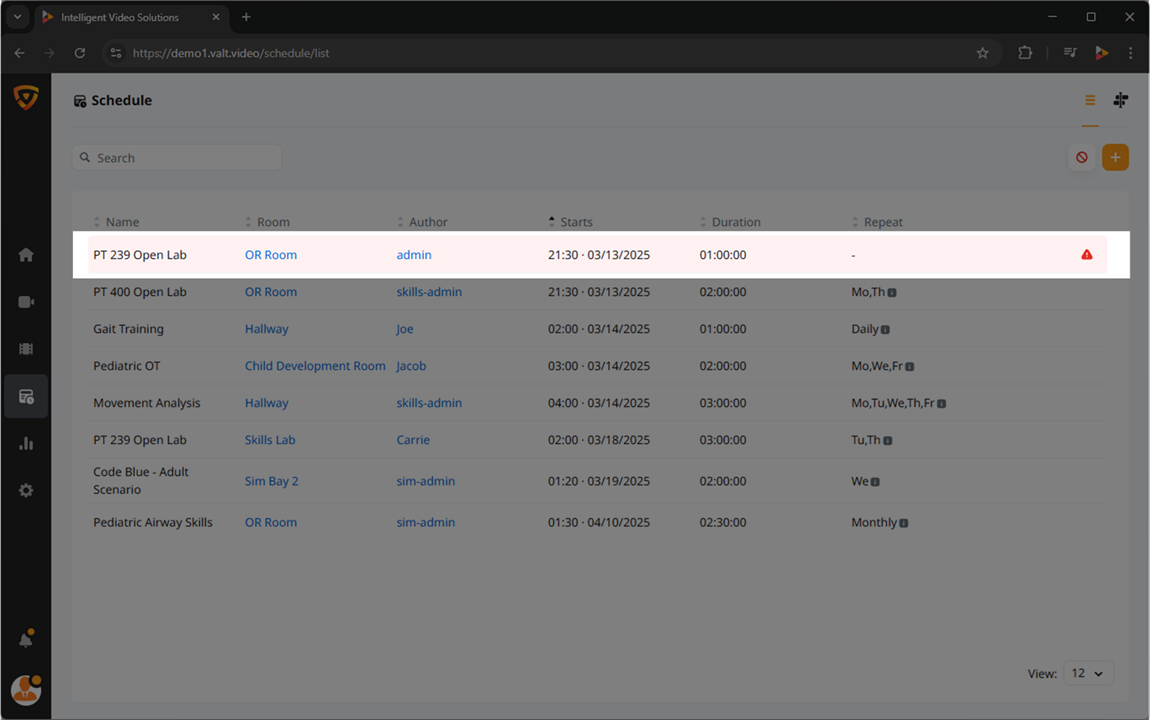
Conflicting Schedules
Schedules that are scheduled to occur in the same space at the same time will appear in yellow or red with an alert icon on the right side. When two schedules overlap, the second one chronologically will only start once the first one has been stopped.
There is another recording planned at this time."
It will only start when the previous recording stops."
Exceptions
Any scheduled recordings on days that are marked as exceptions will display in red and be crossed out.
In-Progress Schedules
If a scheduled recording is in progress, the Starts field will display a timer showing how long the recording has been running. Additionally, if you hover over the in-progress schedule you will see a few options.
Stop Schedule
Select this option to end the schedule early.
Schedule Time
Select this option to change the amount of time the schedule will run. Use the +/- toggle to define whether you will add or subtract time from the schedule. Click the +/- x min to add or subtract that amount of time. You may select an option multiple times for a stacking effect. The Duration field will update to reflect the additional time.
Edit a Schedule
Hover over a scheduled recording and click the pencil icon to modify the pre-defined Information, Sharing, Author, Retention, or Control settings.
Delete a Schedule
Hover over a scheduled recording and click the trash can icon to delete future occurrences of the schedule.
Delete all instances
This option permanently deletes the remaining instances of the schedule.
Delete next occurrence
This option will cause the system to skip only the next instance of the schedule, picking back up with the following scheduled occurrence.
Search
Search for any scheduled recording by typing in text from the Name, Room, or Author.
Pagination
In the bottom right corner, select how many schedules you want to appear per page.
Timeline View
View the scheduled recordings in a daily calendar format, sorted by Room and Time of Day.
Add New Schedule
While in the Timeline View, click the plus button next to any room name on the left side to create a new schedule specifically for that room.
Date
Select the date you wish to view in the upper left corner.
Reading the Timeline View
Scheduled recordings will display in the following ways:
Scheduled Recordings
Recordings that are scheduled with no overlap will show in blue.
Click on a recording to view the:
- Name
- Author
- Start time
- End times
Conflicting Schedules
Schedules that are scheduled to occur in the same space at the same time will appear in orange. When two schedules overlap, the second one chronologically will only start once the first one has been stopped.
Exceptions
Any scheduled recordings on days that are marked as exceptions will display in red and be crossed out.