Difference between revisions of "Template:3235 Drop Ceiling Mounting"
IVSWikiBlue (talk | contribs) (→Drop Ceiling Mounting Instructions) |
IVSWikiBlue (talk | contribs) (→Drop Ceiling Mounting Instructions) |
||
| Line 2: | Line 2: | ||
#If mounting to drop ceiling, determine where the camera will be located on the tile. Ensure that there will be clearance on the tile to secure the dome in place. | #If mounting to drop ceiling, determine where the camera will be located on the tile. Ensure that there will be clearance on the tile to secure the dome in place. | ||
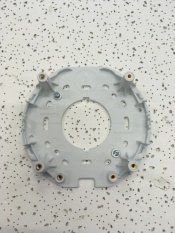
#Using two toggle bolts, secure the mount plate. | #Using two toggle bolts, secure the mount plate. | ||
| − | #:[[File:3245dropC2.JPG|link=https://ipivs.com/wiki/images/5/58/3245dropC2.JPG| | + | #:[[File:3245dropC2.JPG|link=https://ipivs.com/wiki/images/5/58/3245dropC2.JPG|175px]] |
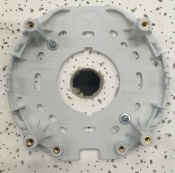
#Using a 1" paddle bit, drill a hole centered in the opening of wall plate. This is where cables will pass through. | #Using a 1" paddle bit, drill a hole centered in the opening of wall plate. This is where cables will pass through. | ||
| − | #:[[File:3245dropCHole2.JPG|link=https://ipivs.com/wiki/images/d/de/3245dropCHole2.JPG| | + | #:[[File:3245dropCHole2.JPG|link=https://ipivs.com/wiki/images/d/de/3245dropCHole2.JPG|175px]] |
#Cut two lengths of 22/2 long enough to reach the mounting location of the microphone. | #Cut two lengths of 22/2 long enough to reach the mounting location of the microphone. | ||
#Using glow rods or fish tape, fish the network drop and 2 sections of 22/2 audio cable into the drop ceiling. | #Using glow rods or fish tape, fish the network drop and 2 sections of 22/2 audio cable into the drop ceiling. | ||
#Attach camera to mount plate. | #Attach camera to mount plate. | ||
''Note:'' Be careful not to press too hard and damage the ceiling tile | ''Note:'' Be careful not to press too hard and damage the ceiling tile | ||
Latest revision as of 07:46, 27 August 2020
Drop Ceiling Mounting Instructions
- If mounting to drop ceiling, determine where the camera will be located on the tile. Ensure that there will be clearance on the tile to secure the dome in place.
- Using two toggle bolts, secure the mount plate.
- Using a 1" paddle bit, drill a hole centered in the opening of wall plate. This is where cables will pass through.
- Cut two lengths of 22/2 long enough to reach the mounting location of the microphone.
- Using glow rods or fish tape, fish the network drop and 2 sections of 22/2 audio cable into the drop ceiling.
- Attach camera to mount plate.
Note: Be careful not to press too hard and damage the ceiling tile

