Difference between revisions of "Template:VALT Manual"
IVSWikiBlue (talk | contribs) |
IVSWikiBlue (talk | contribs) |
||
| Line 1: | Line 1: | ||
| + | __TOC__ | ||
{{Article | padding = 30px 20% | content = | {{Article | padding = 30px 20% | content = | ||
<h1>Intro</h1> | <h1>Intro</h1> | ||
| Line 15: | Line 16: | ||
{{Top of Page}} | {{Top of Page}} | ||
| + | |||
| + | <h1>Live Observation</h1> | ||
| + | <h2>Search</h2> | ||
| + | <ol> | ||
| + | <li>Click the {{img - icon | file = Search.png}} <strong>Search</strong> icon in the top left corner.</li> | ||
| + | <li>Type the name of the room, device, or stream you are looking for.</li> | ||
| + | <li>Look under <b>Rooms</b> for the search results.</li> | ||
| + | </ol> | ||
| + | |||
| + | {{Aside - Helpful | content = See the <b>search</b> feature in action! {{Try it out | link = https://app.storylane.io/share/qhybuoxgfho1}} }} | ||
| + | |||
| + | {{Top of Page}} | ||
| + | {{hr}} | ||
| + | |||
| + | <h2>Filter</h2> | ||
| + | Users can filter their list to show only specific items. | ||
| + | #<b>All</b> <em>(Default)</em><b>:</b> Selecting this will show all available items. | ||
| + | #<b>Rooms:</b> Selecting this will display only the rooms available to the user. | ||
| + | #:<em>Rooms are created by the administrators of the system.</em> | ||
| + | #<b>Views:</b> Selecting this will display any custom views available to the user. | ||
| + | #:<em>Views are saved collections of cameras and streams.</em> | ||
| + | #<b>Streams:</b> Selecting this will display all available streams to the user. | ||
| + | #:<em>BEAM streaming would fit under this category.</em> | ||
| + | |||
| + | {{img left | width = 960px | file = VALT 6.3 Manual-Observe 02.png}} | ||
| + | |||
| + | {{Top of Page}} | ||
| + | {{hr}} | ||
| + | |||
| + | <h2>Select</h2> | ||
| + | The <b>Select</b> option allows users to <b>[[#Start Multiple Recordings|start multiple recordings]]</b> and <b>[[#Stop Multiple Recordings|stop multiple recordings]]</b> in multiple rooms. | ||
| + | |||
| + | {{img with key | width = 960px | file = VALT 6.3 Manual-Observe 03.png | list = | ||
| + | <li>Number of Rooms</li> | ||
| + | <li><b>Select</b>: Opens the selction tool to check multiple rooms to perform an action.</li> | ||
| + | }} | ||
| + | |||
| + | {{Top of Page}} | ||
| + | {{hr}} | ||
| + | |||
| + | <h2>Open a Room</h2> | ||
| + | <ol> | ||
| + | <li>Locate the room from the list.</li> | ||
| + | <li>Click on the name of that room.</li> | ||
| + | </ol> | ||
| + | |||
| + | {{Top of Page}} | ||
| + | {{hr}} | ||
| + | |||
| + | <h2>Open a Stream</h2> | ||
| + | <ol> | ||
| + | <li>Locate a room that contains the desired stream.</li> | ||
| + | <li>Expand the room by clicking the {{Expand Icon}} <b>Expand</b> icon.</li> | ||
| + | <li>Click on the name of the stream.</li> | ||
| + | </ol> | ||
| + | |||
| + | {{Top of Page}} | ||
| + | {{hr}} | ||
| + | |||
| + | <h2>Camera Control</h2> | ||
| + | Each video feed will have a variety of options for control. These controls can vary depending on the type of camera/device. | ||
| + | *Pan-Tilt-Zoom (PTZ) camera | ||
| + | *Fixed camera | ||
| + | |||
| + | {{Top of Page}} | ||
| + | {{hr}} | ||
| + | |||
| + | <h3>Digital Zoom</h3> | ||
| + | Users can zoom in and out on any video feed using a digital zoom. This zooming is only viewable to the user performing the zoom. This means that it will not impact a recording and will not affect other users live observing the feed. | ||
| + | |||
| + | A digital zoom will only take the existing pixels and make them larger. This means there is no increase in image quality. | ||
| + | {{Aside - Helpful | content = Want to see <b>Digital Zoom</b> in action! {{Try it out | link = https://app.storylane.io/share/qhybuoxgfho1}} }} | ||
| + | |||
| + | {{Top of Page}} | ||
| + | {{hr}} | ||
| + | |||
| + | <h3>Move Camera (PTZ)</h3> | ||
| + | #Click on the {{img - icon | file = Camera_Control.png | width = 18px}} <strong>PTZ</strong> icon. | ||
| + | #Position the {{img - icon | file = Bullseye.png | width = 18px}} <strong>bullseye</strong> on the desired location. | ||
| + | #*Left click to center view on that point. | ||
| + | #*Mouse scroll wheel is used to zoom in and out. | ||
| + | |||
| + | {{Aside - Helpful | content = Want to see <b>Camera Control (PTZ)</b> in action! {{Try it out | link = https://app.storylane.io/share/qbficrisonph}} }} | ||
| + | |||
| + | {{Top of Page}} | ||
| + | {{hr}} | ||
| + | |||
| + | <h3>Presets</h3> | ||
| + | The preset dropdown enables users to quickly navigate to predefined locations with specific camera zoom levels. | ||
| + | |||
| + | <h4>Create Preset</h4> | ||
| + | #Using the {{img - icon | file = Camera_Control.png | width = 18px}} <b>PTZ control</b>, move the camera to the desired location. | ||
| + | #Click the '<b>Select Preset</b>' dropdown and select '<b>Save Current</b>'. | ||
| + | |||
| + | {{hr - 2}} | ||
| + | |||
| + | <h4>Delete Preset</h4> | ||
| + | #Click the '<b>Select Preset</b>' dropdown. | ||
| + | #Hover over the preset to be deleted and click the {{img - icon | file = Delete.png}} <b>Delete</b> icon. | ||
| + | |||
| + | {{Top of Page}} | ||
| + | {{hr}} | ||
| + | |||
| + | <h2>Talkback</h2> | ||
| + | Clicking the {{img - icon | file = Talkback.png | width = 16px}} <b>Talkback</b> icon allows a user to talk back into a room using the audio output on the camera (assuming this output has been wired to a speaker or audio transmitter). | ||
| + | |||
| + | {{Top of Page}} | ||
| + | {{hr}} | ||
| + | |||
| + | <h2>Sound Control</h2> | ||
| + | The {{img - icon | file = Audio.png | width = 18px}} <b>speaker</b> icon mutes / unmutes the audio for that camera. When viewing multiple cameras, the user can control which audio channel they are listening to using this button. | ||
| + | |||
| + | {{Top of Page}} | ||
| + | {{hr}} | ||
| + | |||
| + | <h2>Fullscreen Mode</h2> | ||
| + | <h2>Share Settings</h2> | ||
| + | <h3>Create Sharing Link</h3> | ||
| + | <h3>Copy Sharing Link</h3> | ||
| + | <h3>Delete Sharing Link</h3> | ||
| + | <h2>Locking Rooms</h2> | ||
| + | <h3>Lock Room</h3> | ||
| + | <h3>Unlock Room</h3> | ||
| + | <h2>Views</h2> | ||
| + | <h3>Matrix Views</h3> | ||
| + | <h3>Save View</h3> | ||
| + | <h3>Delete View</h3> | ||
| + | <h2>Fullscreen Mode</h2> | ||
| + | <h2>Hide Left Panel</h2> | ||
| + | |||
| + | <h1>Recording</h1> | ||
| + | <h2>Recording Settings</h2> | ||
| + | <h3>Information</h3> | ||
| + | <h3>Evaluation</h3> | ||
| + | <h3>Sharing</h3> | ||
| + | <h2>Author</h2> | ||
| + | <h2>Retention</h2> | ||
| + | <h2>Start a Recording</h2> | ||
| + | <h2>Prepare a Recording</h2> | ||
| + | <h2>Recording Options</h2> | ||
| + | <h2>Pause a Recording</h2> | ||
| + | <h2>Resume a Recording</h2> | ||
| + | <h2>Stop a Recording</h2> | ||
| + | <h2>Select</h2> | ||
| + | <h3>Start Multiple Recordings</h3> | ||
| + | <h3>Stop Multiple Recordings</h3> | ||
| + | <h3></h3> | ||
| + | <h2>Sharing Link</h2> | ||
| + | <h2>Comments</h2> | ||
| + | <h3>Add</h3> | ||
| + | <h4>Quick Markers</h4> | ||
| + | <h4>Enable Audio Mode</h4> | ||
| + | <h4>Add Mention</h4> | ||
| + | <h4>Attach a File</h4> | ||
| + | <h4>Open Comment Template</h4> | ||
| + | <h4>Select Color</h4> | ||
| + | <h4>Reset Timestamp</h4> | ||
| + | <h3>Reply</h3> | ||
| + | <h3>Edit</h3> | ||
| + | <h3>Delete</h3> | ||
}} | }} | ||
Revision as of 20:10, 13 February 2025
Contents
- 1
- 2 Intro
- 3 Live Observation
- 4 Recording
Intro
The Observe section is where live observation and recording takes place. On this page you can find the rooms, and streams that you have access to.
Here you will be able to do the following:
- Perform live observation
- Start and stop recordings
- Control Pan/Tilt/Zoom cameras
- Talkback into a room
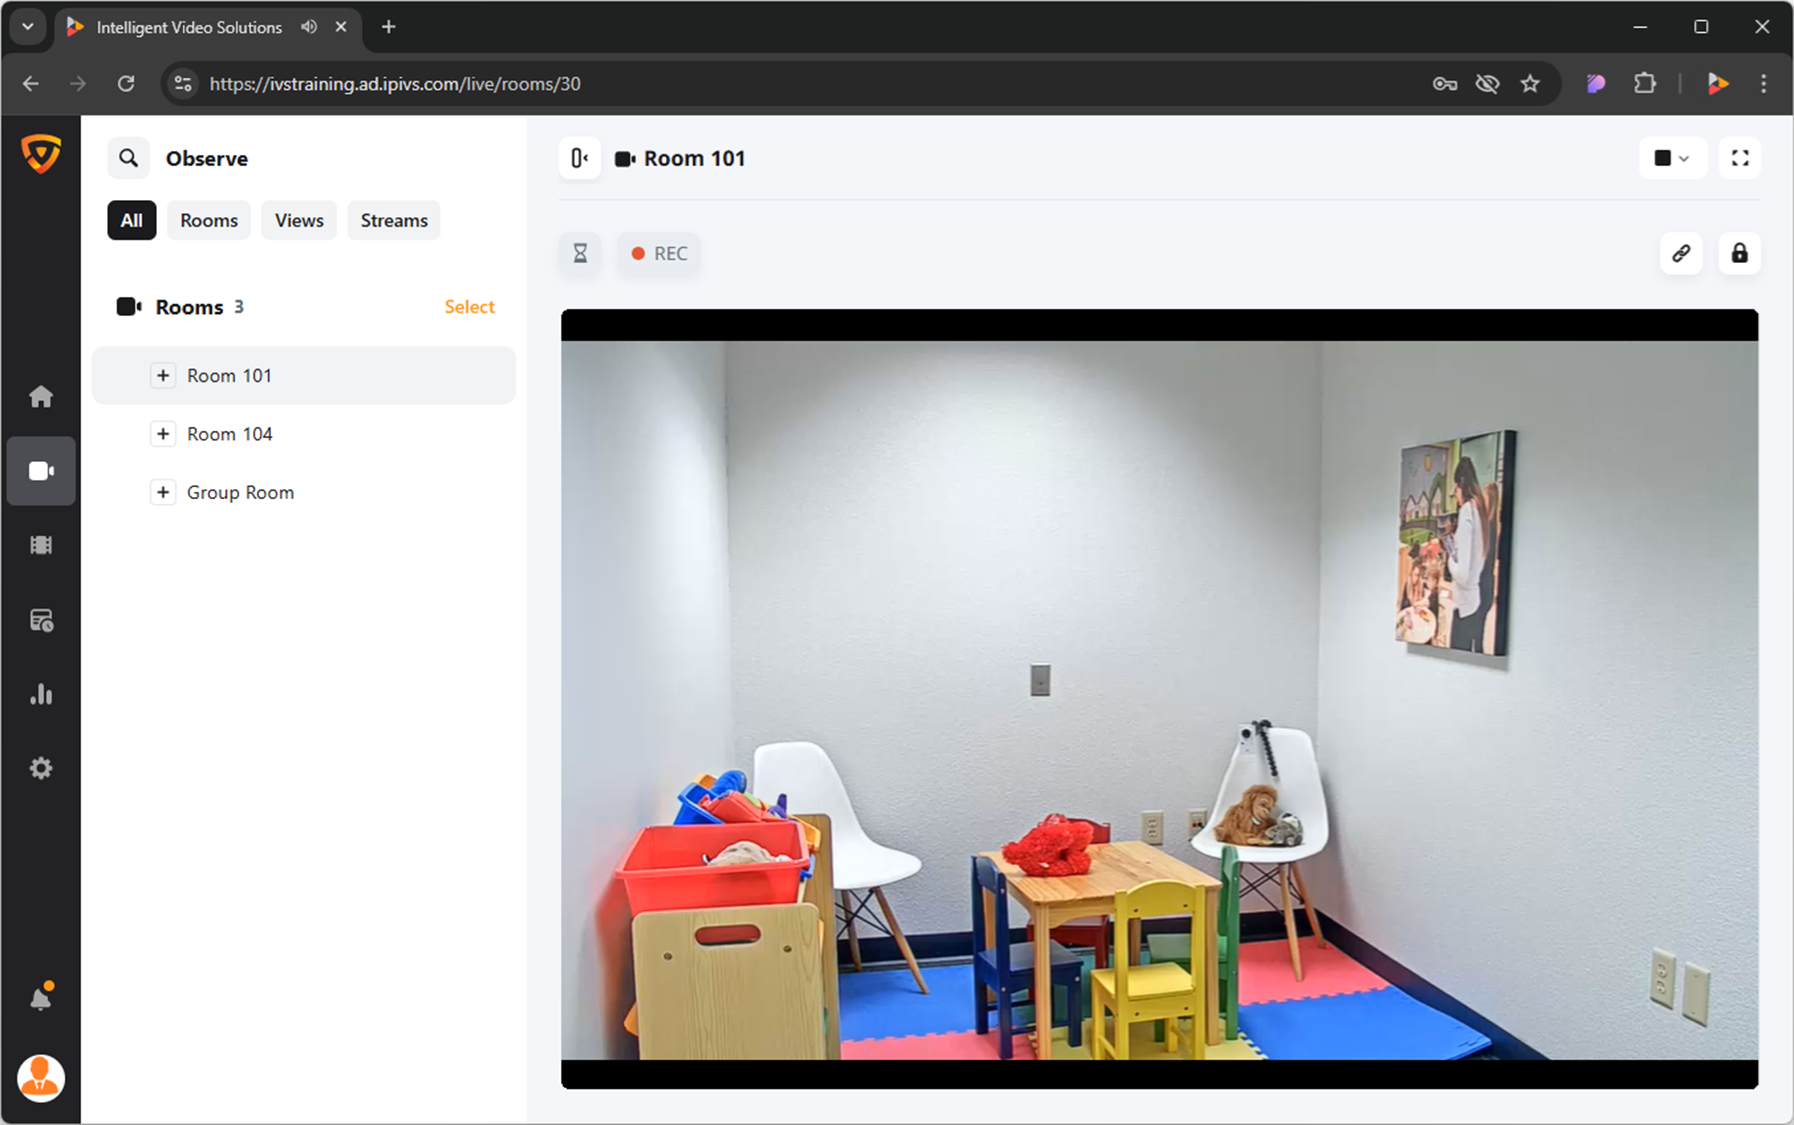
Live Observation
Search
- Click the
 Search icon in the top left corner.
 - Type the name of the room, device, or stream you are looking for.
- Look under Rooms for the search results.

Try it out!
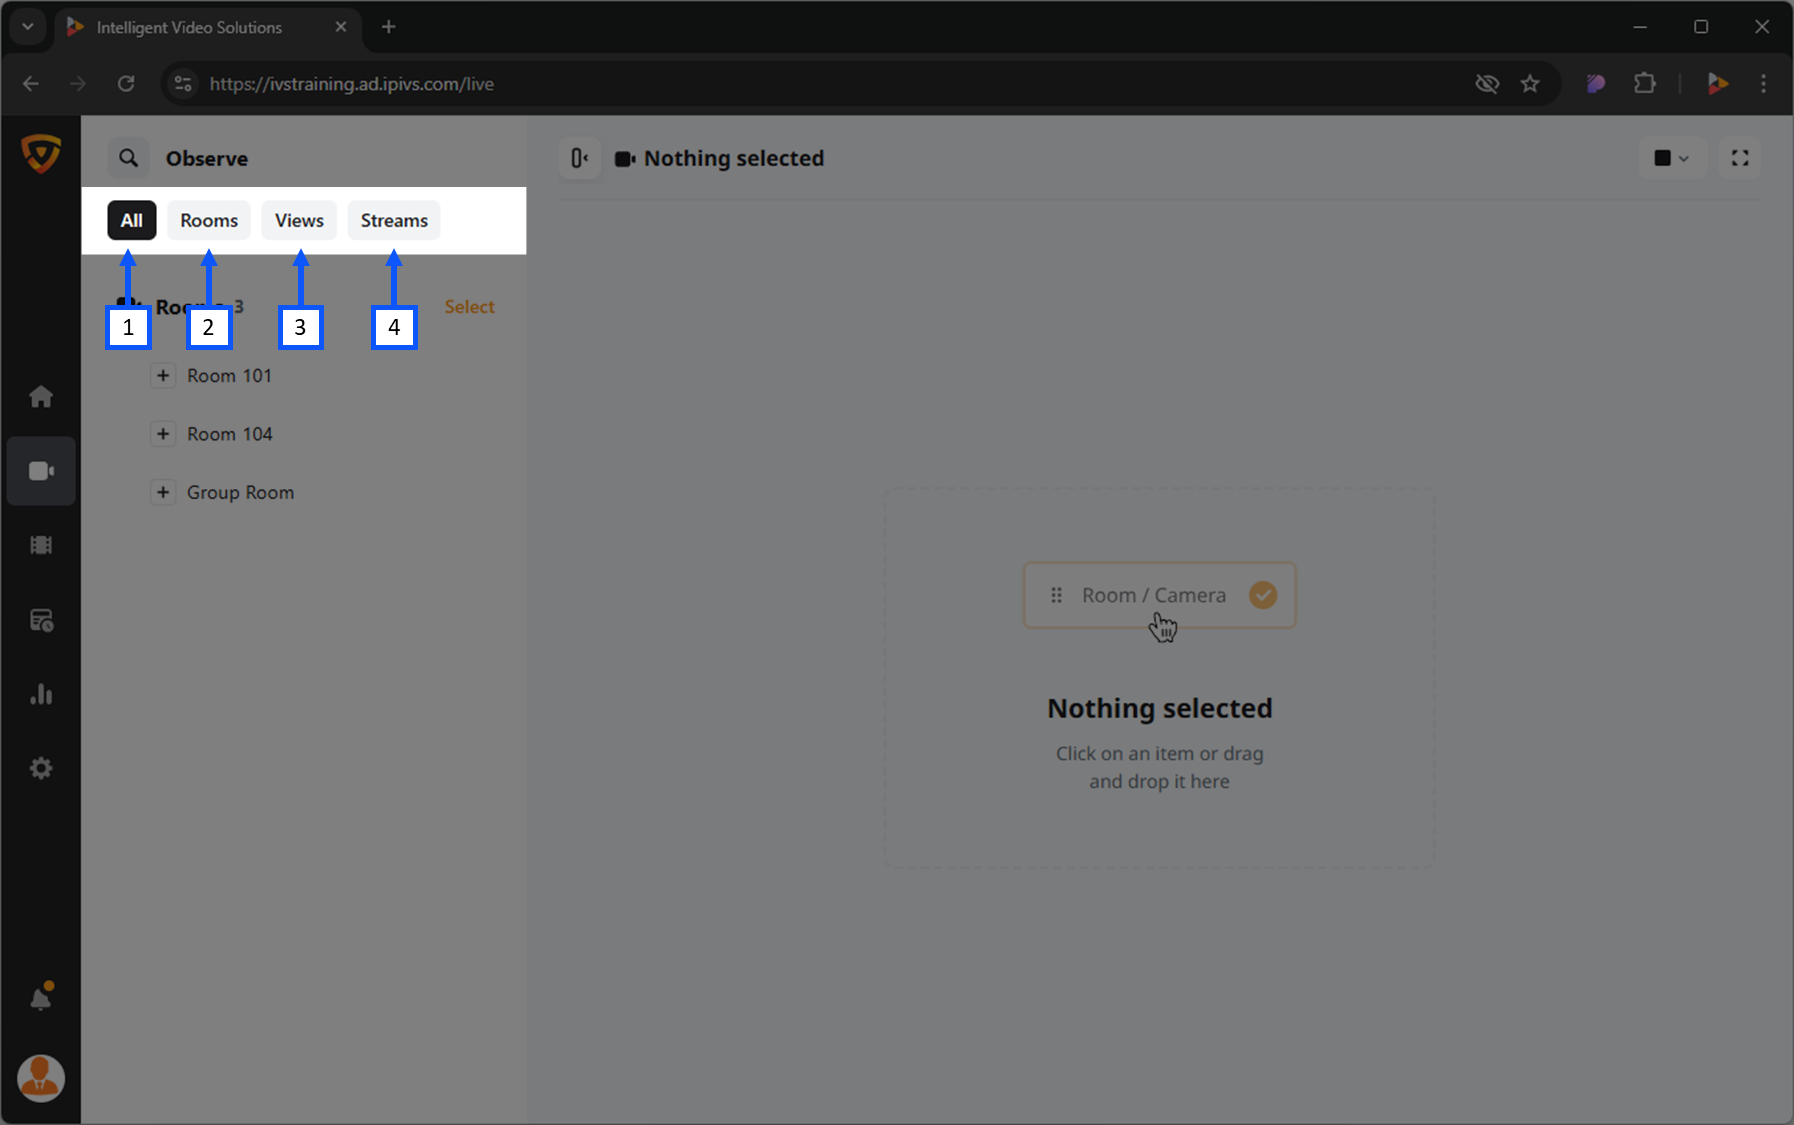
Filter
Users can filter their list to show only specific items.
- All (Default): Selecting this will show all available items.
- Rooms: Selecting this will display only the rooms available to the user.
- Rooms are created by the administrators of the system.
- Views: Selecting this will display any custom views available to the user.
- Views are saved collections of cameras and streams.
- Streams: Selecting this will display all available streams to the user.
- BEAM streaming would fit under this category.
Select
The Select option allows users to start multiple recordings and stop multiple recordings in multiple rooms.
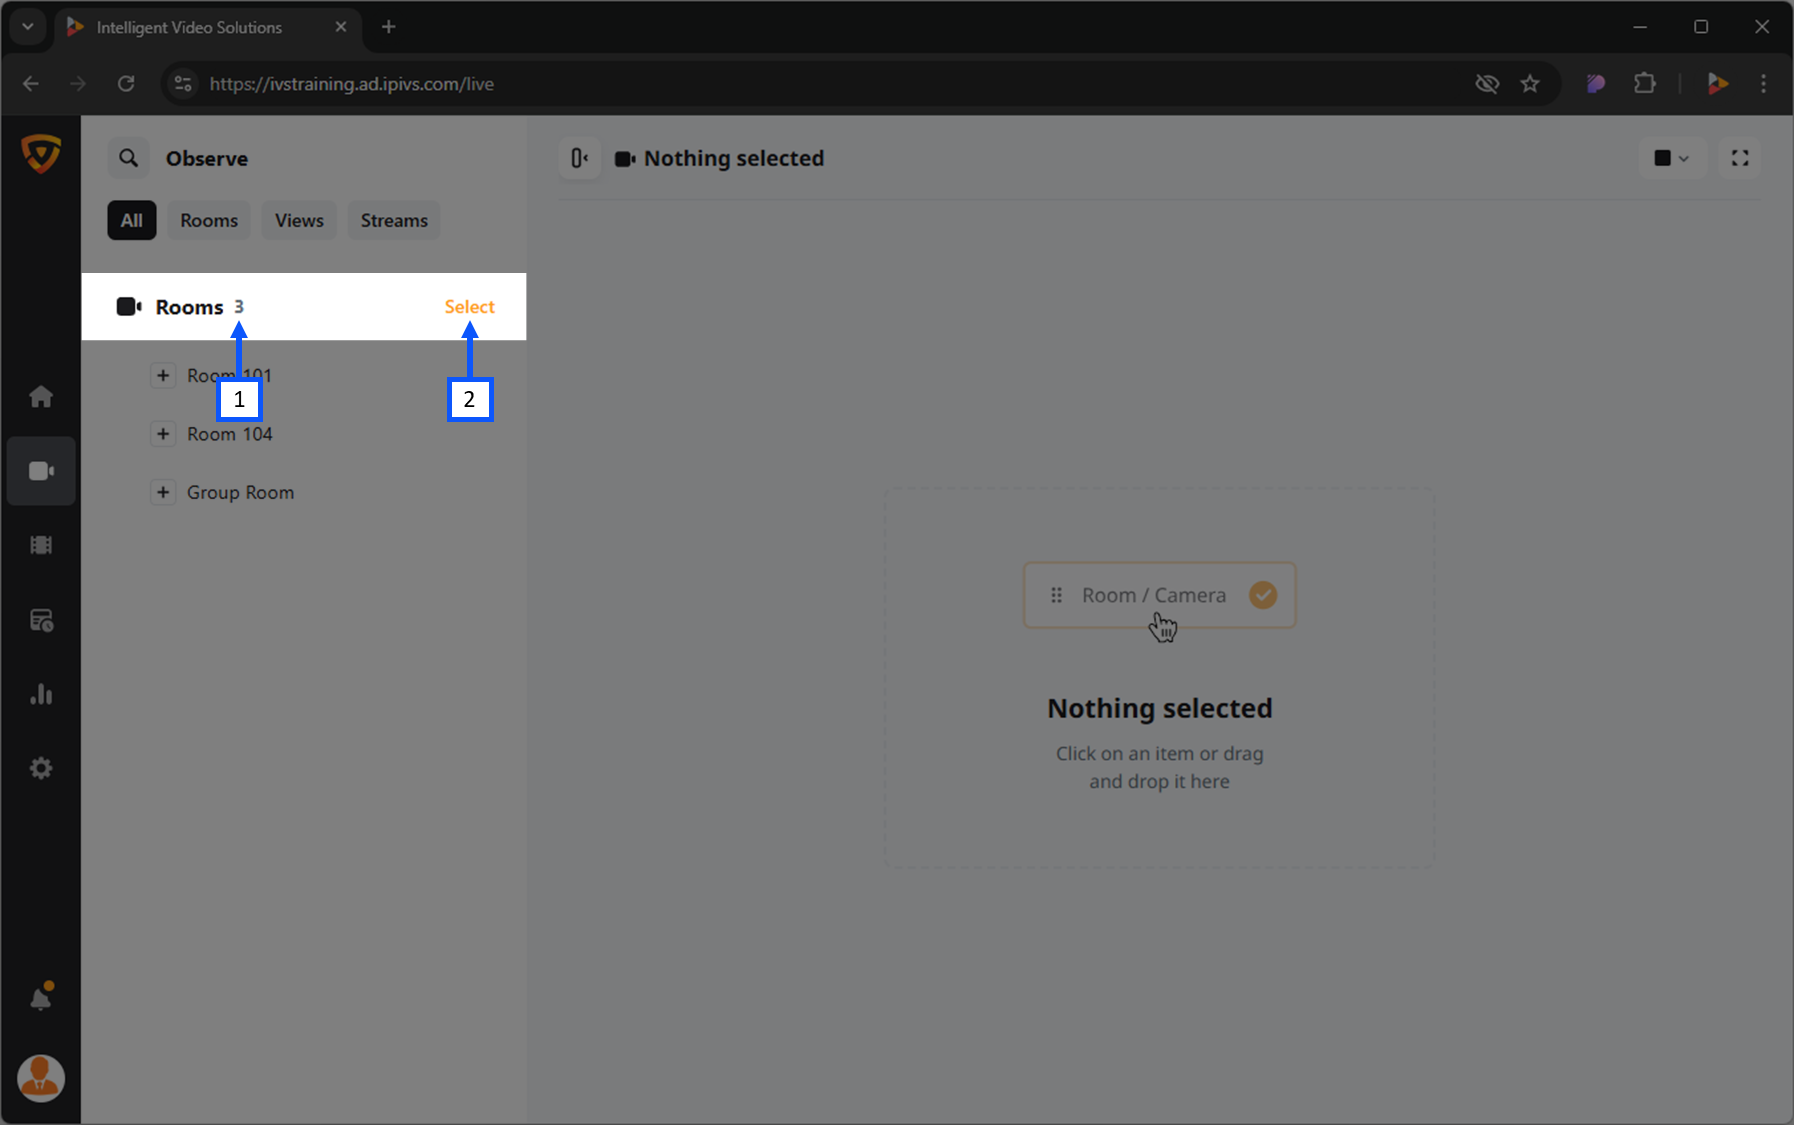
- Number of Rooms
- Select: Opens the selction tool to check multiple rooms to perform an action.
Open a Room
- Locate the room from the list.
- Click on the name of that room.
Open a Stream
- Locate a room that contains the desired stream.
- Expand the room by clicking the + Expand icon.
- Click on the name of the stream.
Camera Control
Each video feed will have a variety of options for control. These controls can vary depending on the type of camera/device.
- Pan-Tilt-Zoom (PTZ) camera
- Fixed camera
Digital Zoom
Users can zoom in and out on any video feed using a digital zoom. This zooming is only viewable to the user performing the zoom. This means that it will not impact a recording and will not affect other users live observing the feed.
A digital zoom will only take the existing pixels and make them larger. This means there is no increase in image quality.
Try it out!
Move Camera (PTZ)
- Click on the
 PTZ icon.
 - Position the
 bullseye on the desired location.
- Left click to center view on that point.
- Mouse scroll wheel is used to zoom in and out.
Try it out!
Presets
The preset dropdown enables users to quickly navigate to predefined locations with specific camera zoom levels.
Create Preset
- Using the PTZ control, move the camera to the desired location.
- Click the 'Select Preset' dropdown and select 'Save Current'.
Delete Preset
- Click the 'Select Preset' dropdown.
- Hover over the preset to be deleted and click the
 Delete icon.
Talkback
Clicking the ![]() Talkback icon allows a user to talk back into a room using the audio output on the camera (assuming this output has been wired to a speaker or audio transmitter).
Talkback icon allows a user to talk back into a room using the audio output on the camera (assuming this output has been wired to a speaker or audio transmitter).
Sound Control
The ![]() speaker icon mutes / unmutes the audio for that camera. When viewing multiple cameras, the user can control which audio channel they are listening to using this button.
speaker icon mutes / unmutes the audio for that camera. When viewing multiple cameras, the user can control which audio channel they are listening to using this button.