Difference between revisions of "Start/Stop Button"
IVSWikiBlue (talk | contribs) m (IVSWikiBlue moved page Camera I/O Wiring to Start/Stop Button: Title change) |
IVSWikiBlue (talk | contribs) |
||
| Line 1: | Line 1: | ||
==Hardware Configuration== | ==Hardware Configuration== | ||
| − | First wire the button to the desired camera's IO | + | First wire the button to the desired camera's IO Phoenix connector. If you are using our buttons, the wires should be connected to the back of the button as shown in the diagram below. |
[[File:BTNDiag.jpg]] | [[File:BTNDiag.jpg]] | ||
| Line 30: | Line 30: | ||
[[File:Start_stop_config.png]] | [[File:Start_stop_config.png]] | ||
| − | #) Select the room | + | #) Select the room. |
| − | #) Check the Use I/O box | + | #) Check the '''Use I/O''' box. |
| − | #) Select what camera the I/O wiring is tied into | + | #) Select what camera the I/O wiring is tied into. |
| − | #) Select a user - All I/O recordings in that room will be considered authored by that user | + | #) Select a user - All I/O recordings in that room will be considered authored by that user. |
| − | #) Select Start/Stop in the command field | + | #) Select '''Start/Stop''' in the command field. |
| − | #) Enter | + | #) Enter Port Number 1. |
| − | #) If it is a PTZ camera you can have the camera move to a preset at the start of the recording | + | #) If it is a PTZ camera, you can have the camera move to a preset at the start of the recording. |
| − | #) Press Save to enable I/O button recordings | + | #) Press '''Save''' to enable I/O button recordings. |
==Camera Configuration== | ==Camera Configuration== | ||
| − | #) Navigate to the IP of the camera | + | #) Navigate to the IP of the camera. |
| − | #) (In the old navigation view) Go to Setup in the top right; then System Options | + | #) (In the old navigation view) Go to '''Setup''' in the top right; then '''System Options'''. |
| − | #) For Allow Password Type, select Unencrypted Only | + | #) For '''Allow Password Type''', select '''Unencrypted Only'''. |
#:[[File:Start_stop_unencrypt.png]] | #:[[File:Start_stop_unencrypt.png]] | ||
| − | #) | + | #) Navigate to '''Ports & Devices'''. |
| − | #) Change | + | #) Change Ports 2 & 4 to '''Output''' (if it hasn't already been done). |
#:[[File:Ports_old.png]] | #:[[File:Ports_old.png]] | ||
| − | #) (In the new navigation view) Go to Settings; then System; then Plain Config | + | #) (In the new navigation view) Go to '''Settings'''; then '''System'''; then '''Plain Config'''. |
#:[[File:Start_stop_unencrypt_new.png]] | #:[[File:Start_stop_unencrypt_new.png]] | ||
| − | #) Scroll and select Network | + | #) Scroll and select '''Network'''. |
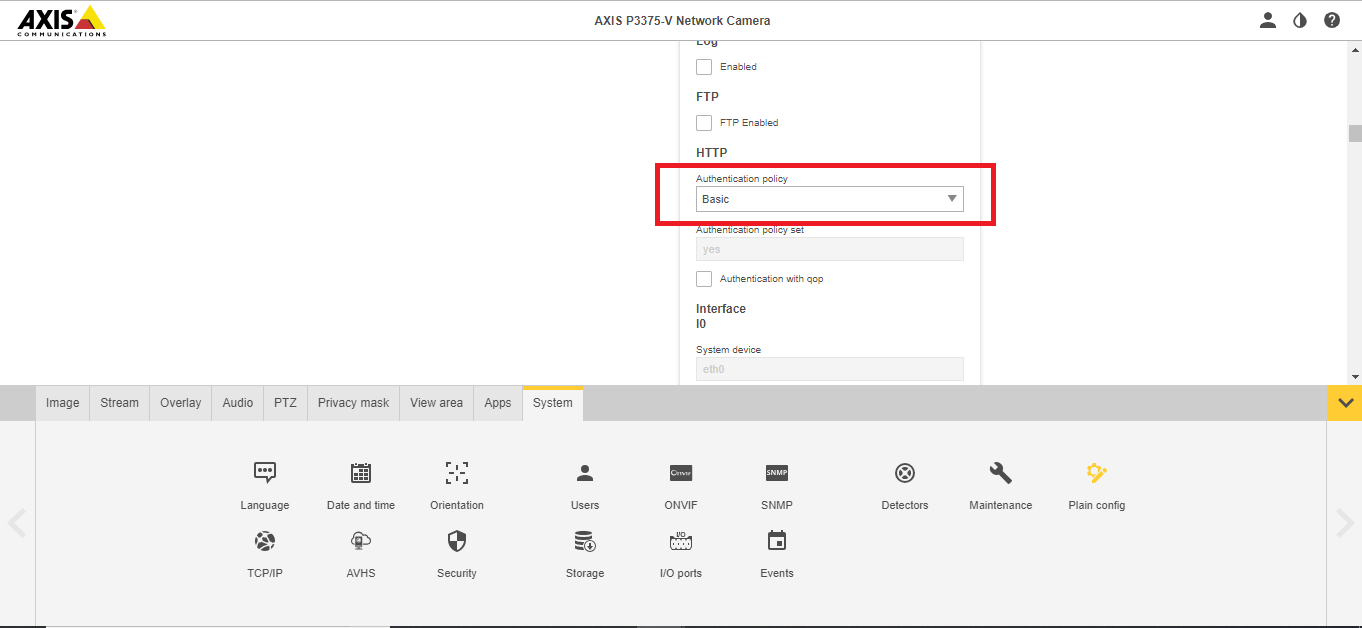
| − | #) Under HTTP, Authentication Policy, select Basic. Scroll to click Save | + | #) Under '''HTTP''', '''Authentication Policy''', select '''Basic'''. Scroll to click '''Save'''. |
#:[[File:Start_stop_unencrypt_new_2.png]] | #:[[File:Start_stop_unencrypt_new_2.png]] | ||
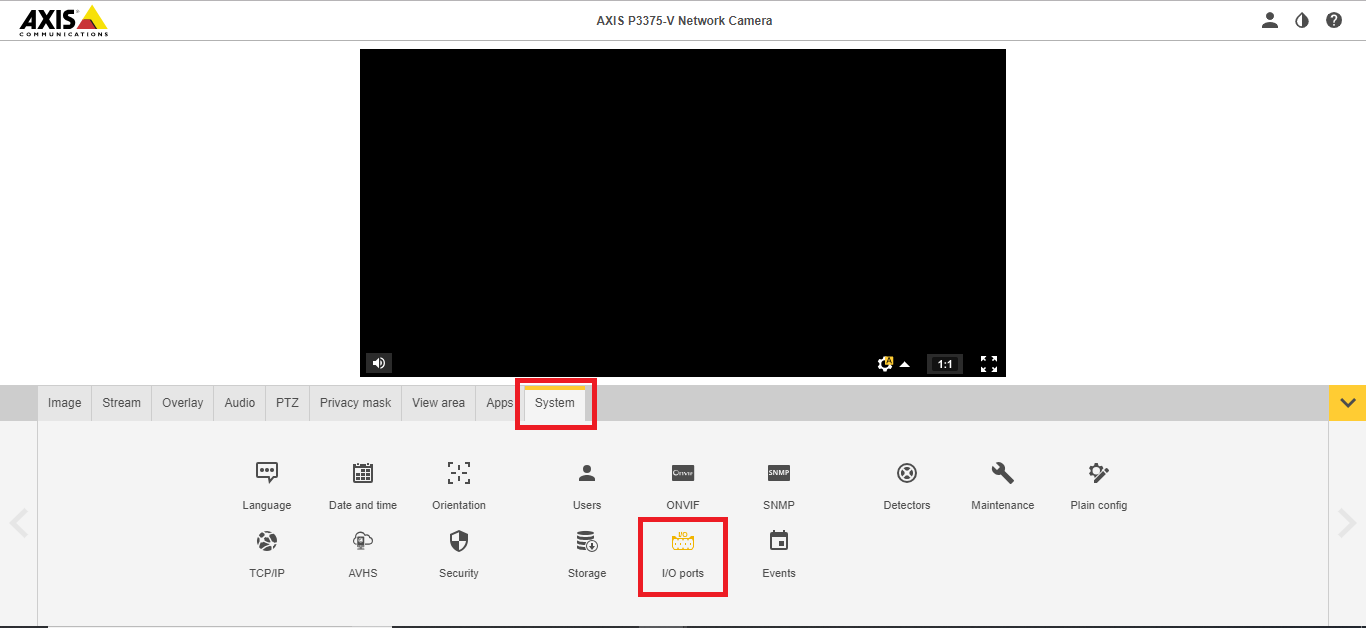
| − | #) Also head to System > I/O Ports | + | #) Also head to '''System''' > '''I/O Ports'''. |
#:[[File:Ports.png]] | #:[[File:Ports.png]] | ||
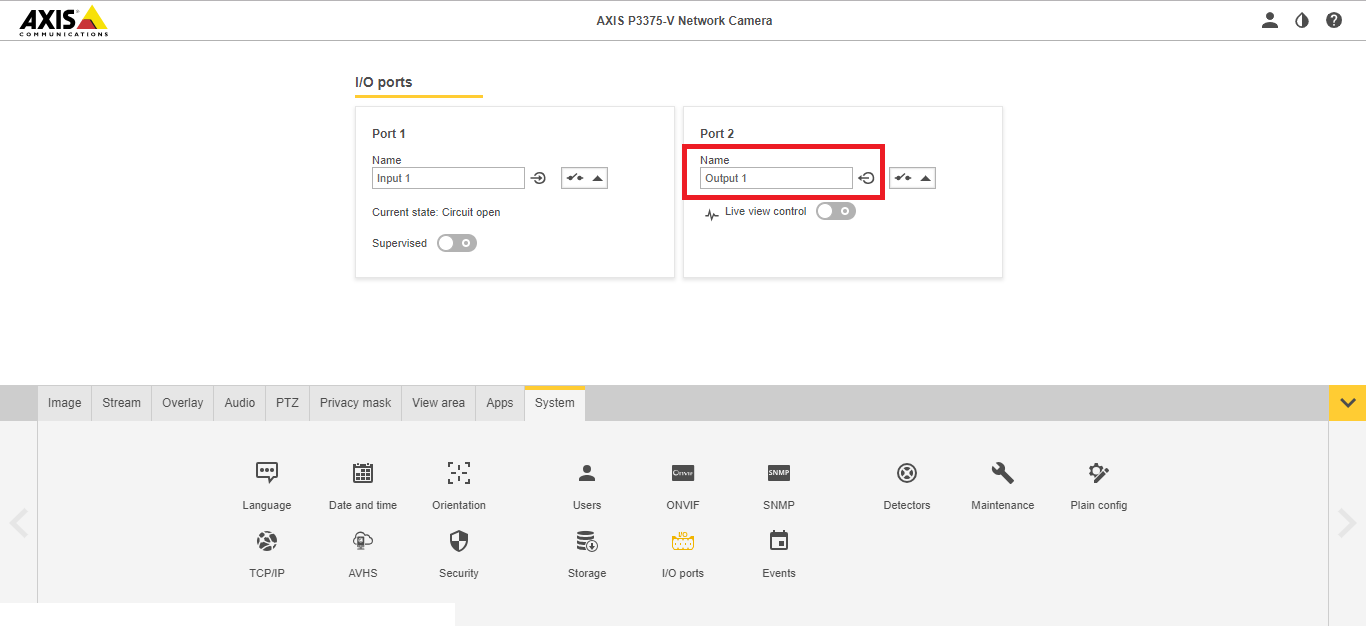
| − | #) Change | + | #) Change Port 2 to '''Output'''. |
#:[[File:Port_2.png]] | #:[[File:Port_2.png]] | ||
Revision as of 10:48, 7 May 2019
Hardware Configuration
First wire the button to the desired camera's IO Phoenix connector. If you are using our buttons, the wires should be connected to the back of the button as shown in the diagram below.
| Button | Phoenix Connector |
|---|---|
| NO | Pin 1 |
| + | Pin 2 |
| C | Pin 3 |
| - | Pin 4 |
We recommend wiring the buttons using 22/4 as shown below:
Software Configuration
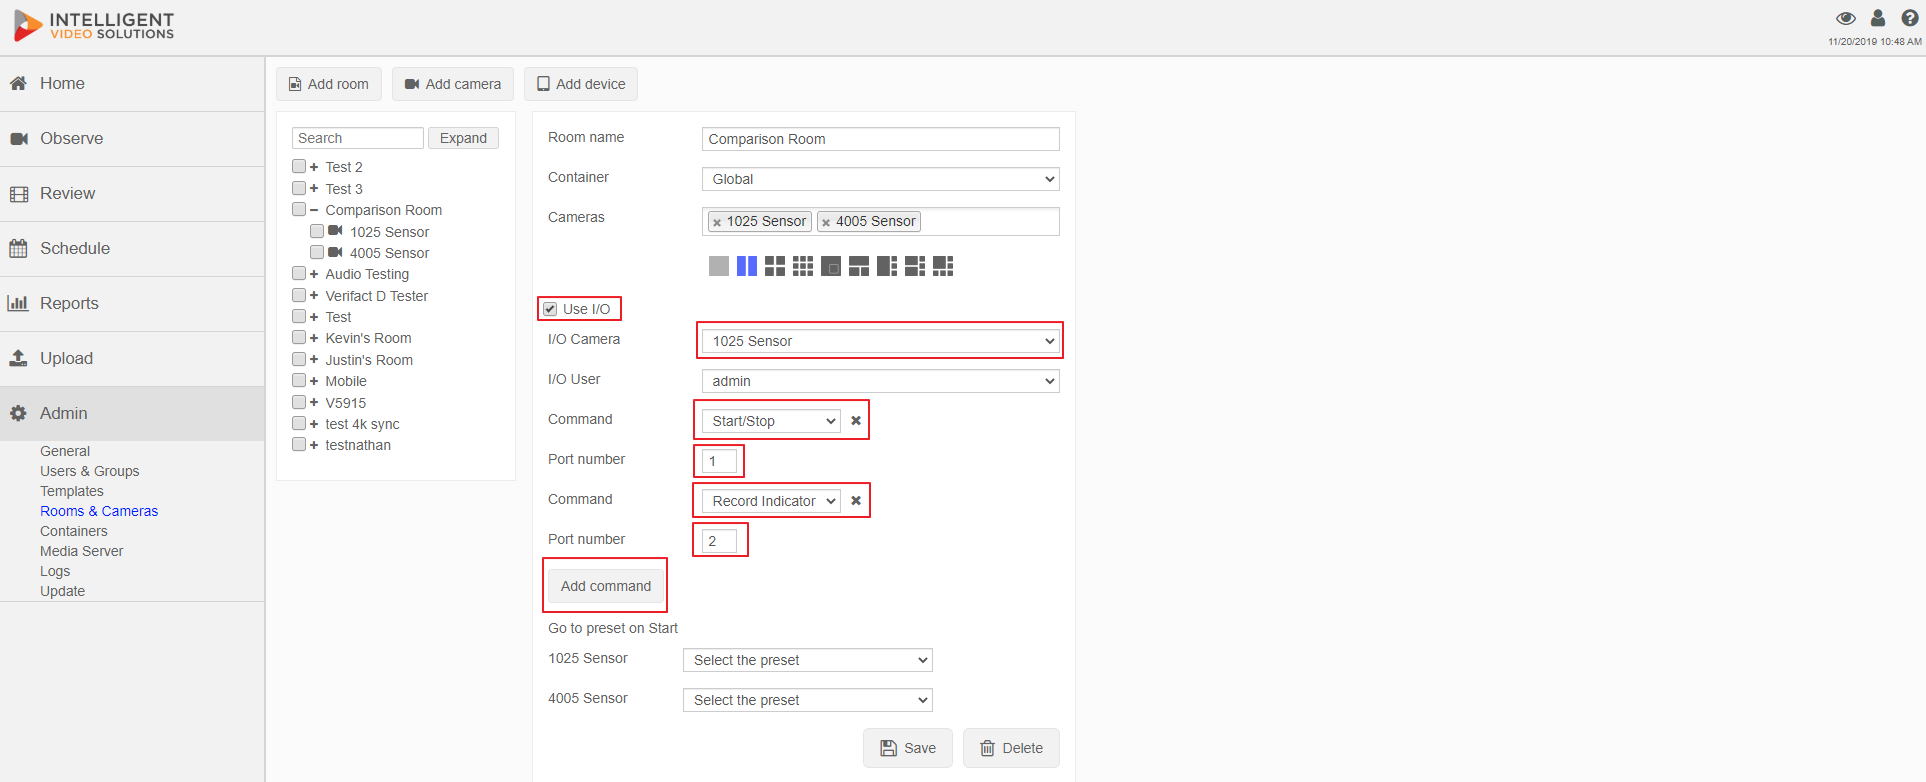
You will need to log into the software with admin rights and navigate to the admin section then click on rooms.
- ) Select the room.
- ) Check the Use I/O box.
- ) Select what camera the I/O wiring is tied into.
- ) Select a user - All I/O recordings in that room will be considered authored by that user.
- ) Select Start/Stop in the command field.
- ) Enter Port Number 1.
- ) If it is a PTZ camera, you can have the camera move to a preset at the start of the recording.
- ) Press Save to enable I/O button recordings.
Camera Configuration
- ) Navigate to the IP of the camera.
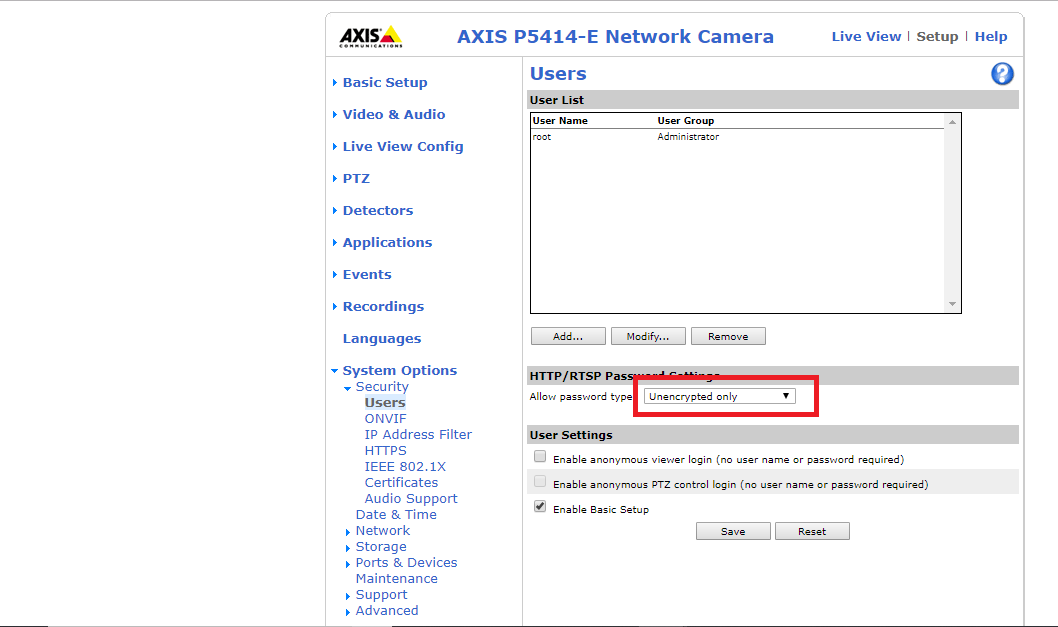
- ) (In the old navigation view) Go to Setup in the top right; then System Options.
- ) For Allow Password Type, select Unencrypted Only.
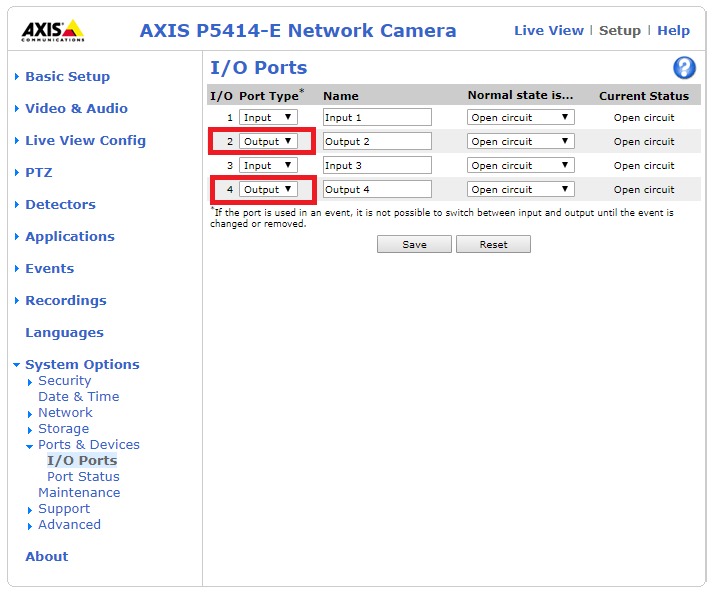
- ) Navigate to Ports & Devices.
- ) Change Ports 2 & 4 to Output (if it hasn't already been done).


