Installing an Axis P3374/P3375 with a Tesira Forte DSP
Revision as of 09:24, 18 May 2020 by IVSWikiBlue (talk | contribs)
Contents
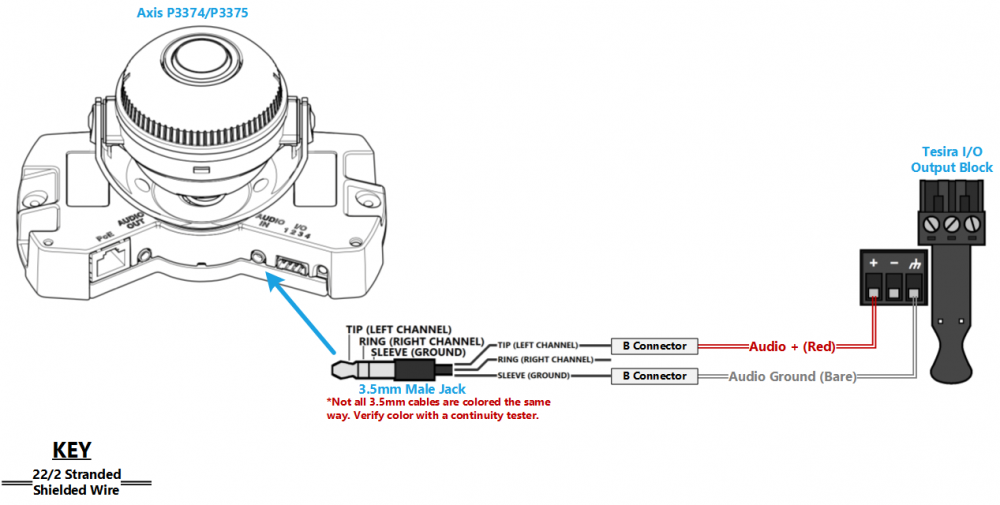
Wiring Diagram
Required Parts And Tools
- Axis P3374 or P3375
- 3.5mm (Male to Male) Audio Cable
- Louroe Verifact A Microphone
- T20 Torx security bit
- Wire Stripper
- Tap-Cons (if mounting to concrete) (3/16")
- Screws and Anchors (3/16")
- Toggle Bolts (If mounting to drop ceiling tile) (3/16")
- Drill bit and drill
- Phillips head drill bit or Phillips head screwdriver
- Small Flat head screwdriver (#3)
- Cat5/6 Patch Cable (7ft-15ft recommended)
- Shielded Stranded 22/2 + ground Wire
Installation Instructions
Disassemble the Camera
- Locate the network drop above the ceiling. It should be terminated with a male Ethernet end (service loop) or a biscuit jack. This line will have been ran back to the POE switch.
- Note: If the switch does not have POE, a POE injector will need to be installed at the network closet.
- Using the T20 bit, remove the dome from the P3374/P3375 camera with the T20 security bit.
Drywall Mounting Instructions
- Using a stud finder, ensure there aren’t any studs where the camera base will be installed.
- Using a pencil, trace the 2 anchor points on the wall where the screws will be installed and mark the opening where the any cabling will pass through.
- Using a 3/16” drill bit, drill 2 holes at the traced location and insert the plastic anchors.
- Using the hole saw (recommended size 2”), drill a hole into the area where cables will pass through.
- Ensure the cut hole does not extend past what the camera dome will cover.
- Using the hole saw, drill a hole above the drop ceiling in line with the hole drilled where the camera is mounted.
- If there is no drywall above the ceiling, adjust accordingly to the circumstance.
- Measure and cut 2 lengths of 22/2 wire long enough to reach the destination where the camera is mounted. One cable will be for audio; the other will be to power the Verifact A. Label both ends of each wire accordingly.
- Using glow rods or fish tape, fish the network drop and 2 sections of 22/2 audio cable down the drywall.
- Mount the Axis P3374/3375 base to the wall using the screws associated with the anchors.
Drop Ceiling Inscructions
- Remove the ceiling tile the camera will be mounted to and determine where on the tile to mount.
- Using a pencil, mark the two holes where the camera base well be attached
- Make a small hole that can be hidden by the camera dome for running cabling through.
- Using toggle bolts, mount the camera.
- Return ceiling tile with mounted camera to drop ceiling.
Connecting the Microphone and Tesira
Using the following link, select the audio option as installed:
