Difference between revisions of "Encoder Settings"
IVSWikiBlue (talk | contribs) |
IVSWikiBlue (talk | contribs) (→Connect to a New Encoder) |
||
| Line 10: | Line 10: | ||
=Connect to a New Encoder= | =Connect to a New Encoder= | ||
| + | |||
To access the VGADVI Broadcaster web interface via the persistent static IP address: | To access the VGADVI Broadcaster web interface via the persistent static IP address: | ||
| − | + | ||
| + | # Record the network settings of the workstation being used to connect to the VGADVI Broadcaster so | ||
that they can be restored later. | that they can be restored later. | ||
| − | + | # Temporarily change the network configuration on the workstation to the following: | |
| − | + | #* Use Static IP assignment | |
| − | + | #* IP address: 192.168.255.249 | |
| − | + | #* Subnet mask: 255.255.255.252 | |
| − | + | # Establish an Ethernet connection between the VGADVI Broadcaster and the workstation by one of the | |
following methods: | following methods: | ||
| − | + | #* Connect the device to a local Ethernet network shared with the workstation. | |
| − | + | #* Connect the device directly to the workstation’s Ethernet port using either a regular or a | |
crossover Ethernet cable. | crossover Ethernet cable. | ||
| − | + | # Start a web browser on the workstation and browse to: http://192.168.255.250/admin/ | |
| − | + | # Log in as the administrator user with the user name admin and the admin password (by default there is | |
no password); the web interface page opens. | no password); the web interface page opens. | ||
| − | + | # Click the Networking link in the Configuration menu. | |
| − | |||
=Configuring the Encoder= | =Configuring the Encoder= | ||
Revision as of 11:49, 31 March 2022
Default IP
By default the all Epiphans can always be accessed by the following IP scheme. Note: If multiple encoders are on the network, your connection might switch between multiple of the encoders.
- IP Address:
192.168.255.250 - Netmask:
255.255.255.252 - User Name:
admin - Password: your admin password (by default set to no password)
Connect to a New Encoder
To access the VGADVI Broadcaster web interface via the persistent static IP address:
- Record the network settings of the workstation being used to connect to the VGADVI Broadcaster so
that they can be restored later.
- Temporarily change the network configuration on the workstation to the following:
- Use Static IP assignment
- IP address: 192.168.255.249
- Subnet mask: 255.255.255.252
- Establish an Ethernet connection between the VGADVI Broadcaster and the workstation by one of the
following methods:
- Connect the device to a local Ethernet network shared with the workstation.
- Connect the device directly to the workstation’s Ethernet port using either a regular or a
crossover Ethernet cable.
- Start a web browser on the workstation and browse to: http://192.168.255.250/admin/
- Log in as the administrator user with the user name admin and the admin password (by default there is
no password); the web interface page opens.
- Click the Networking link in the Configuration menu.
Configuring the Encoder
The following camera settings should be enabled prior to adding the camera to the VALT system.
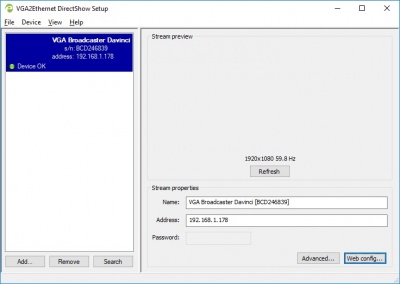
- 1.) Use the Epiphan Discovery Tool to find the VGABroadcaster device.
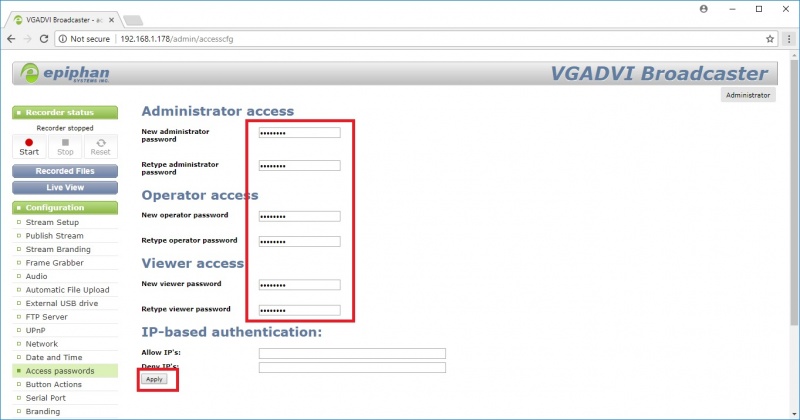
- 2.) Click on Web Config using the Discovery tool, or enter the <ipaddress>/admin in a web browser to access the configuration menu. The username should be admin, with a blank password. Click on the Access button.
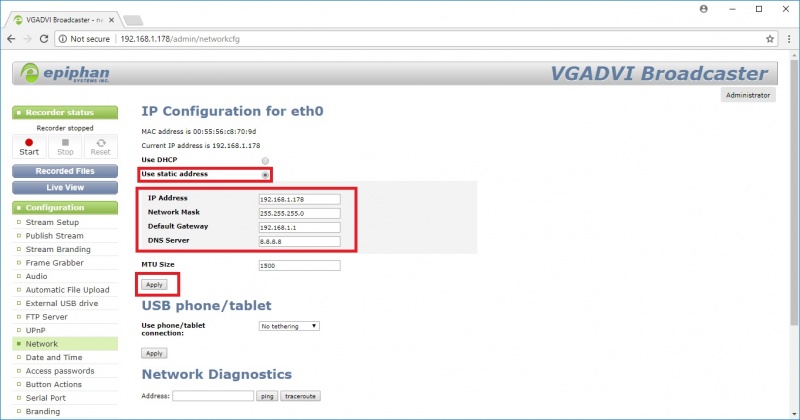
- 3.) Click on the Network button and select Use Static Address, Set the IP, Network Mask, Gateway & DNS information, then click Apply as shown below.
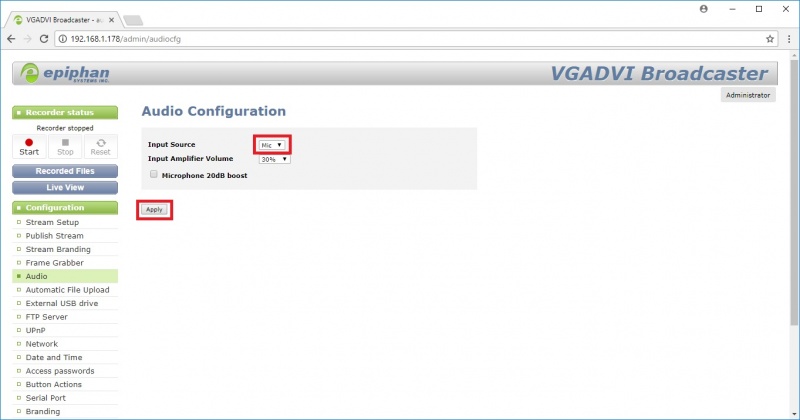
- 4.) Click on the Audio button, change the input source to Mic, and click the Apply button.
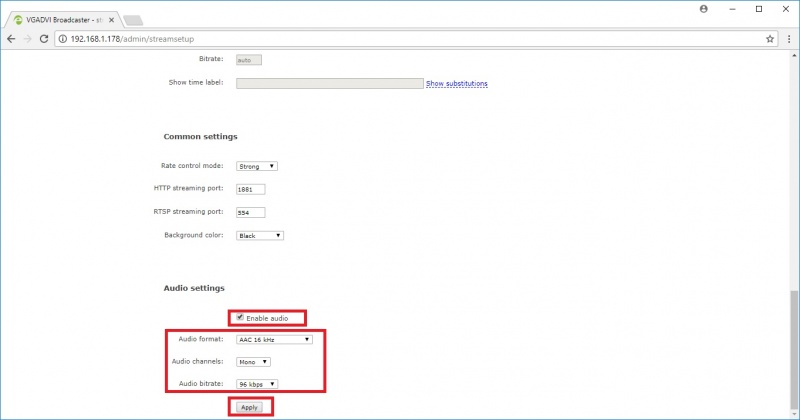
- 5.) Click on the Stream tab, scroll to the bottom, change the audio format to AAC 16 kHz, change the bitrate to 96 kbps, and finally click the Apply button.
