Installing the Valt Software
Contents
Install Ubuntu 14.0.4 LTS
The valt software is currently only supported on Ubuntu 14.04 LTS. Internet access is required to complete the installation. After installation is complete, the server can be disconnected from the internet and run without issue.
- Boot the machine from an Ubuntu Server 14.04 installation CD.
-
- When prompted select your language from the menu and press enter.
-
- Press F4
- If you are installing on a virtual machine select Install Minimal Virtual Machine
- If you are installing on a physical machine select Install Minimal System
-
- When prompted select your language from the menu and press enter.
-
- When prompted select your location from the menu and press enter.
-
- Select No when prompted to detect keyboard layout.
-
- Select the country of origin for your keyboard from the menu and press enter.
- Most likely English (US)
- Select your keyboard layout from the menu and press enter.
- Most likely English (US)
- Enter a name for the appliance when prompted. (This can be changed later.)
-
- Enter a full name for the new user when prompted.
- The default name for installations of Valt by IVS is IVS Admin
- Enter a username for the new user when prompted.
- The default name for installations of Valt by IVS is ivsadmin
- Enter a password for the new user when prompted.
-
- Reenter the password for the new user when prompted.
-
- When prompted to encrypt the home directory, select No.
-
- Verify the timezone detected is correct, then select yes.
-
- When prompted to partition the disks, select Guided – use entire disk
-
- Select the proper disk to partition. In most cases this will be the smaller of the available disks/array. The larger disks/array should be allocated for video storage and will be configured later.
-
- Select Yes to write the changes to the disk.
-
- Wait while the installer completes
-
- If you need to enter http proxy information, enter it now. It most cases this will not be required, you can just select continue.
-
- Wait while apt is configured.
-
- Select Install Security updates automatically.
-
- When prompted for software selection, choose OpenSSH server
- Select Continue
-
- Select Yes when prompted to install the GRUB boot loader
-
- Installation is now complete. Select continue to reboot the appliance.


Obtain an IP Address
If you specified a static ip address during installation, this section can be skipped. If you opted to use DHCP to configure the network interface you will need to determine the IP address of the server before proceeding.
To obtain the IP log in to the console and run the following command:
ifconfig
Network configuration will be displayed similar to the below screenshot.
[File:Install26.png]]
The active network adapter should have an ip address displayed. In this case it is eth0 and the address is 192.168.0.159.
The server should be configured with a static address. If you want to use DHCP, you should set up a DHCP reservation for the server so the IP address does not change.
Download Installation Package
- Connect to the server via SSH or log in to the teminal
- It is highly recommended that you connect via ssh so you can copy and paste the commands below
- Type apt-get install wget -y and press enter.
- Type wget --content-disposition https://dl.boxcloud.com/d/1/VF2lE8x5-KKi-T7WFknQN-hY3anpXpjPw3z8qJziuCP874mHaM2SlcrQjjVlMNdU56rDXsC4w5HTwACfGA0YTKlNQ0S3NvPMKNPp90tbHE9IYtcTLn2Zxf6p8njDukoa6hgBhUi3apC7VelPZ_k0a2i4FOJgrDj9aEUAD6rPD_598vGF8EDp2Yh625DpI9PE9QRWtxuc9xHTwqKprp7znnv19dqkFiSh2hdXh96J84-qFVBaVPksa4gKG8OZ8jTGthQXIibu3FQ6UKJAqQvyM3HcToMDypUIBBpGB2abcFKwGHdickoHbpw2QuBLYnq7JZzuTrFZOQh9_JyacCT6qXw6HYut0864mRnoUqgJBqaUu95EkAs0yGBRyIT4GF6IHu_fs0cYtmRVcLKGwG6HiWLgRdKZ10FyPy4WP099160T5dmC-zJLZVnJP87fngxKHwtinsKD0SuyLTOhVcabj--on4z15k6P0WCnnrVgmKhWQJQltqsTMAewBFstSepVQ1PyKpsx3r1B9dkD_pMdxtJQykYkSQHvmI9Bmv9cv5t_CortbFq4j6WygI-cPLDA-G2uFCUnuThPYehpgcbZihJ6XIDg13DpYXdqFHHcbgwbJuwj733ctkm9lL8AsO-6s74goZADnoIN0BKmgS0CAOF8gY3j8L6PTLdbDNdi6wxOssksKzTyxtH3BQsdvZIK2CD2dGx0UQGzDpICNZCHk7RROV8CB1XWKBGWAF1zARgNIxjf2FjlsGc1kcs6vD2CVc53SdmbzUAYLpwTiaWA3f_LcMbfutfLEX5Gzxm5xj6Cpwt0PvciRH-pvjHy0K5AsWrbV4Y5KZ1cHB284aTO8A8CD1pwkZ1OV6jzOtGmffUvamlv_-lLrpzWs3XIoc5p8L5VKfASMIzqVEfgRIQbBTeldQse4SbrwKPNqdLjsTmrCCrEpiPAC6NLJByhcpJtC6kHsCf_txe797FWai0GgUUPPlLEwbmmIA8NpRBJtQGCgq-z9mlKeHUEsdq2OmeZ5Wg-HVIQsHeFADnvhp90vX0JhfbpBsC_S7BSKG82gJ24aYgKZprv2ZKb6fiT44Wetb9WVgoN2BaproRnAEbkrAKcRtay/download -O ValtInstall and press enter.
- Type tar -xvf ValtInstall.tar.gz and press enter.
Install Valt
- Connect to the server via SSH or log in to the teminal
- Type cd ValtInstall and press enter.
- Type chmod +x ValtSetup and press enter.
- Type sudo ./ValtSetup and press enter.
- When prompted enter the password for your user account.
-
- When prompted by the Wowza EULA, press Q to skip to the bottom of the agreement.
-
- Type yes and press enter.
-
- When prompted for a username enter one.
- The default username for an IVS Valt install for Wowza is root
- When prompted for a password enter one.
- The default password for an IVS Valt install for Wowza is admin51
- When prompted confirm the password.
-
- When prompted for a Wowza license key enter: ET2A4-6vG9p-c4txQ-ucAWD-KybPJ-uwKbM-8GGQEAyZQwrm
- The purpose of this key is just to complete the Wowza Streaming Engine installation. This key will be replaced later on in the installation process.
- When prompted to start the streaming service on reboot, type yes and press enter.
-
- Enter a password for the MySQL root user.
- The default password for an IVS Valt install for MYSQL is admin51
- Repeat the password when prompted.
-
- When prompted to configure phpmyadmin, select apache2
-
- Select Yes when prompted
-
- Enter the MySQL root password defined previously.
-
- When prompted enter a password for phpmyadmin to communicate with MySQL
- The default password for an IVS Valt install for phpmyadmin to communicate with MYSQL is admin51
- Confirm the password when prompted.
-
- When prompted, press enter to select the default for all options.
-
- Press enter to continue
-
- Enter an administrator password for your ldap directory when prompted.
- This will not be used, so any password can be entered here.
- The default password for an IVS Valt install for ldap is admin51
- Confirm the password.
-
- When prompted enter admin for the email.
- When prompted enter admin for the password.


Configure Storage
If video files will be stored on the same drive as the OS, only the following command needs to be run from the terminal:
sudo ./Storage
The following steps should be completed only if you have a separate drive (physical or virtual) for storing the video files.
- Type sudo lshw -C disk and press enter.
-
- You should now see a list of the available disks on the machine. Locate the disk you want to provision for storage in the list. In this case it is /dev/sdb
- Type sudo parted /dev/sdb and press enter.
- Replace /dev/sdb with the appropriate disk identified in step 2.
- You will now be taken to a GNU Parted prompt
- Type mklabel gpt and press enter.
- Type mkpart pri 1 -1 and press enter.
- Type quit and press enter.
- Type sudo mkfs -t ext4 /dev/sdb1 and press enter.
- Replace /dev/sdb1 with the appropriate disk identified in step 2.
- Type sudo blkid and press enter.
- This will display the UUIDs for each partition. Note the UUID for the partition you just formatted.
- Type sudo nano /etc/fstab and press enter.
-
- Add a line for the partition you just created. It should read similar to the following:
- UUID=cd07f82a-307c-46e9-8b80-a7859335c3a9 /usr/local/WowzaStreamingEngine/content ext4 defaults 0 2
-
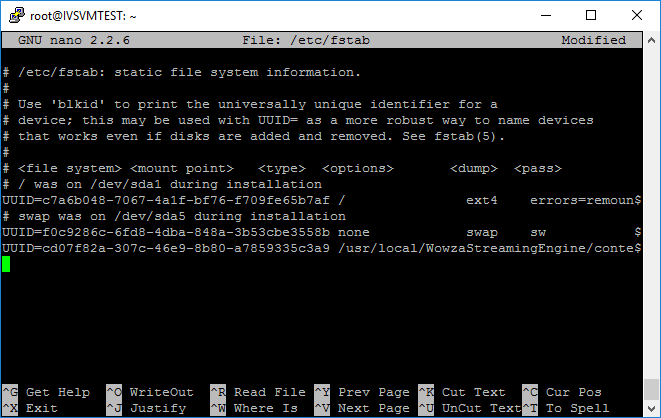
- Press CTRL-X
- Enter Y to save.
- Do not change the file name and press enter
- Type sudo mount /dev/sdb1 /usr/local/WowzaStreamingEngine/content and press enter.
- Replace /dev/sdb1 with the appropriate disk identified in step 2.
- Type sudo lsblk and press enter.
-
- The results should be similar to the above picture where sdb1 is mounted under /usr/local/WowzaStreamingEngine-4.0.6/content
- Type sudo ./Storage and press enter.
- Type sudo reboot and press enter.


Install the Wowza Streaming Engine License
- Open a web browser and navigate to http://IPAddress:8088
- Replace IPAddress with the IP Address of the server.
-
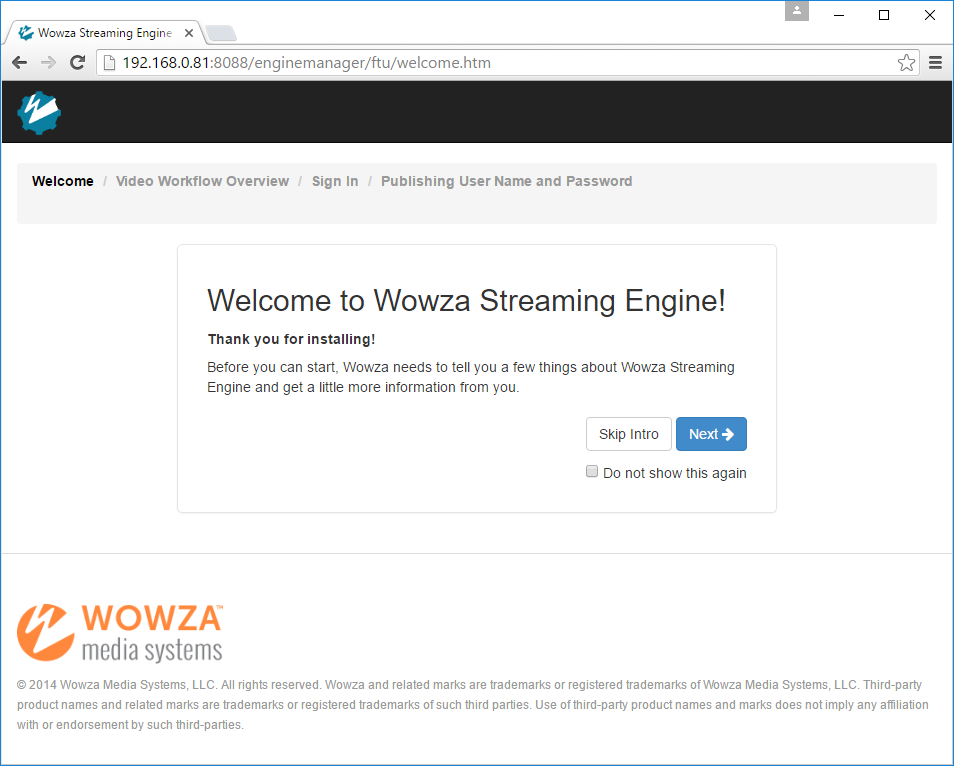
- Click Skip Intro.
-
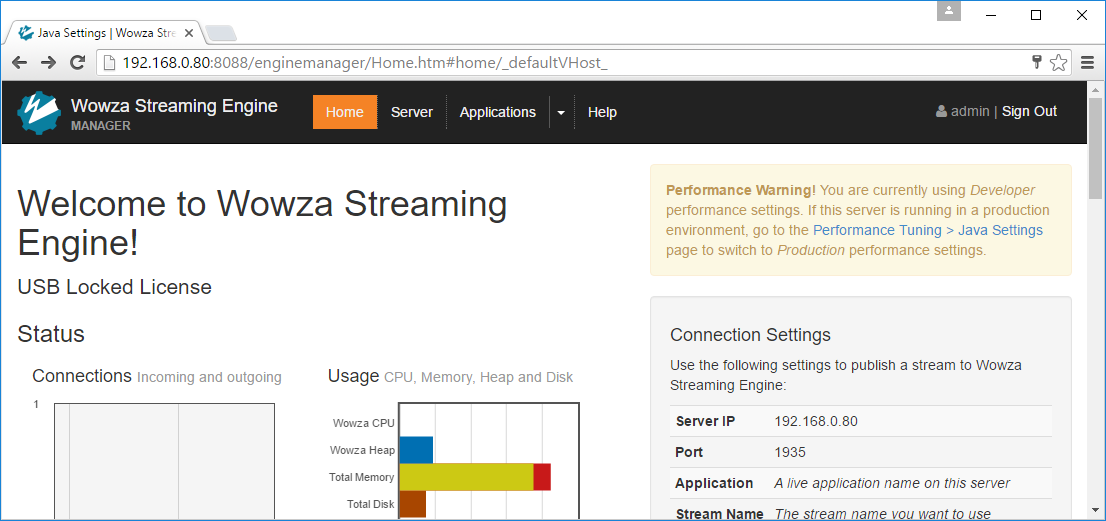
- Sign in using the username and password defined earlier for Wowza.
-
- Copy and paste the Wowza License Key into the box provided.
- If you were provided with a USB key by IVS, the USB key must already be inserted into the appliance.
- You will be returned to the sign in page.
- Sign back in to the Wowza web console.
- If you are returned to the license page, the license was not accepted.
- Check to make sure the USB key is inserted.
- Check to make sure there are no typos or leading or trailing spaces.
- Reboot the server
-
- If you are returned to the license page, the license was not accepted.
- Click on Performance Tuning > Java Settings
-
- Click Edit
-
- Select Production Level
- Click Save
-
- You will be prompted to restart, click Restart Now


Install the Valt Camera License
- Access the Valt Server Command Line Menu.
- This menu is presented automatically at the Valt server terminal. It can also be accessed via ssh by running the following command from the prompt:
- sudo /usr/local/valt/bin/Menu
-

- Enter Option 3 for Valt Configuration
-
- Enter Option 1 for Install License
-
- Enter your license provided by IVS and press enter.
- You will be returned to the menu.


