Difference between revisions of "Simple Configuration with EQ and Compression"
IVSWikiBlue (talk | contribs) |
IVSWikiBlue (talk | contribs) (→Tesira Software) |
||
| (8 intermediate revisions by the same user not shown) | |||
| Line 1: | Line 1: | ||
=Description/Objective= | =Description/Objective= | ||
| − | In this example, we will be | + | In this example, we will be connecting one microphone to one camera and using the Tesira Forte DSP to reduce the amount of white noise. |
=Physical Wiring/Line Diagram= | =Physical Wiring/Line Diagram= | ||
| − | + | We can really use whichever inputs and outputs we’d like, so let’s use input 1 and output 1 to keep things simple. When we terminate our cables, the mic will go into Orange Input 1 and the audio line to the camera will go into Black Output 1. | |
[[File:Simple_Config_Line_Diagram_2.png|link=https://ipivs.com/wiki/images/3/3a/Simple_Config_Line_Diagram_2.png|500px]] | [[File:Simple_Config_Line_Diagram_2.png|link=https://ipivs.com/wiki/images/3/3a/Simple_Config_Line_Diagram_2.png|500px]] | ||
| Line 10: | Line 10: | ||
==Additional Blocks== | ==Additional Blocks== | ||
| − | # If we've completed our physical connections, open the Tesira software and start building a configuration | + | # If we've completed our physical connections, open the Tesira software and start building a configuration. |
| − | # In this configuration we'll be using the following blocks | + | # In this configuration we'll be using the following blocks: |
#* TesiraFORTE CI block | #* TesiraFORTE CI block | ||
| − | #* Peak Meter x | + | #* Peak Meter x 3 |
#* Matrix Mixer with at least 1 input and 1 output, with one extra output | #* Matrix Mixer with at least 1 input and 1 output, with one extra output | ||
| − | |||
#* Uber Filter with as many as 6 filters | #* Uber Filter with as many as 6 filters | ||
#* Compressor with "ganged mode" and "advanced curve" | #* Compressor with "ganged mode" and "advanced curve" | ||
#* Level block | #* Level block | ||
| − | |||
#Connect the blocks as follows (from the previous example): | #Connect the blocks as follows (from the previous example): | ||
#* The Tesira Input block will already be connected to the AEC block, so connect the first peak meter to the Input block also. This will help us to be sure we have the proper levels set on the preamp. More on that in a minute. | #* The Tesira Input block will already be connected to the AEC block, so connect the first peak meter to the Input block also. This will help us to be sure we have the proper levels set on the preamp. More on that in a minute. | ||
| − | #* Connect the AEC block to the Matrix Mixer. | + | #* Connect the AEC block to the Uber Filter, then the Filter to the Level Block. |
| − | #* Connect output 1 from the mixer to port 1 on the Tesira Output block AND to the | + | #* Connect the Level Block to the Compressor and the second Peak Meter. |
| − | #* Connect the extra output from the Matrix Mixer to the AEC reference. We will not need to activate the Automatic Echo Cancellation feature in this example. However, Tesira will not allow us to delete the AEC reference block | + | #* Connect the Compressor to the Matrix Mixer. |
| − | + | #* Connect output 1 from the mixer to port 1 on the Tesira Output block AND to the third peak meter. This way we can make sure to reach the right audio levels before we send it to the camera. | |
| − | + | #* Connect the extra output from the Matrix Mixer to the AEC reference. We will not need to activate the Automatic Echo Cancellation feature in this example. However, Tesira will not allow us to delete the AEC reference block. It also will not compile the configuration if any blocks are not connected (including the AEC reference block.) So use the extra output from the mixer as a "dummy output" channel. Do not send any audio to this channel. | |
| − | + | ||
When we're complete, our file should look something like this: | When we're complete, our file should look something like this: | ||
| − | + | {{img | file = One_Complex_Blocks.png}} | |
| Line 39: | Line 37: | ||
This section will provide further thought process behind the audio processing blocks, and how to adjust settings. | This section will provide further thought process behind the audio processing blocks, and how to adjust settings. | ||
| − | + | {{img | file = One_Complex_Config.png}} | |
#Here is our Uber Filter, which offers the opportunity to add multiple EQ adjustments. Each EQ parameter will allow us to either boost or cut a range of frequencies to optimize the sound captured. Often times, the audio from a room mic will need some sweetening, mostly due to the symptoms of a physical environment. We should add this before the mixer, so it affects only the microphone audio. More on EQ in the next image. | #Here is our Uber Filter, which offers the opportunity to add multiple EQ adjustments. Each EQ parameter will allow us to either boost or cut a range of frequencies to optimize the sound captured. Often times, the audio from a room mic will need some sweetening, mostly due to the symptoms of a physical environment. We should add this before the mixer, so it affects only the microphone audio. More on EQ in the next image. | ||
| Line 46: | Line 44: | ||
===EQ/Uber Filter=== | ===EQ/Uber Filter=== | ||
| − | Here I make recommendations and outline each EQ setting. Keep in mind, the settings will be environment-dependent, so it is crucial to actively listen to the audio on an install, but these settings are a good place to start. | + | Here I make recommendations and outline each EQ setting. Keep in mind, the settings will be environment-dependent, so it is crucial to actively listen to the audio on an install, but these settings are a good place to start. Use the "Bypass" buttons to hear an A/B comparison of your changes to the unaltered audio. |
| − | + | {{img | file = Tesira_EQ3.png}} | |
#High pass: This will allow any frequencies higher than what we have chosen, to “pass”. Meaning, frequencies lower than that will be removed. This will help us clean out low rumble of HVAC, vending machines, fridges; if there happens to be one in an adjacent break room. Removing frequencies below 150-200 Hz is usually appropriate. | #High pass: This will allow any frequencies higher than what we have chosen, to “pass”. Meaning, frequencies lower than that will be removed. This will help us clean out low rumble of HVAC, vending machines, fridges; if there happens to be one in an adjacent break room. Removing frequencies below 150-200 Hz is usually appropriate. | ||
| − | #Low boost: This | + | #Low boost: This is by no means crucial, but it will help provide some fullness to the dialogue. Since the microphone is as far away as 10 feet from the people in the room, the fullness and richness can be lost a bit. At the office at IVS, I found about 400-450 was a good place to boost. |
#Mids dip: This is a place where the audio can sound “boxy” or thin. Again, this is not crucial, but I prefer to drop these frequencies a bit for more accurate sound. At the office, I had this EQ set at about 850-900 Hz. | #Mids dip: This is a place where the audio can sound “boxy” or thin. Again, this is not crucial, but I prefer to drop these frequencies a bit for more accurate sound. At the office, I had this EQ set at about 850-900 Hz. | ||
#High frequency white noise dip: If the Noise Reduction settings on the AEC Block haven’t solved everything, we may still find there is white noise in the room. If the walls are particularly close, or flat and empty, we may find that this is the case. At the office, I found that about 9000-9500 Hz was where the white noise lives. | #High frequency white noise dip: If the Noise Reduction settings on the AEC Block haven’t solved everything, we may still find there is white noise in the room. If the walls are particularly close, or flat and empty, we may find that this is the case. At the office, I found that about 9000-9500 Hz was where the white noise lives. | ||
| Line 59: | Line 57: | ||
Below is an example of a "surgical" EQ cut, at 1000 Hz: | Below is an example of a "surgical" EQ cut, at 1000 Hz: | ||
| − | + | {{img | file = Tesira_EQ_Surgery.png}} | |
| Line 65: | Line 63: | ||
Here is a how-to guide and a brief explanation of compression, a surprisingly difficult topic. | Here is a how-to guide and a brief explanation of compression, a surprisingly difficult topic. | ||
| − | + | {{img | file = Tesira_Compressor3.png}} | |
| − | # | + | #Peak compression: This is an aggressive compression component, designed to crush loud noises like a door slamming or Adonis laughing while standing directly under the microphone. This is also known as an "upper ceiling limiter". |
#Proximity compression: This is a light compressor, which will apply a soft reduction, for dialogue within a couple feet of the microphone, that would normally be louder. | #Proximity compression: This is a light compressor, which will apply a soft reduction, for dialogue within a couple feet of the microphone, that would normally be louder. | ||
#Normal room volume: This section indicates no change/no compression. This is our sweet spot for our dialogue – anyone talking in our area of interest should show up in this section, so we have natural, unaltered sound. | #Normal room volume: This section indicates no change/no compression. This is our sweet spot for our dialogue – anyone talking in our area of interest should show up in this section, so we have natural, unaltered sound. | ||
Latest revision as of 10:10, 10 May 2022
Contents
Description/Objective
In this example, we will be connecting one microphone to one camera and using the Tesira Forte DSP to reduce the amount of white noise.
Physical Wiring/Line Diagram
We can really use whichever inputs and outputs we’d like, so let’s use input 1 and output 1 to keep things simple. When we terminate our cables, the mic will go into Orange Input 1 and the audio line to the camera will go into Black Output 1.

Tesira Software
Additional Blocks
- If we've completed our physical connections, open the Tesira software and start building a configuration.
- In this configuration we'll be using the following blocks:
- TesiraFORTE CI block
- Peak Meter x 3
- Matrix Mixer with at least 1 input and 1 output, with one extra output
- Uber Filter with as many as 6 filters
- Compressor with "ganged mode" and "advanced curve"
- Level block
- Connect the blocks as follows (from the previous example):
- The Tesira Input block will already be connected to the AEC block, so connect the first peak meter to the Input block also. This will help us to be sure we have the proper levels set on the preamp. More on that in a minute.
- Connect the AEC block to the Uber Filter, then the Filter to the Level Block.
- Connect the Level Block to the Compressor and the second Peak Meter.
- Connect the Compressor to the Matrix Mixer.
- Connect output 1 from the mixer to port 1 on the Tesira Output block AND to the third peak meter. This way we can make sure to reach the right audio levels before we send it to the camera.
- Connect the extra output from the Matrix Mixer to the AEC reference. We will not need to activate the Automatic Echo Cancellation feature in this example. However, Tesira will not allow us to delete the AEC reference block. It also will not compile the configuration if any blocks are not connected (including the AEC reference block.) So use the extra output from the mixer as a "dummy output" channel. Do not send any audio to this channel.
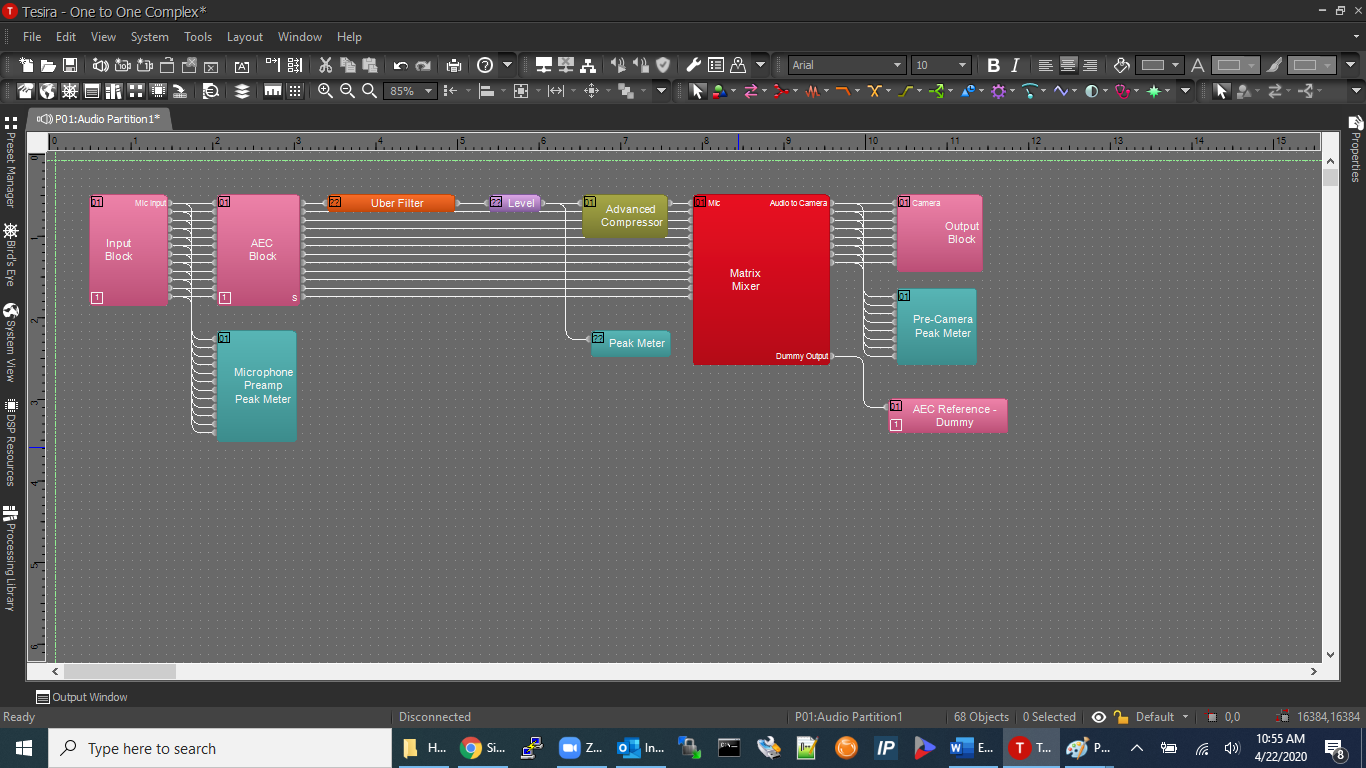
When we're complete, our file should look something like this:
Processing Blocks in Tesira
This section will provide further thought process behind the audio processing blocks, and how to adjust settings.
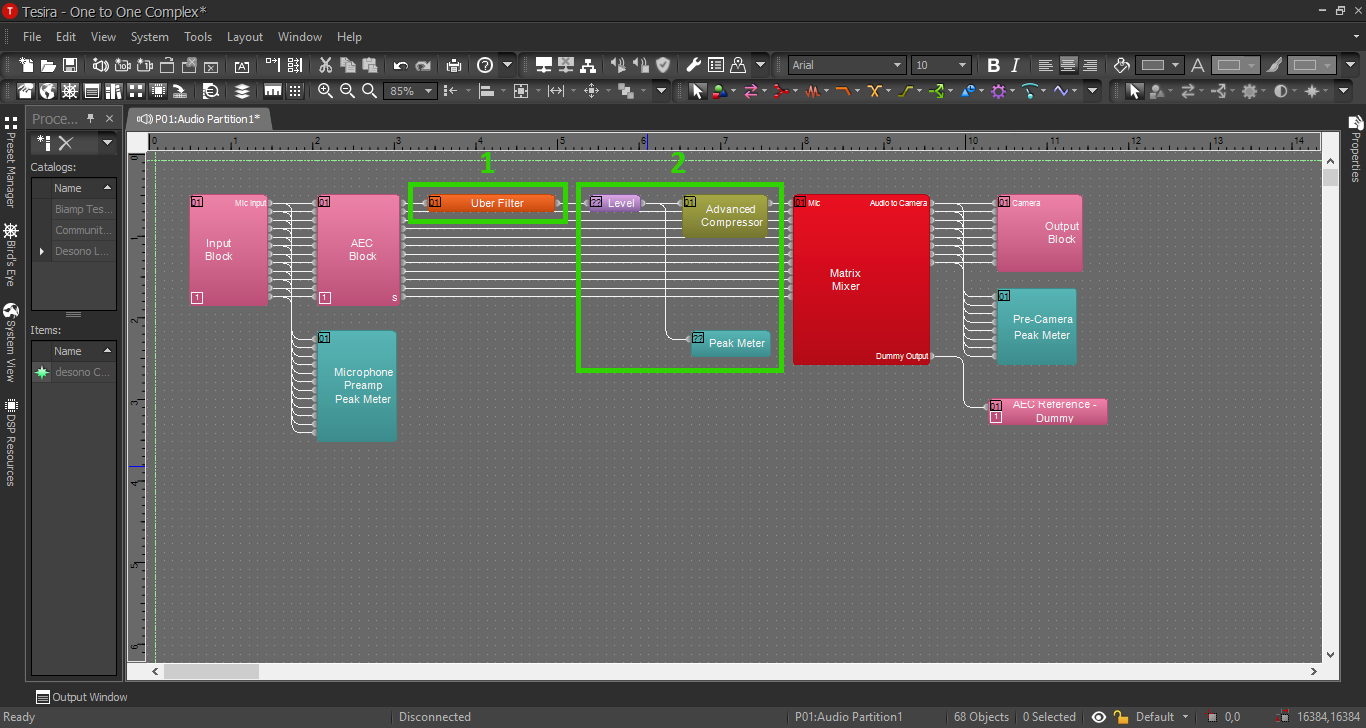
- Here is our Uber Filter, which offers the opportunity to add multiple EQ adjustments. Each EQ parameter will allow us to either boost or cut a range of frequencies to optimize the sound captured. Often times, the audio from a room mic will need some sweetening, mostly due to the symptoms of a physical environment. We should add this before the mixer, so it affects only the microphone audio. More on EQ in the next image.
- Level/Peak meter/Compressor: This is a set of blocks that work together. The purpose of the compressor is to keep the audio signal from getting too loud for the camera input, also known as “clipping”; and to raise the volume of the dialog so our customers don't blow their eardrums when they switch back to their favorite YouTube video or Rebecca Black song. The level block and peak meter will assist us in optimizing the audio level before it reaches the compressor. More on compression later.
EQ/Uber Filter
Here I make recommendations and outline each EQ setting. Keep in mind, the settings will be environment-dependent, so it is crucial to actively listen to the audio on an install, but these settings are a good place to start. Use the "Bypass" buttons to hear an A/B comparison of your changes to the unaltered audio.
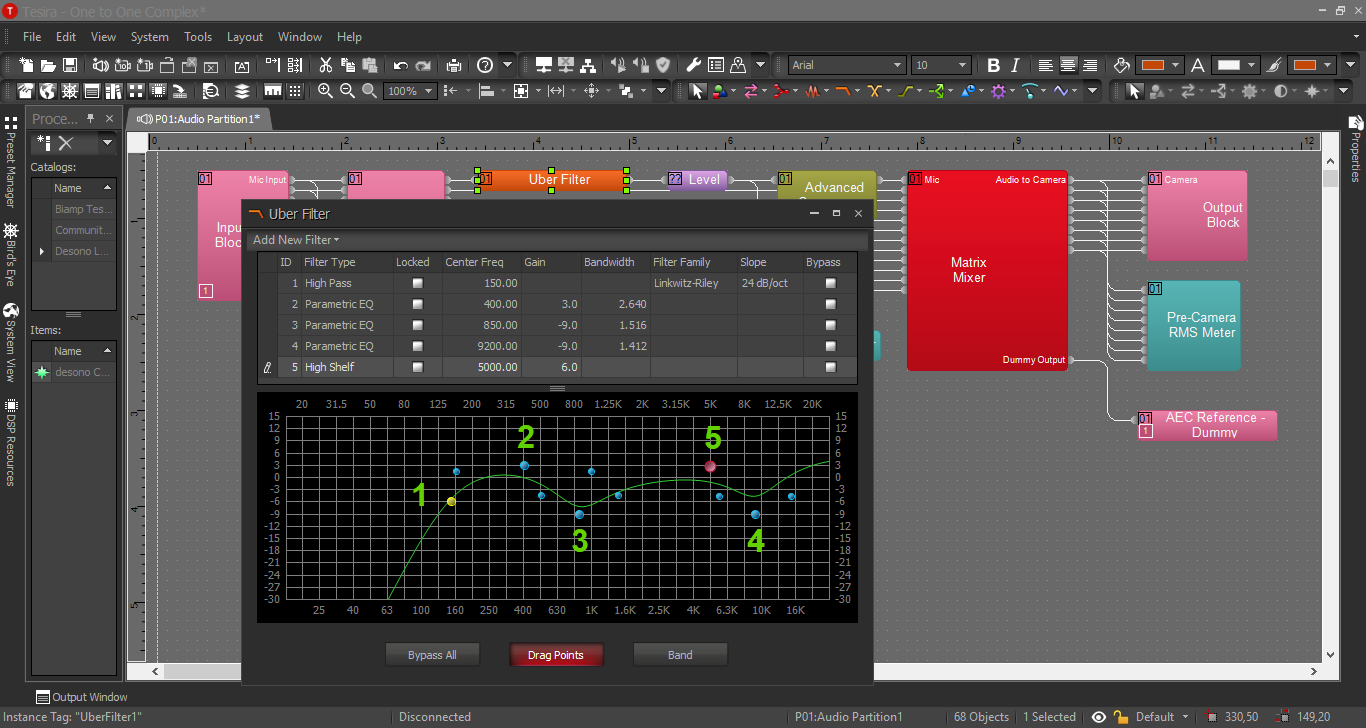
- High pass: This will allow any frequencies higher than what we have chosen, to “pass”. Meaning, frequencies lower than that will be removed. This will help us clean out low rumble of HVAC, vending machines, fridges; if there happens to be one in an adjacent break room. Removing frequencies below 150-200 Hz is usually appropriate.
- Low boost: This is by no means crucial, but it will help provide some fullness to the dialogue. Since the microphone is as far away as 10 feet from the people in the room, the fullness and richness can be lost a bit. At the office at IVS, I found about 400-450 was a good place to boost.
- Mids dip: This is a place where the audio can sound “boxy” or thin. Again, this is not crucial, but I prefer to drop these frequencies a bit for more accurate sound. At the office, I had this EQ set at about 850-900 Hz.
- High frequency white noise dip: If the Noise Reduction settings on the AEC Block haven’t solved everything, we may still find there is white noise in the room. If the walls are particularly close, or flat and empty, we may find that this is the case. At the office, I found that about 9000-9500 Hz was where the white noise lives.
- High shelf: A high shelf will boost all the frequencies above a point we choose. It will boost all those frequencies the same amount (differs from a pass filter; a pass filter will remove those frequencies exponentially.) This will provide clarity to the dialogue, to keep it from sounding dull or muffled. At the office, I boosted above 5000. (You’ll notice this is actually below the frequency setting for the HF noise dip I mentioned in #4. In this case, the white noise was not too noticeable until I boosted above 5K, so the white noise dip was then needed.)
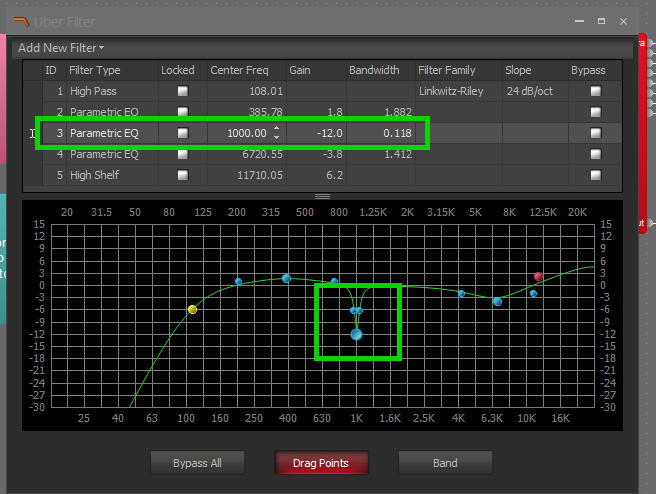
- You may notice that the curvature of these boosts and cuts is fairly broad; many frequencies are impacted by our settings. This is almost always what you are aiming for. In infrequent cases, we may find that there is a sound at a very specific frequency. This will almost always be caused by some device; a beeping or a whining at a certain frequency that may be distracting. To cut a noise like this, we can pull the curve together with the handles of each EQ to create a more “surgical” cut. Then simply sweep the EQ across the spectrum until you find that frequency.
Below is an example of a "surgical" EQ cut, at 1000 Hz:
Compressor/Peak Meter/Level Block
Here is a how-to guide and a brief explanation of compression, a surprisingly difficult topic.
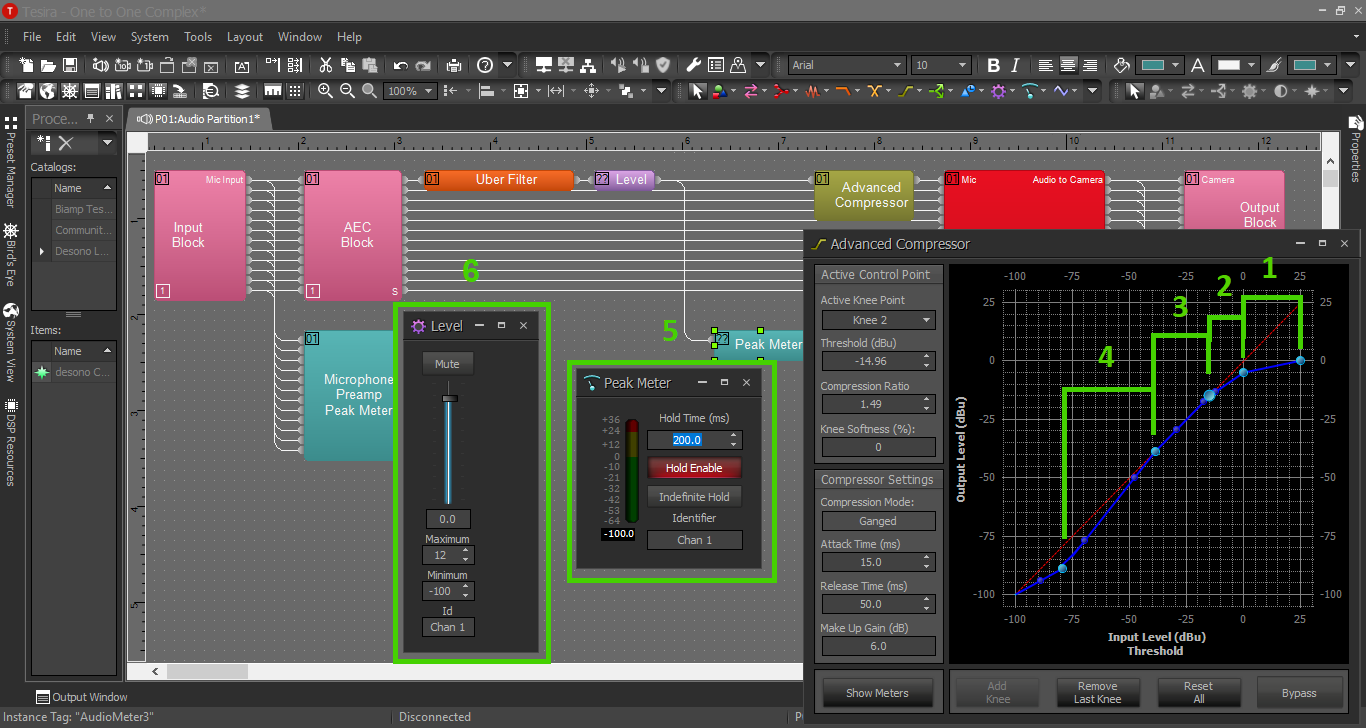
- Peak compression: This is an aggressive compression component, designed to crush loud noises like a door slamming or Adonis laughing while standing directly under the microphone. This is also known as an "upper ceiling limiter".
- Proximity compression: This is a light compressor, which will apply a soft reduction, for dialogue within a couple feet of the microphone, that would normally be louder.
- Normal room volume: This section indicates no change/no compression. This is our sweet spot for our dialogue – anyone talking in our area of interest should show up in this section, so we have natural, unaltered sound.
- Soft gate for localization: A gate is the opposite of a compressor; the quieter something gets, the more the device drops its volume. The purpose of this is to drop the volume of the white noise in the room when no one is talking, and to create more localization of sound. We can mimic the effect of a shotgun microphone in this way; people talking out in the hallway or on the other half of a large simulation room, outside our area of interest, will be even quieter.
- Peak meter: Since the range we set on the compressor for no change is between about -12 to -30 dB, our goal is for most of the natural dialogue in the room to fall in that range. This meter will help us judge the volume as it enters the compressor. If the dialog is not between that range of -12 to -30 on the meter, we may want to raise or lower the level block to reach this range.
- Level block: This allows us to update the level going into the compressor. If the dialogue isn’t quite in the optimal range, we can raise or lower the overall level to ensure this.
- If we find that the volume is extremely low and need to boost even more than this level block allows, we may have the pre-amp gain too low on the input block.