Difference between revisions of "User Interface Microphone Selector"
IVSWikiBlue (talk | contribs) (→Tesira) |
IVSWikiBlue (talk | contribs) (→Components) |
||
| (17 intermediate revisions by the same user not shown) | |||
| Line 1: | Line 1: | ||
=Description/Objective= | =Description/Objective= | ||
| − | The Biamp Canvas User Interface software will allow | + | The Biamp Canvas User Interface software will allow a customer access to almost any parameters in the Tesira configuration. One of two main use cases for IVS customers will be a microphone selector - the ability to select between multiple microphones to listen for observation. |
In this section, we will build the corresponding Canvas UI for the Microphone Selector Tesira config. There are 16 cameras, each with their own microphone, and an adjacent observation room with 2 OWISP speakers. The customer would like to solo one mic at a time through their overhead speakers, mute all mics, and adjust the speaker levels. | In this section, we will build the corresponding Canvas UI for the Microphone Selector Tesira config. There are 16 cameras, each with their own microphone, and an adjacent observation room with 2 OWISP speakers. The customer would like to solo one mic at a time through their overhead speakers, mute all mics, and adjust the speaker levels. | ||
| Line 12: | Line 12: | ||
=Components= | =Components= | ||
| − | Open the | + | Open the Microphone Selector Tesira configuration. |
==Tesira== | ==Tesira== | ||
| − | + | There will be 2 components of interest in the Tesira config. | |
| + | # The Level Block will become the mute button and volume control. | ||
| + | # The Standard Mixer, which determines what audio channels pass to the speakers. | ||
| − | + | Copy these blocks and paste them into a blank Canvas file. | |
| − | |||
| − | |||
| − | |||
| − | |||
| − | + | {{img | file = V2_Channel_Selector_Config_2.png}} | |
==Canvas Blocks== | ==Canvas Blocks== | ||
| − | + | Standard Mixer and Level Block as they first appear in Canvas. | |
| + | |||
| + | {{img | file = Canvas_Mic_Selector_Blocks.png}} | ||
| + | |||
| + | Ungroup the Buttons. Remove the Level block name, the Mixer matrix, the output components, and the level meters of the input channels. | ||
| − | + | Select each Mute button and update display properties. Since these are Mute buttons that we will use as Activate buttons, the parameters will be backwards. | |
| + | {{img | file = Canvas_Mic_Selector_Mute.png}} | ||
| + | #* In "Text Off", type Active | ||
| + | #* In "Text On", type Muted | ||
| + | #* In "Background Off Color", select green or blue (active state) | ||
| + | #* In "Backlight On Color", select dark grey or even red (inactive state) | ||
| − | An appropriate layout might look something like this: | + | ==Appearance== |
| + | Alter the elements to create an effective User Interface for the customer. An appropriate layout might look something like this: | ||
| − | [[File: | + | [[File:Canvas_Mic_Selector_Config_File_2.png|link=]] |
# Level Block in Canvas. When ungrouped, the mute button can be separated from the level slider. | # Level Block in Canvas. When ungrouped, the mute button can be separated from the level slider. | ||
| − | # | + | # Simple image components in Canvas, for branding and appearance purposes. Upload these when creating image elements. |
| − | |||
| − | |||
# Exit button. Once the UI config is complete, it should be set up to auto launch with a desktop icon (instructions in another section). The customer will not (or should not) have access to any menu, so an Exit button will be necessary (instructions in another section). | # Exit button. Once the UI config is complete, it should be set up to auto launch with a desktop icon (instructions in another section). The customer will not (or should not) have access to any menu, so an Exit button will be necessary (instructions in another section). | ||
| + | |||
| + | =Canvas Settings= | ||
| + | Click the image below for Canvas Settings and Auto-Connect: | ||
| + | |||
| + | [[File:Canvas_Options.png|link=https://ipivs.com/wiki/Canvas_Settings]] | ||
Latest revision as of 13:21, 10 May 2022
Contents
Description/Objective
The Biamp Canvas User Interface software will allow a customer access to almost any parameters in the Tesira configuration. One of two main use cases for IVS customers will be a microphone selector - the ability to select between multiple microphones to listen for observation.
In this section, we will build the corresponding Canvas UI for the Microphone Selector Tesira config. There are 16 cameras, each with their own microphone, and an adjacent observation room with 2 OWISP speakers. The customer would like to solo one mic at a time through their overhead speakers, mute all mics, and adjust the speaker levels.
Physical Wiring
Physical wiring and the line diagram is available in the Tesira config section for this example, so this should already be complete.
The only other thing to keep in mind is: The computers with the Biamp UI will need to be able to reach the Tesira on the network. This should not typically be an IVS task, and should be up to the customer.
Components
Open the Microphone Selector Tesira configuration.
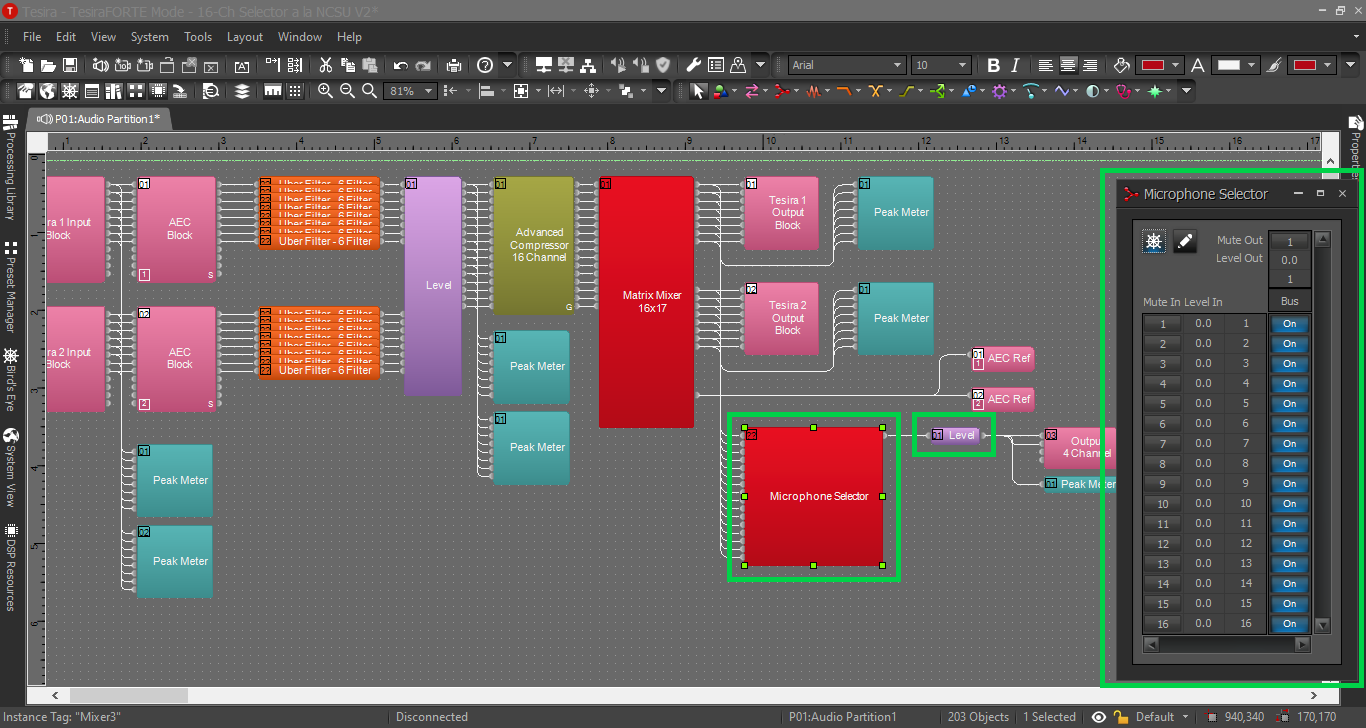
Tesira
There will be 2 components of interest in the Tesira config.
- The Level Block will become the mute button and volume control.
- The Standard Mixer, which determines what audio channels pass to the speakers.
Copy these blocks and paste them into a blank Canvas file.
Canvas Blocks
Standard Mixer and Level Block as they first appear in Canvas.
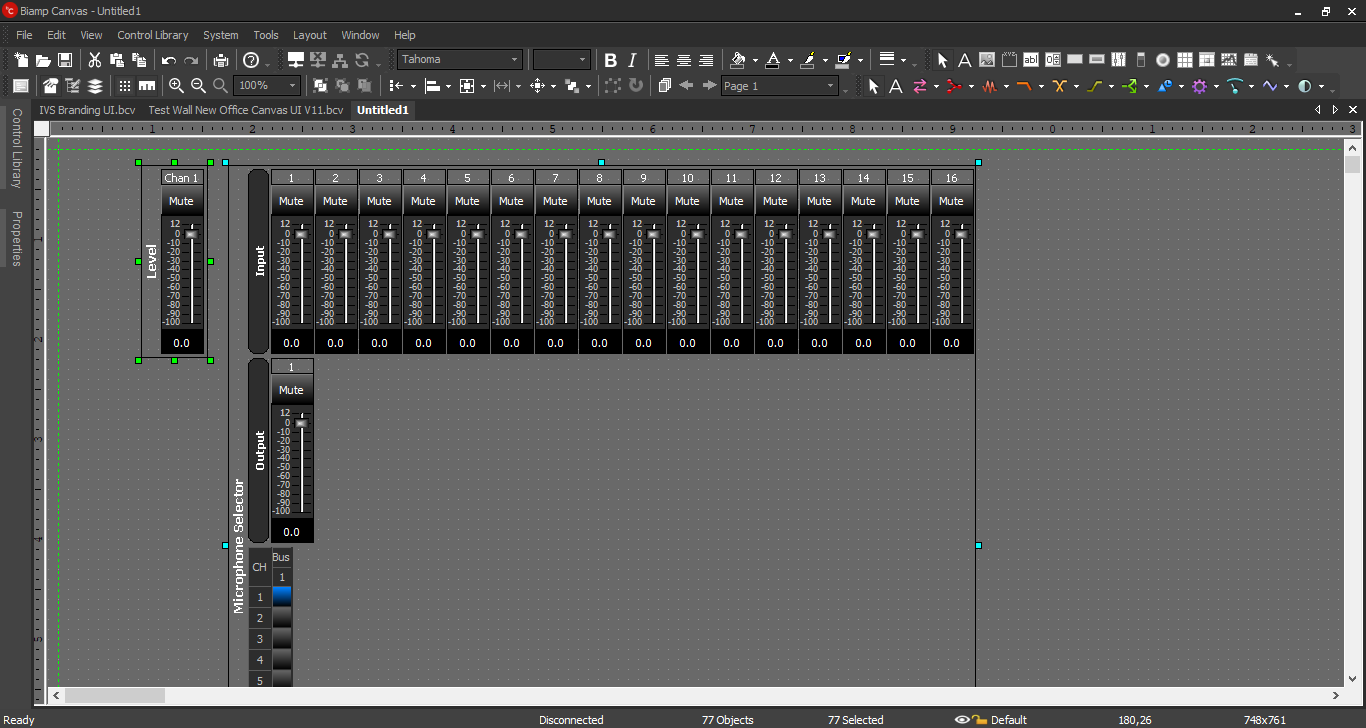
Ungroup the Buttons. Remove the Level block name, the Mixer matrix, the output components, and the level meters of the input channels.
Select each Mute button and update display properties. Since these are Mute buttons that we will use as Activate buttons, the parameters will be backwards.
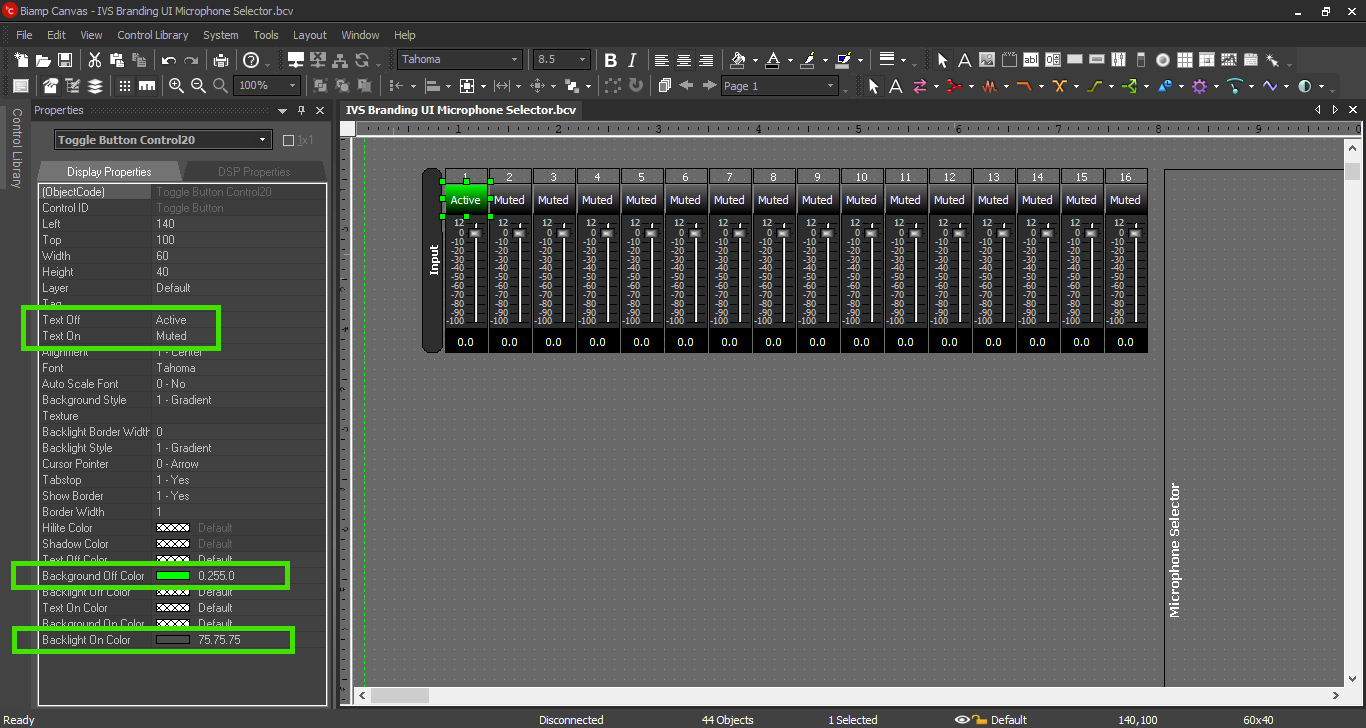
- In "Text Off", type Active
- In "Text On", type Muted
- In "Background Off Color", select green or blue (active state)
- In "Backlight On Color", select dark grey or even red (inactive state)
Appearance
Alter the elements to create an effective User Interface for the customer. An appropriate layout might look something like this:
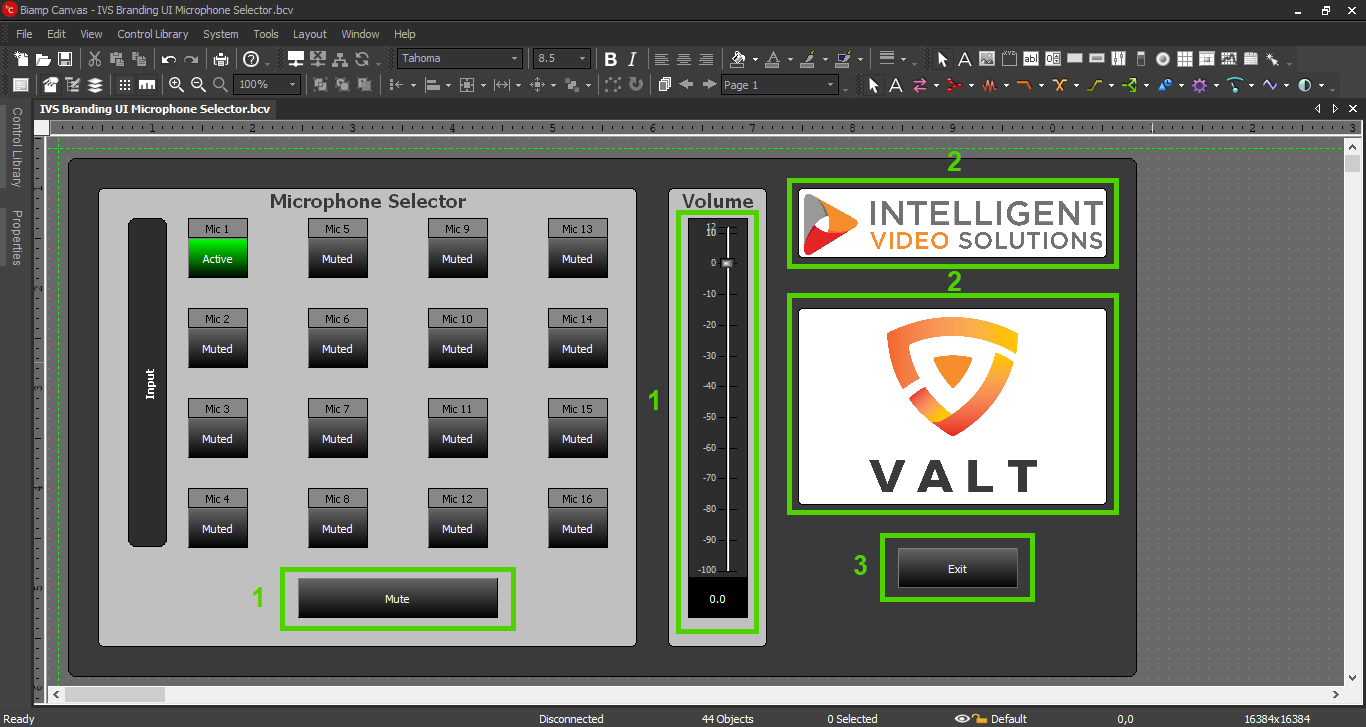
- Level Block in Canvas. When ungrouped, the mute button can be separated from the level slider.
- Simple image components in Canvas, for branding and appearance purposes. Upload these when creating image elements.
- Exit button. Once the UI config is complete, it should be set up to auto launch with a desktop icon (instructions in another section). The customer will not (or should not) have access to any menu, so an Exit button will be necessary (instructions in another section).
Canvas Settings
Click the image below for Canvas Settings and Auto-Connect:
