Valt Administrator Guide 5.0
General
The general section under Admin provides a snapshot of the software along with some management links as shown below.
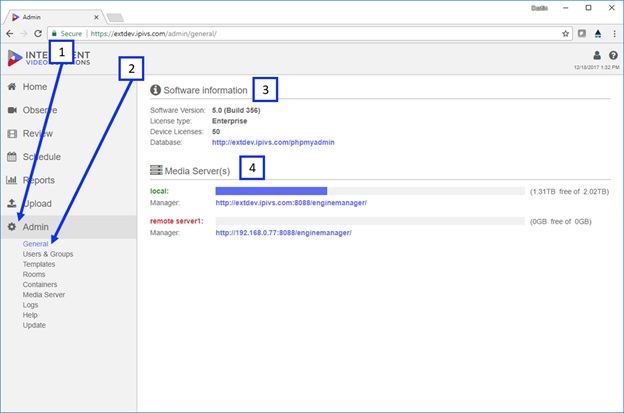
- ) Admin: If a user has administrative rights they will be able to click on the admin section.
- ) General Link: The default section that will load once a user clicks on admin is “General” assuming they have access to this admin section. The general system provides some basic application and system information.
- ) Software Information: This displays the software version, license type, number of licenses and a link to a database management tool (phpmyadmin).
- ) Media Server(s): This displays all the media servers associated with the software instance, the amount of storage used / remaining on each, and a management link for the video engine on each media server. Note if a media server is online it will have a green name, if it is offline the name will appear in red as shown above.
Templates
Templates are used to capture information and associate them with recordings. There are two types of templates: information and marker. The admin template section is used to create, delete, and edit templates in the system. Templates are assigned to a user group so different user groups can leverage different template types.
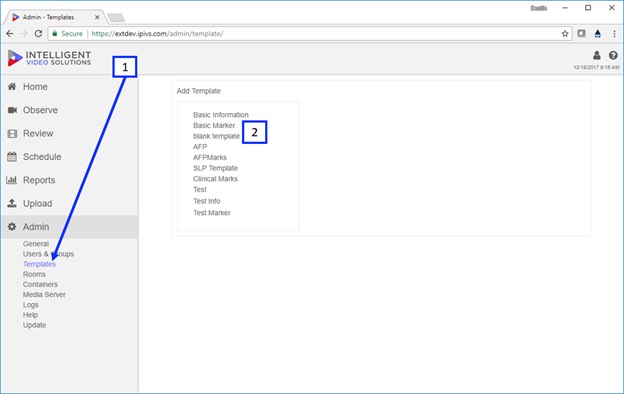
- ) Clicking on the templates link under Admin will take you to the section displayed above.
- ) The existing templates will be displayed in a list, to view or edit a template click on the name.
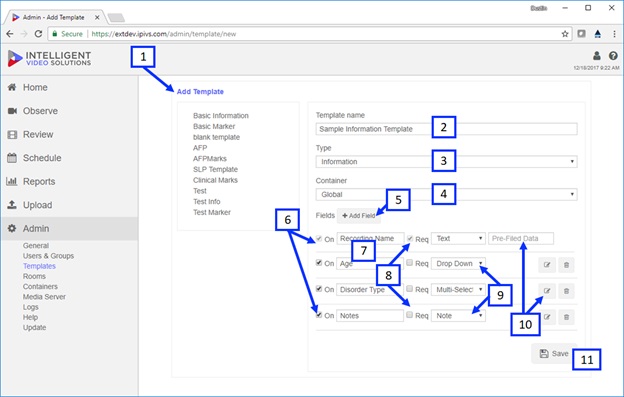
- ) Add Template: To create a new template click on the Add Template button.
- ) Template Name: This name is used as an identifier only when assigning the template to a user group.
- ) Template Type: There are two template types information and marker. Information ties data to the overall recording while markers are designed to tie data to specific points within the recording.
- ) Container: This specifies the container the template will use. Users are only able to see objects that are in the same container or a sub container.
- ) Add Field: This button will add another field to the template, there is no limit to the number of fields within a template.
- ) On: This checkbox enables the corresponding field. If this is unchecked the field will not be used.
- ) Field Name: This is a label for the field.
- ) Required Checkbox: If this is checked it will force a user to enter data into the corresponding field before they can continue.
- ) Field Type: This changes the type of field. We currently support Text, Drop Down, Audio, Note, Multi-Select, Quick Mark / Quick Record.
- ) Data: This can be left blank or can be used to pre-populate data into to the field depending on what field type is used.
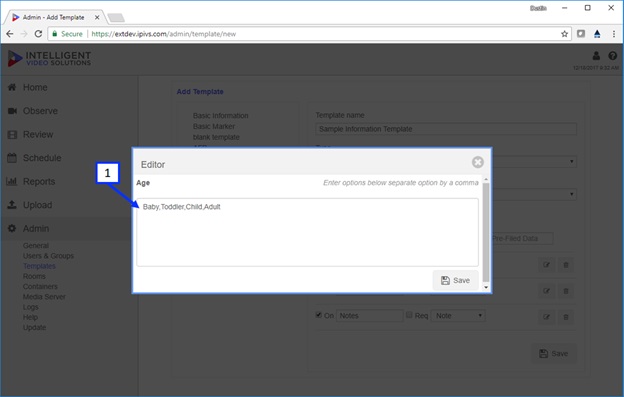
- ) If a Drop Down or Multi-Select field type is used the options must be defined in a format as shown above. It is important that data is separated only by a comma and spaces are not used.
Rooms
Rooms act as containers for a camera or group of cameras. Rooms can be recorded using a contact closure / card reader, schedule, or on demand through the user interface. Rooms are also assignable from a user permission perspective.
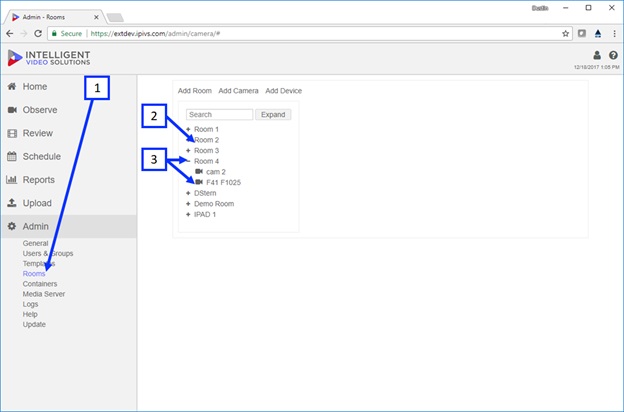
- ) Clicking on the Rooms link under Admin will take you to the section displayed above.
- ) Clicking on a room name will allow a user to edit the room name / settings.
- ) Expanding a room will reveal the camera(s) associated with a room, clicking on a camera will allow a user to edit the camera name / settings.
Clicking on a room name or clicking Add Room will pull up the room settings as shown below.
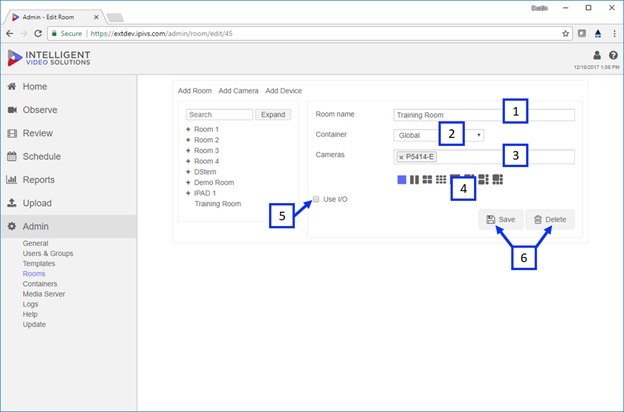
- ) Room Name: A room name can be entered here, this name is the identifier that will be used throughout the rest of the system.
- ) Container: This specifies the container the template will use. Users are only able to see objects that are in the same container or a sub container.
- ) Cameras: This is used to associate cameras to a room.
- ) View Type: This can be used to define a view type default for the room, if no option is selected the system will automatically use the assumed best fit view type for the number of cameras.
- ) Use I/O: This checkbox should be checked if you are using a push button to start / stop recordings. When this is checked a sub menu with options will appear.
- ) Save / Delete: Once a room is configured pressing save will save the changes.
