Compression Settings
Compressor/Peak Meter/Level Block
In any environment with sound sources at varying distances from the mic, the resulting audio volume will be highly dynamic, depending on the activity in the room. Compression is the process of altering the resulting volume of the audio signal. Compression can be used to limit the volume of loud noises, such as a door slamming shut or a person shouting loudly; or simply even out dialogue in a large room. It will also keep the audio signal from getting too loud for the camera input, also known as “clipping” or distorting.
Here is a how-to guide and a brief explanation of compression, a surprisingly difficult topic. Below is an example compressor that will work in most cases on a typical installation. The Level Block, Peak meter, and Compressor work together. The level block and peak meter will assist us in optimizing the audio level before it reaches the compressor.
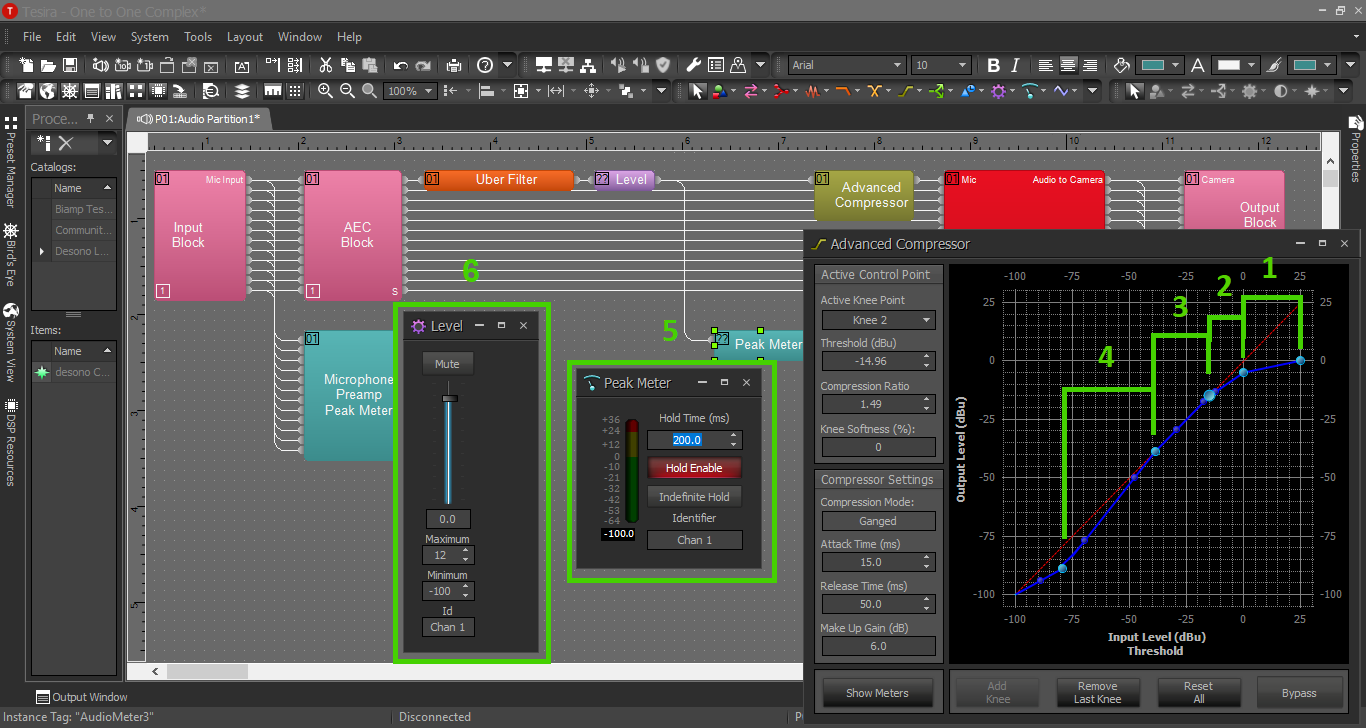
- Peak compression: Compression is a reduction in This is an aggressive compression component, designed to crush loud noises like a door slamming or a person shouting or laughing while standing directly under the microphone. This is also known as an "upper ceiling limiter".
- Proximity compression: This is a light compressor, which will apply a soft reduction, for dialogue within a couple feet of the microphone, that would normally be louder. This will even out the dialogue volume between the near and far areas of the room.
- Normal room volume: This section indicates no change/no compression. This is the sweet spot for dialogue – anyone talking in the area of interest (other than directly underneath the mic) should show up in this section, to achieve natural, unaltered sound.
- Soft gate for localization: A gate is the opposite of a compressor; the quieter something gets, the more the device drops its volume. The purpose of this is to drop the volume of the white noise in the room when no one is talking, and to create more localization of sound. This will mimic the effect of a shotgun microphone; people talking out in the hallway or on the other half of a large simulation room, outside our area of interest, will be even quieter. This is not a crucial step in most scenarios.
- Peak meter: Since the range we set on the compressor for no change is between about -12 to -30 dB, our goal is for most of the natural dialogue in the room to fall in that range. This meter will help us judge the volume as it enters the compressor. If the dialog is not between that range of -12 to -30 on the meter, we may want to raise or lower the level block to reach this range.
- Level block: This allows us to update the level going into the compressor. If the dialogue isn’t quite in the optimal range, we can raise or lower the overall level to ensure this.
- If we find that the volume is extremely low and need to boost even more than this level block allows, we may have the pre-amp gain too low on the input block.