IVS Wiki:Privacy Switch - Add Recipients
Introduction
Some of the rules point to a recipient at a specific IP address, so the camera must have a recipient set up, even for itself.
✎
In the case of a room with multiple cameras, the master camera will need a recipient set up for all other cameras in the room as well.
Adding Self
- Navigate to Setup → Events → Recipients.
- Click on Add.
- Add Self in the name field.
- In Recipient, type
http://IPADDRESS/axis-cgi/param.cgi
- Type in the login credentials for the camera.
- Click Test.
- Click Close.
Adding Remote Cameras
Fixed Cameras
- Click on Setup.
- Click on Events.
- Click on Recipients.
- Click on Add.
- Add Remote in the name field.
- For rooms with multiple remote cameras, be sure to give them unique names.
- In Recipient, type
http://IPADDRESS/axis-cgi/param.cgi
- Type in the login credentials for the camera.
- Click Test.
- Click Close.
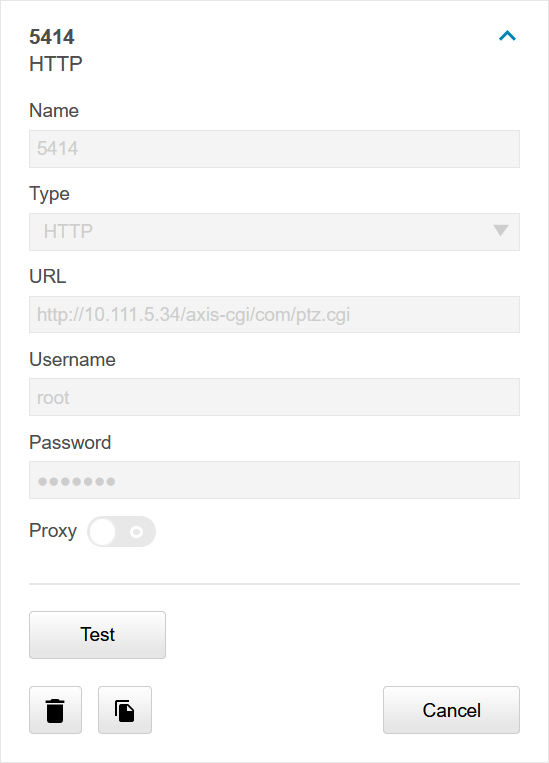
PTZ Cameras
When a PTZ camera is being used as a secondary camera, one must add a separate recipient, just for the PTZ rules, using the following information.
- Click on Setup.
- Click on Events.
- Click on Recipients.
- Click on Add.
- Add Remote PTZ in the name field.
- In Recipient, type
http://IPADDRESS/axis-cgi/com/ptz.cgi
- Type in the login credentials for the camera.
- Click Test.
- Click Close.
Image Example
Remote PTZ rules
To create the Remote PTZ rules, add the following parameters:
| Name | Value |
|---|---|
| action | update |
| gotoserverpresetname | presetname (typically named Privacy or Home) |
Make a copy of the newly generated Action rule, and modify the second parameter to reflect either Privacy or Home; whichever one was not chosen before.