Installing Anchor AN-30 on Axis Cameras with STM-1
Required Parts And Tools
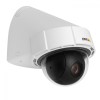
- Axis P5414-E
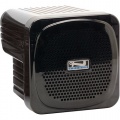
- Anchor AN-30s
- 3.5mm audio cable

- B Connectors

- Wire Stripper


The following equipment is optional in the event of the need to extend the 3.5mm audio cable and/or the power transformer of the AN-30.
- 22/2 audio cable

- Fish Tape or Glow Rod

- 18/2 low voltage cable
- B Connectors
- Electrical Tape


Installation Instructions
- Once your camera is installed, locate the AUDIO OUT on your P5414E.
- Strip the jacket of the 22/2 cable revealing the red, black, and bare wires inside. Cut away the bare wire and plastic surround the cable inside. Strip away a small piece of the red and black jackets revealing the bare copper wire.
- Wire the red to the + and black to the - of the AUDIO OUT of the P5414E phoenix connector.
- Cut 3.5mm audio cable in 1/2. Strip away jacket, revealing inside wiring. The inside of each cable can be different in color. What you want to do is identify which wires inside are your positive or hot, and which is your ground wire. Expose the copper wire for these and use be connectors to attached the red wire of the 22/2 to your hot of your 3.5mm cable, and black to your ground.


- Once audio is plugged in and the AN-30 is powered, test that the talkback unit is working by activating the talkback function within the Valt Software by having a partner use their computer microphone to communicate with you.
