Troubleshoooting LDAP
Contents
- 1 Troubleshoooting LDAP
Troubleshoooting LDAP
Validate Connection
- Connect to the VALT server via SSH or access the terminal.
- If accessing via the terminal, you will need to exit to Shell.
- Ping the LDAP server:
EX: Ping ldap.ipivs.com
- If the server responds, you are able communicate with that server.
- If the server does not respond, you may have a networking issue, or ICMP may be blocked. You may need to contact the customer's IT department to investigate. If ICMP is just blocked, you do not need ICMP in order to perform LDAP queries.
- Verify you have the correct server address, and check if the server is set to accept queries via LDAP or LDAPS.
- Check to see if the VALT server can communicate with the LDAP server on the appropriate port:
For LDAP: nc -zv ldapserver 389
- This command should return: Connection to ldapserver 389 port [tcp/ldap] succeeded!.
- For LDAPS:
nc -zv ldapserver 636
- This command should return: Connection to ldapserver 636 port [tcp/ldaps] succeeded!.
- If the appropriate command returns a failure message, the VALT server is unable to communicate with the LDAP server on the appropriate port. This could be caused by a firewall or other security appliance between the two servers, or you may have the incorrect LDAP server. You should contact the customer's IT department, and notify them that the VALT server is unable to connect to the provided LDAP server on the appropriate port.
Validate LDAP Query/Credentials with ldapsearch
After verifying communication between the VALT server and the LDAP server, you can validate the credentials you were provided by attempting to connect to the LDAP server from the command line.
- Connect to the VALT server via SSH or access the terminal.
- If accessing via the terminal, you will need to exit to shell.
- Enter the following:
ldapsearch -H ldap://ldapserver -x -b "distinguishedname" -D username -W
- Be sure to replace the ldapserver, distinguishedname, and username with the appropriate information.
- Example:
- LDAP Server: ivs2012r2dc.internal.ipivs.com
- Protocol: LDAPS
- Distinguished Name of Group: CN=IVS Users,CN=Users,DC=internal,DC=ipivs,DC=com
- Username: ivs@internal.ipivs.com
-
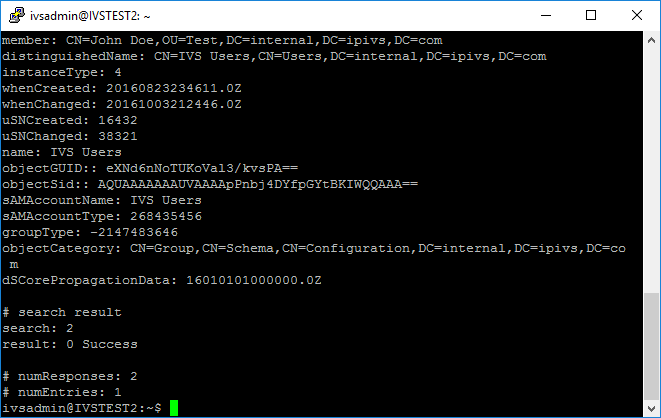
ldapsearch -H ldaps://ivs2012r2dc.internal.ipivs.com -x -b "CN=IVS Users,CN=Users,DC=internal,DC=ipivs,DC=com" -D ivs@internal.ipivs.com -W
- Enter the password when prompted.
- The query should return a list of group members.
- If a list of group members was returned successfully, then LDAP authentication should be working. If you are still experiencing issues, it is most likely a configuration problem with the application.
-
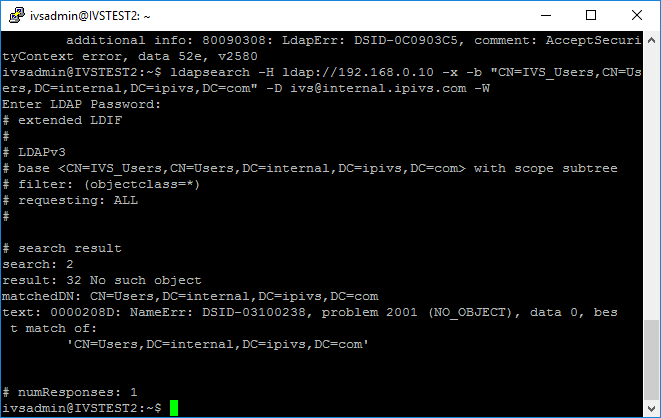
- If you received a message stating No Such Object, the distinguished name of the group you entered is incorrect. The next section contains information on verifying the distinguished name or the group, or you can contact the customer's IT department.
-
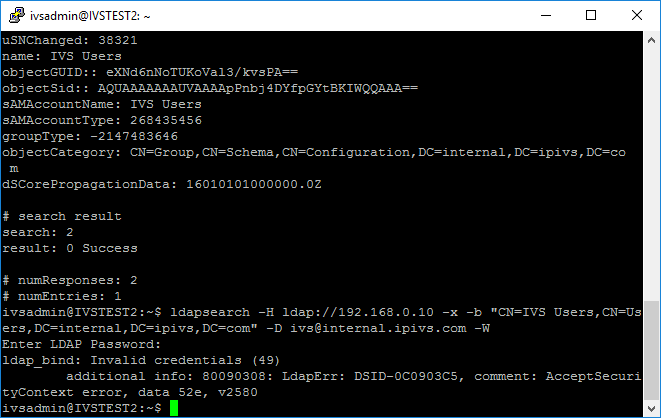
- If you received a message stating Invalid credentials, the username or password you entered is incorrect. You will need to contact the customer's IT department.
-
- If a list of group members was returned successfully, then LDAP authentication should be working. If you are still experiencing issues, it is most likely a configuration problem with the application.
Validate LDAP Server Database Entry
If the Server and Credentials are correct, make sure that the database entry has the correct information
- Go to the phpmyadmin interface for the server
http://<server_ip>/phpmyadmin - In the V3 database, find the table called ldap_server and copy the contents of the field "base_dn" into the field "dn" if not already present
- Test the ldap import again and see if it is working now
Verify Distinguished Name of Groups
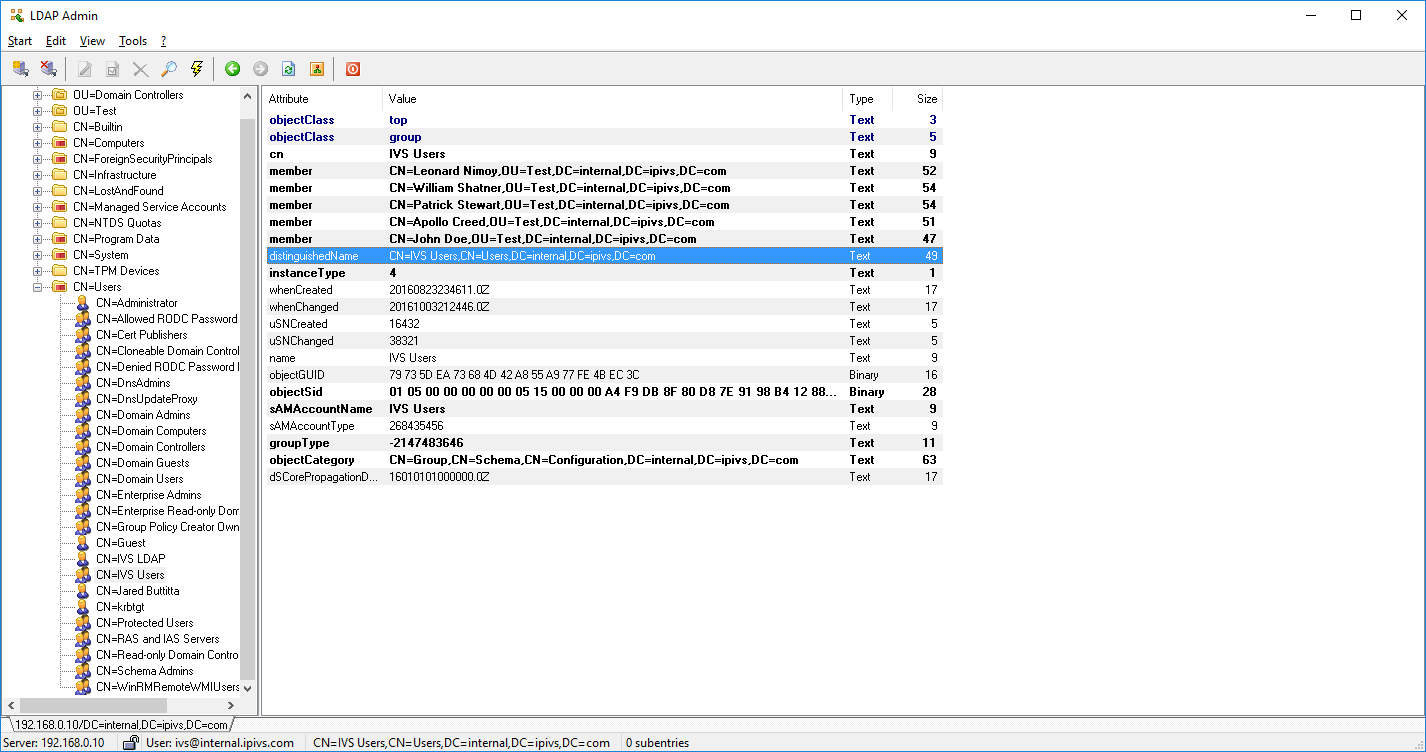
If you believe the distinguished name of the group is incorrect, you can verify it by accessing the customer's directory using LDAP Admin and the credentials they have provided you.
- Download and run LDAP Admin.
-
- Click Connect.
-
- Double click on New Connection.
-
- Enter the host.
- Uncheck Anonymous Connection.
- Enter the username and password.
- Click Fetch DNs.
- Select the Base DN for the domain.
- EX: DC=internal,DC=ipivs,DC=com
-
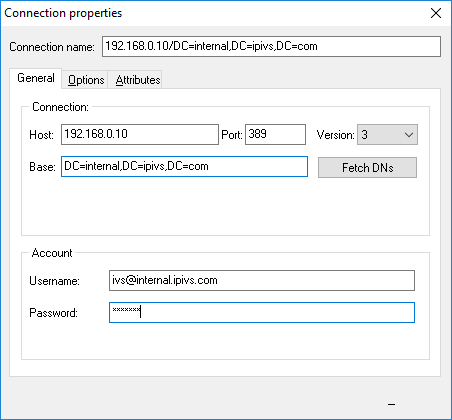
- Click OK.
- You can now browse the customer's directory. Using the distinguished name you were provided, try to locate the group.
- If you are able to locate the group, click on the group, and the DN will be displayed on the right hand side of the window.
- If you are unable to locate the group, contact the customer's IT department.
-


LDAPS Security Certificate
If you are connecting over LDAPS, you may experience an issue with security certificate presented by the LDAP server being untrusted by the VALT appliance.
Verify the Issue
- Run an ldapsearch query against the LDAP directory server using LDAPS, and append -d1 to the end of the command.
- See the section above regarding Validate LDAP Query/Credentials for information on running an ldapsearch
- The query will fail, but the results should contain diagnostic details about why.
- Review the results of the query. If there is an issue with the certificate, you will see a message stating Certificate Untrusted, or something similar in the results.
- Enter the following:
sudo nano /etc/ldap/ldap.conf
- Append the following to the end of the file:
-
TLS_REQCERT never
- Rerun the ldapsearch command. It should be successful this time.
Resolution
- Download the security certificate from your LDAP directory server.
- Upload the certificate to the VALT appliance.
- Copy the certificate file to:
/etc/ssl/certs/
- EX: sudo cp ./cert.crt /etc/ssl/certs/
- Enter the following:
sudo nano /etc/ldap/ldap.conf
- Append the following to the end of the file, replacing the italicized text with the name of your certificate:
- TLS_CACERT /etc/ssl/certs/cert.crt
- Press CTRL-X.
- Answer Y to save.
- Press Enter to keep the file name the same.
TLS 1.2 Issues
There is a known compatibility issue between OpenLDAP and certain versions of Windows Server. This issue was resolved in hotfixes, however you if you are able to verify all the information is correct and you are still unable to submit an LDAP query via LDAPS, this may be the cause. The issue stems from a compatibility problem related to TLS 1.2. By disabling TLS version 1.2, you can force LDAPS to use TLS version 1.1.
To test if this is the case, run the following:
export LDAPTLS_CIPHER_SUITE=NORMAL:!VERS-TLS1.2
- Run another LDAPSearch.
- If the search is successful, the compatibility issue is causing your problem.
putenv("LDAPTLS_CIPHER_SUITE=NORMAL:!VERS-TLS1.2");
The following files will need to be modified:
/var/www/v3/src/FS/UserBundle/Util/LdapSynchronizer.php
/var/www/v3/src/FS/UserBundle/Controller/LDAPController.php
/var/www/v3/src/FS/CamBundle/Command/LdapSyncCommand.php
/var/www/v3/src/FS/UserBundle/Entity/LdapServer.php
/var/www/v3/src/FS/UserBundle/Entity/LdapSynchronize.php
/var/www/v3/src/FS/UserBundle/Entity/User.php
/var/www/v3/app/console
This list of files was from old notes and may not be 100% accurate
Unable to Connect to MYSQL Database
This issue can occur after updating VALT to version 5.2 if the MySql config has been changed to listen on an interface other than the loopback address. This is not a common config, however this has been done in the past on several VALT implementations in order to allow customers to access the database directly to run queries or reports.
- Connect to the server via SSH or log in to the teminal
- Type the following and press enter:
sudo nano /etc/mysql/mysql.conf.d/mysqld.cnf
- Scroll down through the file until you see the entry for bind-address (it should be around line 43). This entry will most likely be set to the IP address of the server. If the entry is currently set to 127.0.0.1, this is NOT the issue.
- Comment out the line by adding a # at the start of the line.
- Add a new line below it:
bind-address = 0.0.0.0
- Press CTRL-X
- Enter Y to save.
- Do not change the file name, and press Enter
LDAP Jar Debug
The below commands are used to help troubleshoot LDAP issues. You will need to substitute the correct information into the string in order for the command to function properly.
java -Dcom.sun.jndi.ldap.object.disableEndpointIdentification=true -jar /var/www/v3/app/../services/ldap_import.jar "localhost%3A3306%2Fv3" "<DB UserName>" "<DB Password>" "ldaps%3A%2F%2Fad.ipivs.com%3A636" "dc%3Dad%2Cdc%3Dipivs%2Cdc%3Dcom" "<LDAP Service Account" "<Service Account Password>" "cn%3DTestGroup1%2Cou%3DGroups%2Cou%3DTest" 17 "-" "-" 8 "-" "activedirectory" 0 [] [] -debug
%3A = :
%2F = /
%40 = @
%2C = ,
%3D = =
Using another special character check out this website to get the correct format
Disable LDAPS SSL Check
- Enter the below string at the bottom of
/var/www/v3/app/config/parameters.yml