User Training Guide 5.0
Home
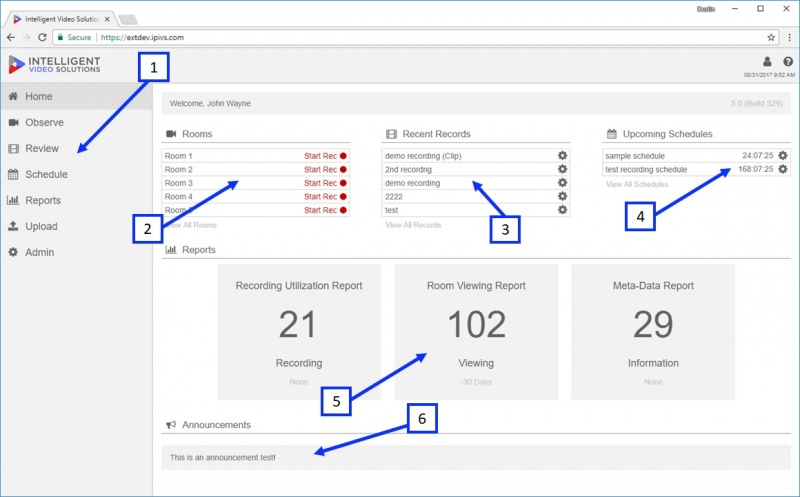
The home section is designed to give a user an overview of recent activity on the system.
- ) Navigation Pane: This section is used to navigate between sections of the application, a user will only see the sections that they have access to.
- ) Rooms: This displays the first 5 rooms that the active user has access to. Clicking on any of the rooms will take the user to the observe section with that room open. The user can also start / stop recording from this menu.
- ) Recent Records: This displays the most recent 5 recordings the active user has access to, clicking any will take the user to the review section with that recording open.
- ) Upcoming Schedules: This displays the next 5 upcoming schedules the user also has the ability to edit upcoming schedules from this menu.
- ) Reports: Displays the last 5 reports clicking on any of the reports will open the report graph.
- ) Announcements: Shows any announcements assigned to the user group of the active user.
Observe
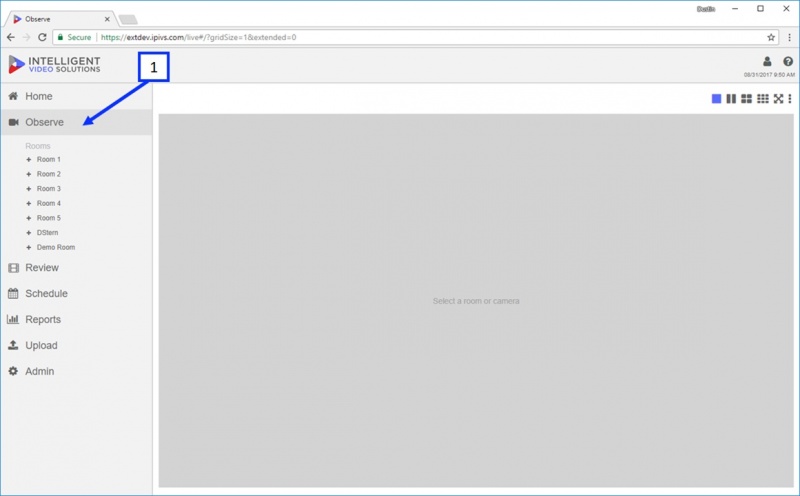
The observe section is used to view live video and audio as well as kick off ad-hoc recordings.
Accessing
- ) Clicking on the Observe section in the navigation page will take you to the section displayed above.
Overview
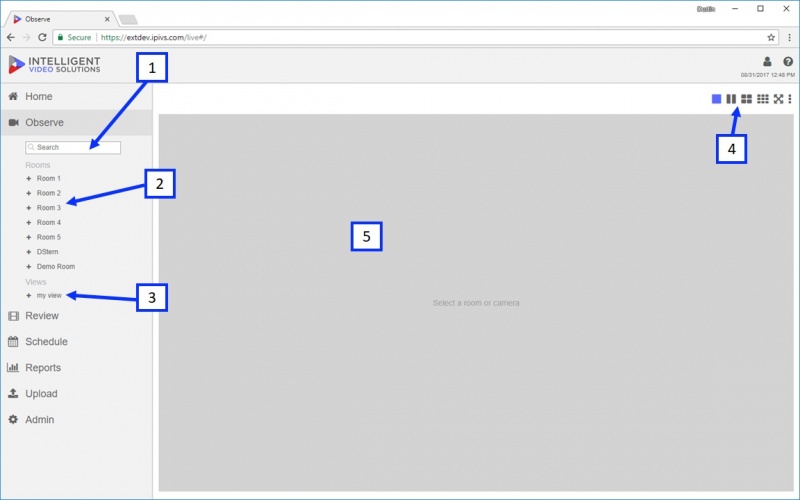
- ) Search dialog box: filters the results list in the rooms/views list.
- ) Rooms list: clicking on a room will bring up the corresponding video/audio in the view pane (5).
- ) View list: clicking on a view will bring up the corresponding video/audio in the view pane (5).
- ) The icons in the upper right allow users to switch the view pane into different configurations including 2x1, 2x2, 3x3, PIP, etc.
- ) The view pane is where the selected video / audio will appear.
Observing Live Video
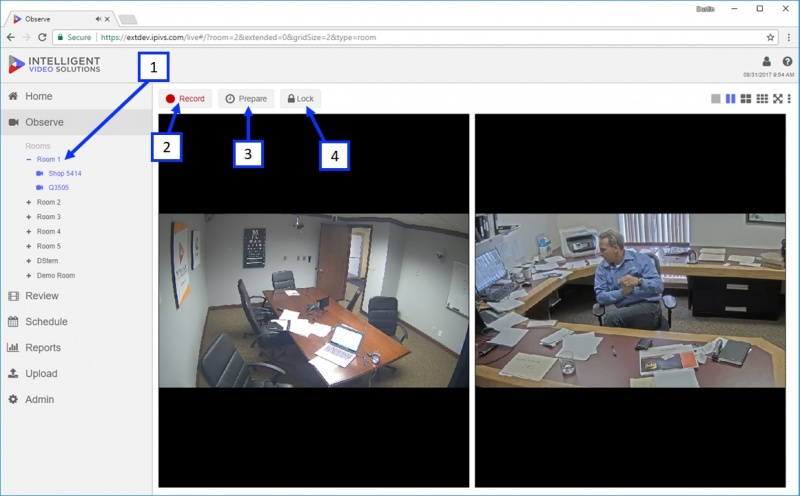
- ) Selecting a “Room” will pull up the corresponding audio / video as shown above.
- ) The “Record” button is used to initiate an ad-hoc recording, pressing the record button will bring up the information template.
- ) The “Prepare” button is used to arm a room for an active recording. This option allows you to fill in all the information fields ahead of time and then use a physical button or start recording button to initiate the recording.
- ) The “Lock” button is used to prevent recording / viewing of a room until the room is unlocked by an authorized user.
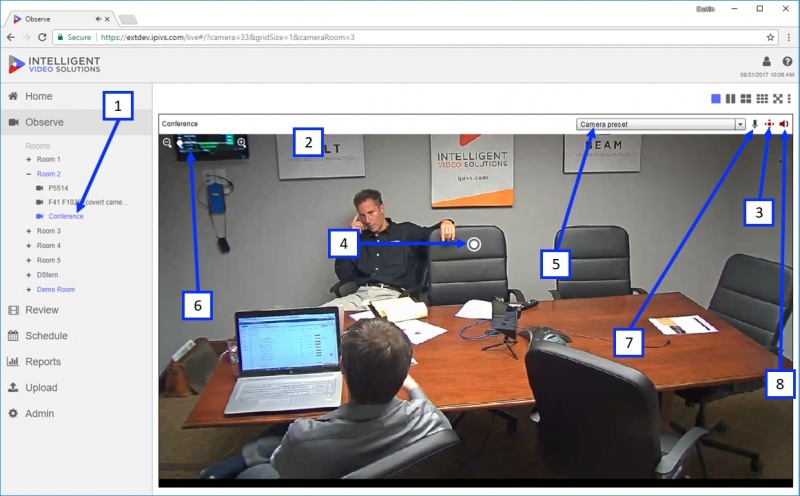
- ) If a room has multiple cameras associated with it you can still select a single camera view by clicking the + icon next to the room and then selecting a specific camera for viewing.
- ) Clicking on the camera image will bring up the camera controls / toolbar as shown above.
- ) If the camera is PTZ capable clicking on the PTZ arrow will enable Pan/Tilt control.
- ) The camera is controlled by positioning the bullseye on the desired object then left clicking to center the image on that point. The mouse scroll wheel is used to zoom in and out.
- ) Camera preset dropdown: allows users to jump to predefine presets, create new presets or delete existing ones.
- ) Digital zoom: allows users to digitally zoom in and out without affecting recording or other users live viewing experience. This feature is available on PTZ and non PTZ cameras.
- ) Talkback: allows a user to talk back into a room using the audio output on the camera (assuming this output has been wired to a speaker or audio transmitter).
- ) This button mutes / unmutes the audio for that camera, when viewing multiple cameras the user can control which audio channel they are listening to using this button.
Matrix
A user can arrange up to 9 cameras in an assortment of different ways for live observation using the built in matrix. If you want to save these groups of cameras and have different capabilities, including recording, they can be saved as views.
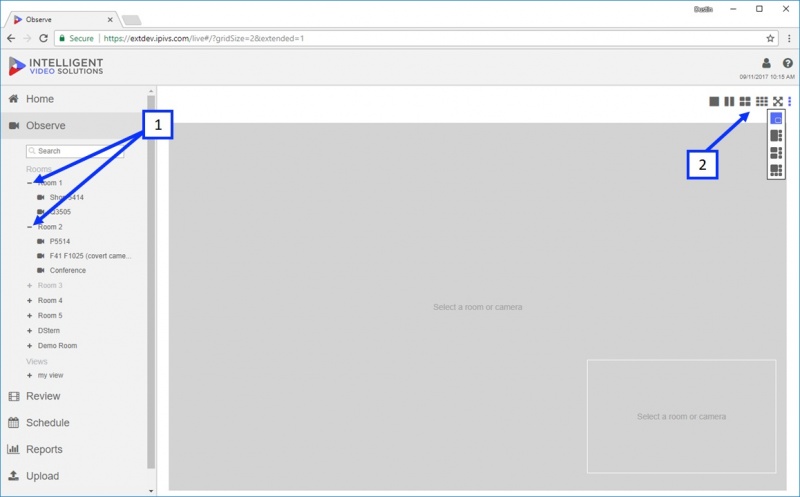
- ) Rooms can be expanded to reveal the associated cameras.
- ) Users can select a matrix; clicking the three dots will reveal additional options as shown in the image above.
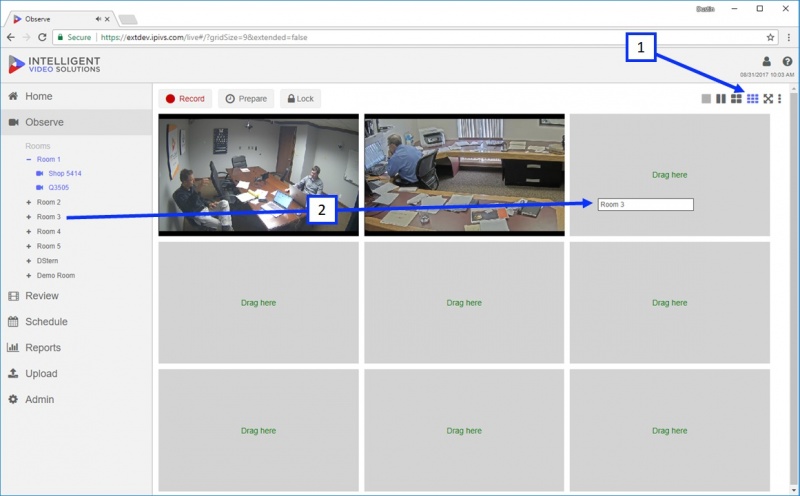
- ) To use the matrix views, first select which view to use.
- ) Drag and drop cameras / rooms into the available tiles. Note you can also drag cameras/rooms over existing cameras to replace them.
Views
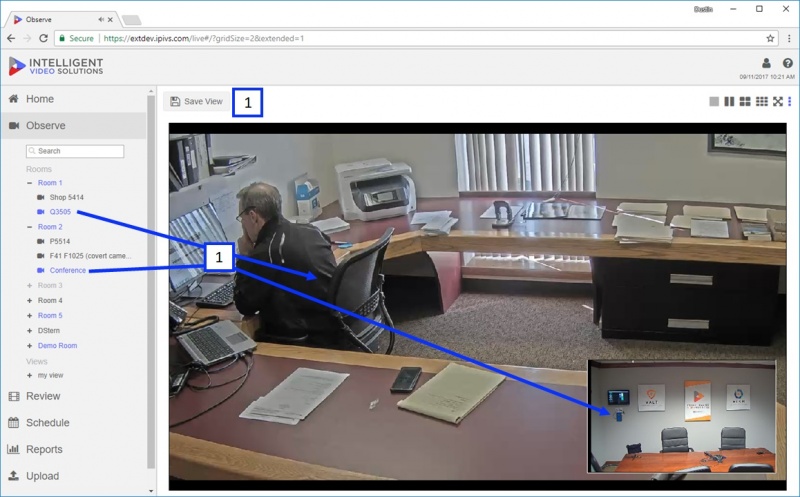
Views are a saved group of cameras. They can be used to create a camera group for live observation or recording purposes. Views are specific to the user that created them, but can be shared across user groups via the admin panel.
- ) Clicking and dragging cameras or rooms into the open camera panes will populate the camera panes with the associated video.
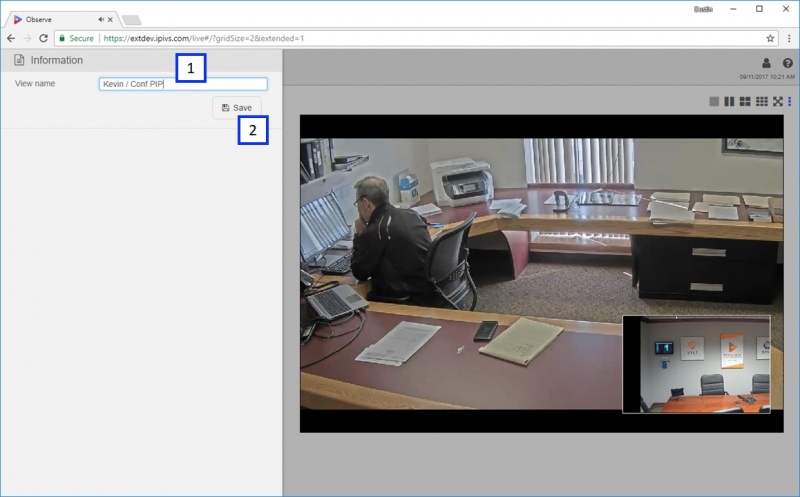
- ) Clicking Save View will allow a user to save that camera grouping arrangement and it will show up under Observe --> Views for that user.
- ) Give the view a name
- ) Click Save.
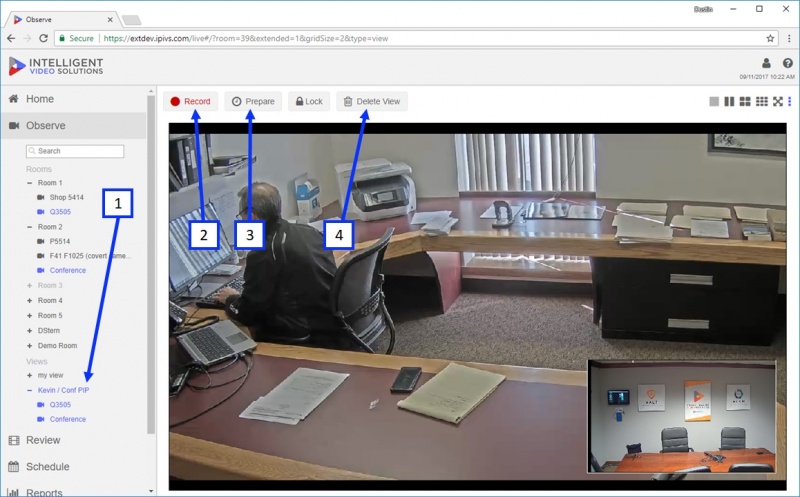
- ) After a view is saved it will show up under Views, clicking on the view will pull it up as shown above.
- ) Views can be recorded in an ad-hoc manner same as rooms by clicking Record, this will bring up the active users’ information template.
- ) Clicking Prepare will arm the view so Start Recording can be pressed for 1 click recording. Note buttons cannot be associated with views.
- ) Clicking Delete View will remove the selected view.
Recording
There are several ways to initiate a recording using the Valt software. The first is ad-hoc recordings as shown below. Recordings can also be started using physical Start/Stop buttons, RFID card readers, a built in scheduler, or our API.
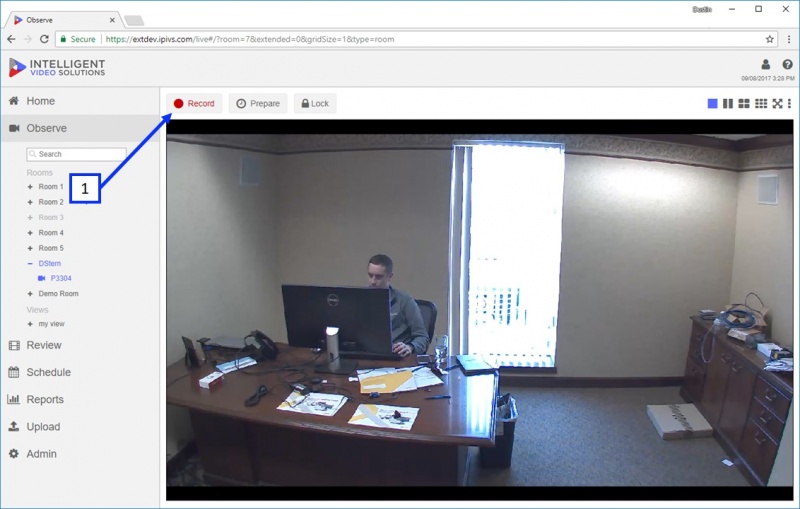
- ) To start a recording select a room or view and press the Record button as shown above. After the Record button is pressed it will bring up the information template as shown below.
Information
An information template is a set of fields associated with a user group that is intended to capture information associated with the recording at the time the recording was created / scheduled. Information templates can easily be generated or changed in the Admin section.
- ) Container Drop Down: this item will only show up if a user has access to more than a single container. It allows them to select which container the recording will be assigned to.
- ) Information Template: this item will only show up if a user has more than one template assigned to it. This drop down menu allows a user to switch the template used for the recording.
- ) Information Fields: these are input fields used to assign searchable information to the recording. They can be text fields, drop down menu, picklist, notes field, or audio field.
- ) Start Recording: clicking this button will kick off the recording once all required information fields are filled out.
- ) Navigation Menu: clicking on sharing, author or retention will take the user to that section of the menu and collapse the information portion.
Sharing
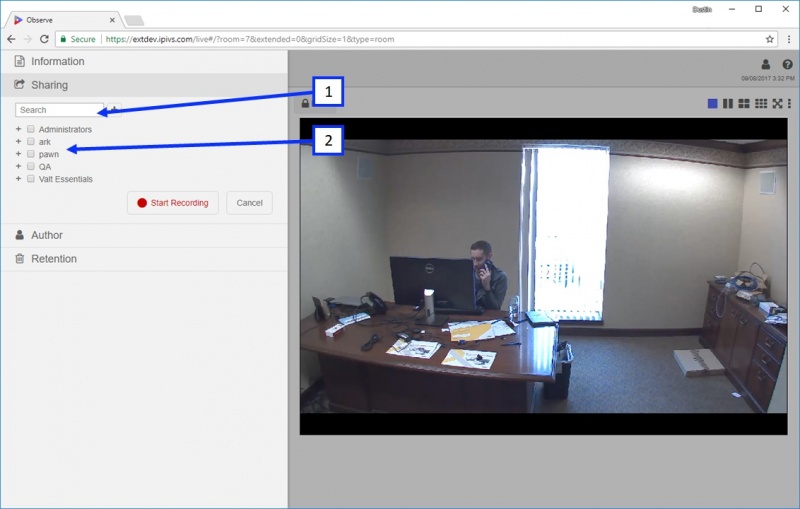
Sharing allows you to share videos with users or user groups that would normally not have access to the video.
- ) Search: this dialog box is used to search for the user / user group you want to share the video with; it is used to narrow the list of possible users.
- ) Available User Groups / Users: list of the available users / user groups you can share with.
Change Author
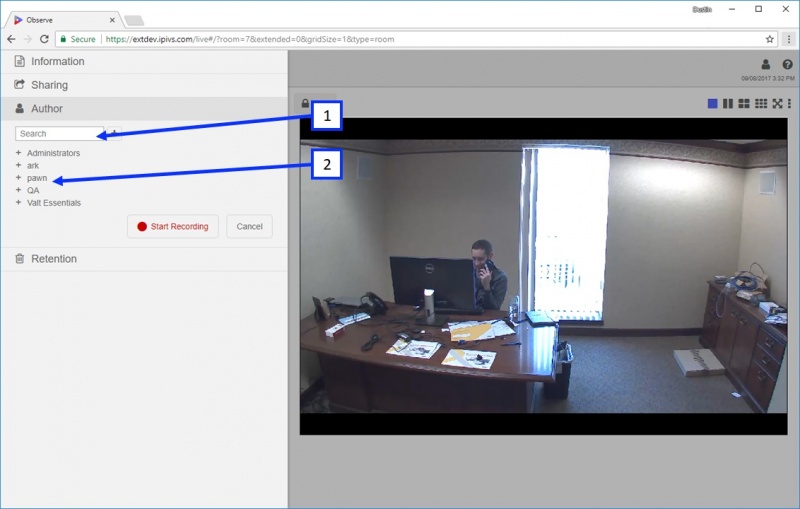
The author section can be used to change the author of the recording. The Valt system assigns access to the recording based on the author so changing the author will change who can see the live and recorded video.
- ) Search: this dialog box is used to search for the user you want to use as the author of the video; it is used to narrow the list of possible users.
- ) Available Users: list of the available users you can assign as the new video author.
Retention
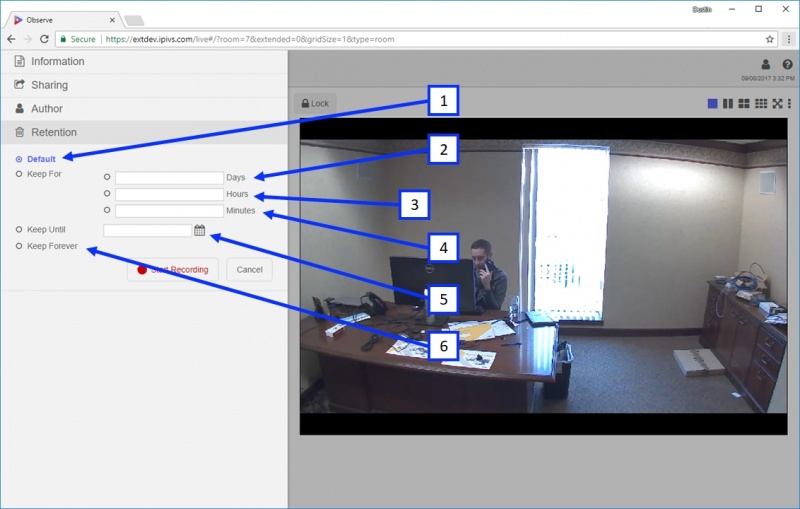
By default, every recording has a retention rule assigned to it based on the author that recorded the video. The retention rule determines how long the video will be saved for before it is automatically deleted from the system.
- ) Default: this option is always selected by default; if this is selected, the retention rule will follow what is set for the authors user group.
- ) Keep for Days: Assign a number of days for this video to be kept for 1-99999
- ) Keep for Hours: assign a number of hours for this video to be kept 1-99999
- ) Keep for Minutes: assign a number of minutes for this video to be kept for 1-99999
- ) Keep Until: Select a date that the video is automatically deleted on.
- ) Keep Forever: never delete this video unless retention is changed in the future or it is manually deleted.
Started Recording
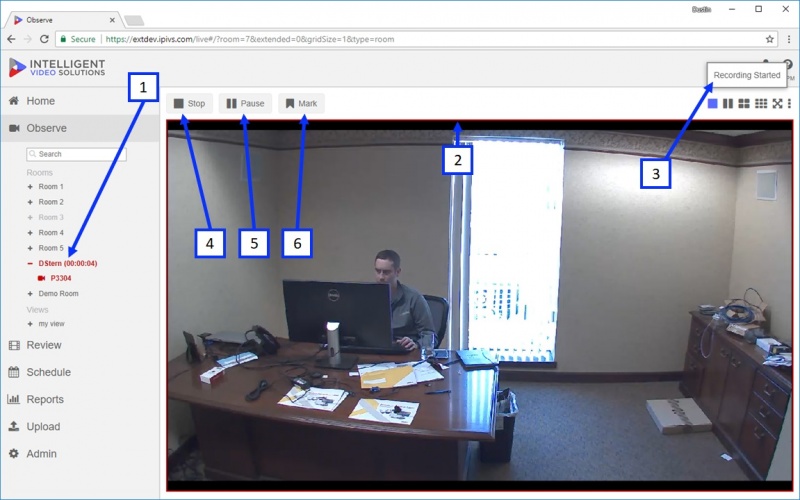
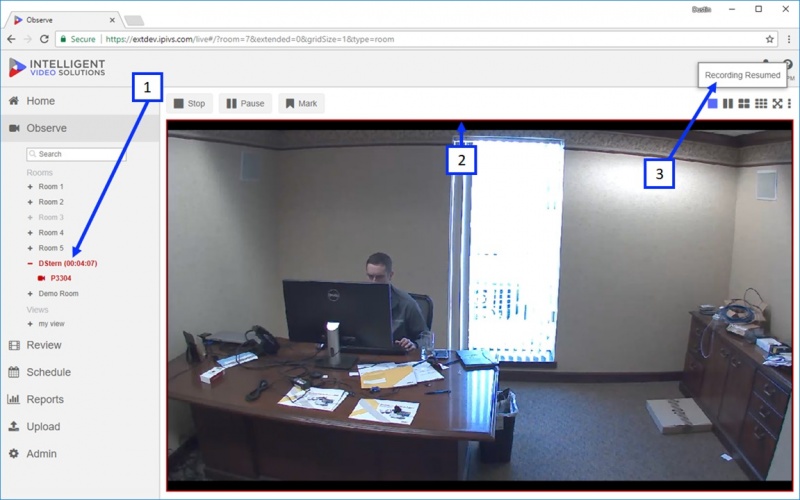
Once a user presses the “Start Recording” button the left hand menu will collapse and the application will look like below picture.
- ) The red highlight indicates the room is recording; you will also notice a duration to the right of the room indicating how long it has been recording for.
- ) If you select a room that is being recorded, a red border will be displayed around the video(s) associated with the room.
- ) Once a recording starts, you will see a notification that the recording started. This notification will display for ~ 5 seconds before disappearing.
- ) Stop: clicking on this button will stop the active recording.
- ) Pause: clicking on this button will pause the active recording.
- ) Mark: clicking on this button will pull up the marker template associated with the active user.
Pause
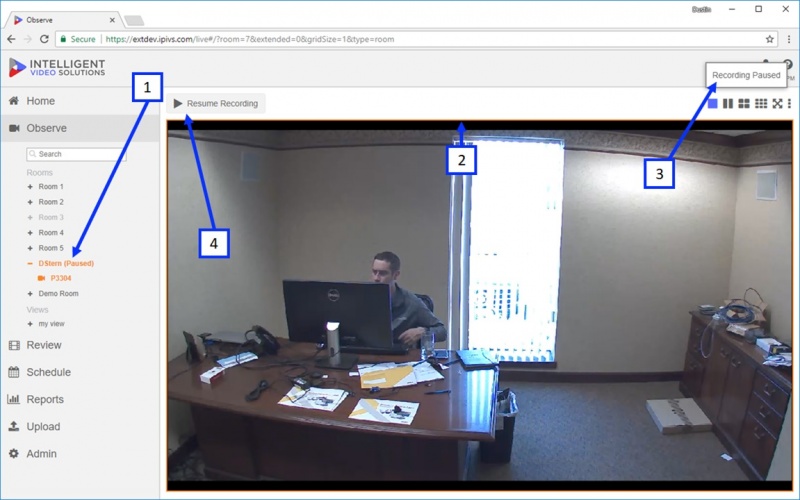
The pause function pauses an in progress recording until resume is pressed.
- ) If a recording in a room is paused, the room text will turn orange with the words (Paused) to the right of it as shown above.
- ) If you select a room that is paused, an orange border will be displayed around the video(s) associated with the room.
- ) When a recording is paused, you will see a notification that the recording has been paused. This notification will display for ~ 5 seconds before disappearing.
- ) Resume Recording: clicking this will resume the recording.
- ) When a recording is resumed from a paused state, the room will turn red and the duration counter will resume where it last left off.
- ) Red border will re-appear around all cameras associated with the room.
- ) A notification will be displayed for ~ 5 seconds, indicating the recording has been resumed.
Button
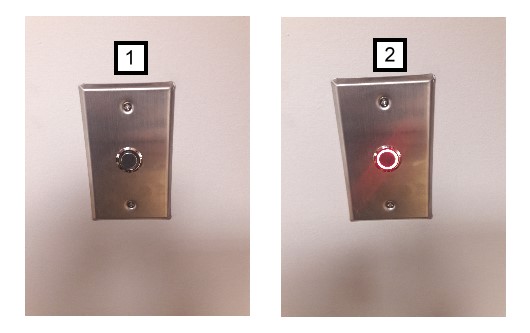
One option to start and or stop a recording is to use a simple momentary contact button. Integrated or independent of the button, an LED can also be lit to indicate when a recording is active. Buttons are tied to rooms within the software. From an author perspective, each button is also assigned an author (when the button is pressed it will use this user to author the recording). IVS sells buttons that have been validated to work with our software with a built in LED (shown below). IVS offers two LED options for recording indication: Red (shown below) and Blue.
- ) Shows the button when a recording is not active for the associated room.
- ) Shows the button when a recording is active for the associated room.
Access Control
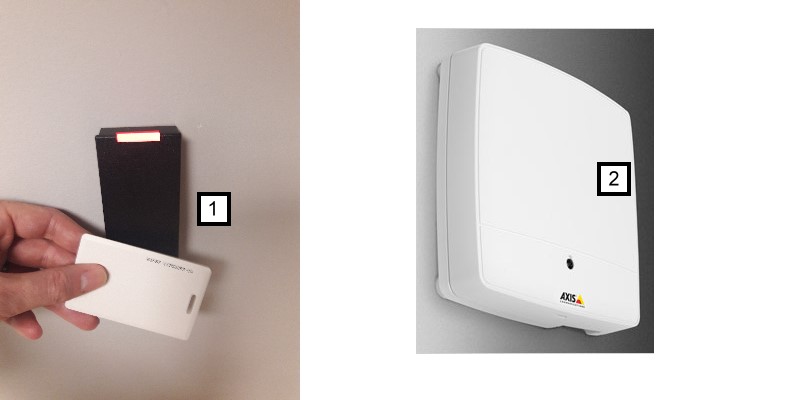
Access control readers can be configured to start and/or stop a recording with the Valt software. Readers are tied to rooms, and card numbers are tied to specific users. The advantage of using an access card and reader is the software can understand who started the recording, and apply the correct author to the recording automatically.
- ) Example of card reader used to start and stop a recording.
- ) Axis A1001 required to interface access reader with Valt software.
Review
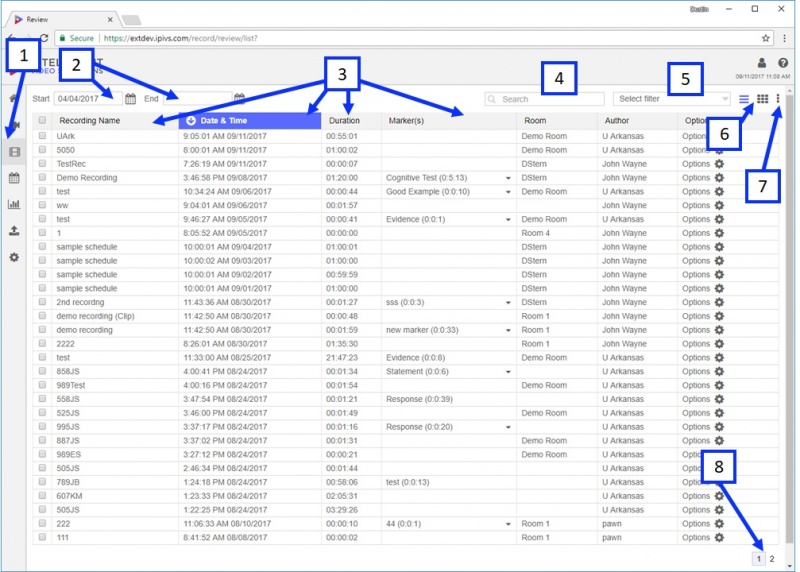
The review section is used to find and manage recordings. Only recordings the active user has access to will show up under the review section.
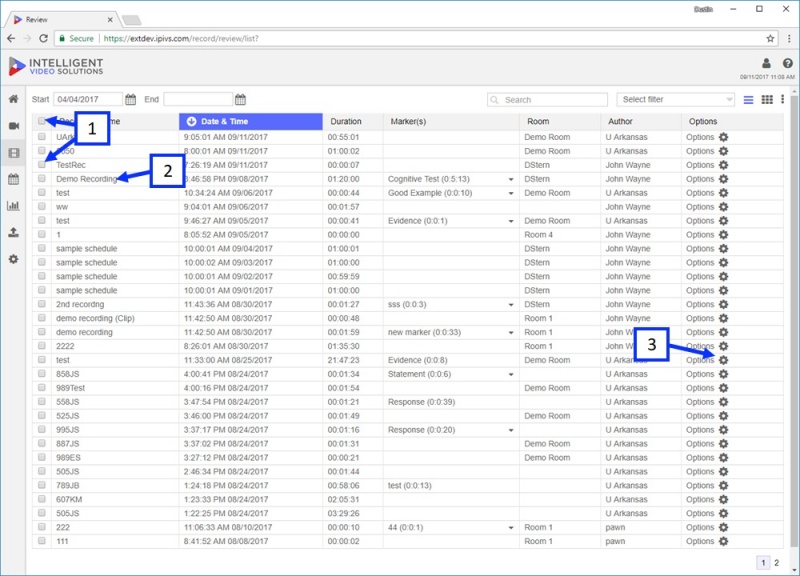
- ) Navigation pane: the navigation pane will collapse depending on browser width as shown above. To navigate to a different section, click the Section icon.
- ) Date range: this is used to define the range to display results. The default start range is a definable setting in the Admin section.
- ) Sortable Column Headers: clicking on any of these will sort results on the selected column.
- ) Search: This is used to narrow results. The search box applies to all information / marker fields associated with recordings.
- ) Search Filter: This section allows users to create and apply filters to the results. Filters are specific search queries that can be generated and saved.
- ) View Mode: this allows users to switch between list and thumbnail view for results.
- ) Export Options: Export results to pdf or cvs using the button.
- ) Paginator: if multiple pages of results are present (30 per page), you can use this to navigate between pages.
- ) Multi-Select: this is used to select multiple items at once.
- ) Recording Name: clicking on this will launch the video player.
- ) Options Button: clicking this will bring up a sub menu listing options the user can perform on this recording based on the users rights.
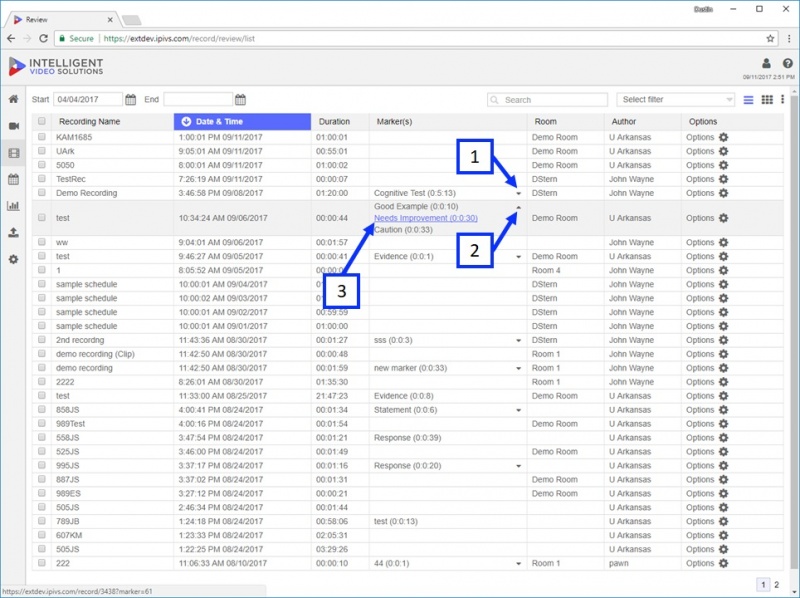
- ) Marker Expand: clicking on the down arrow will expand the selection and reveal all the additional markers associated with the recording.
- ) Marker Decrease: clicking on the up arrow will hide additional markers associated with the recording.
- ) Markers: clicking on a marker will launch the video player and automatically take the user to that point in the recording.
Options
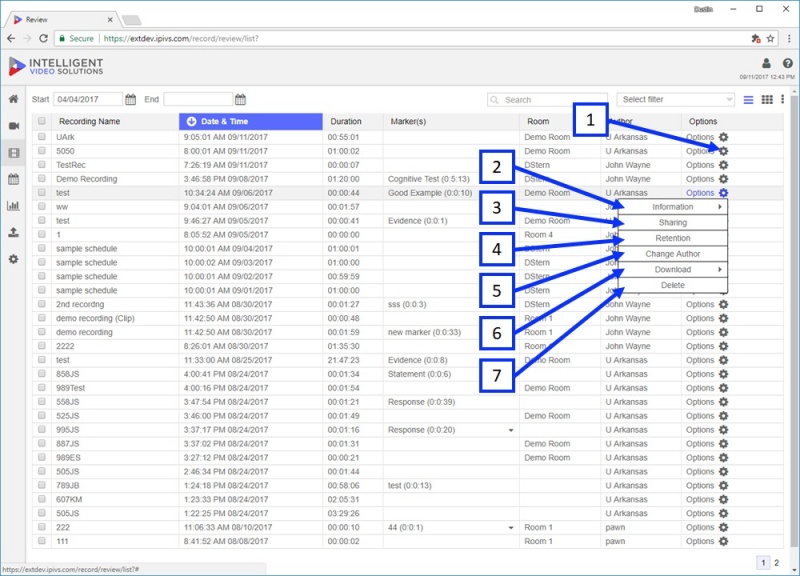
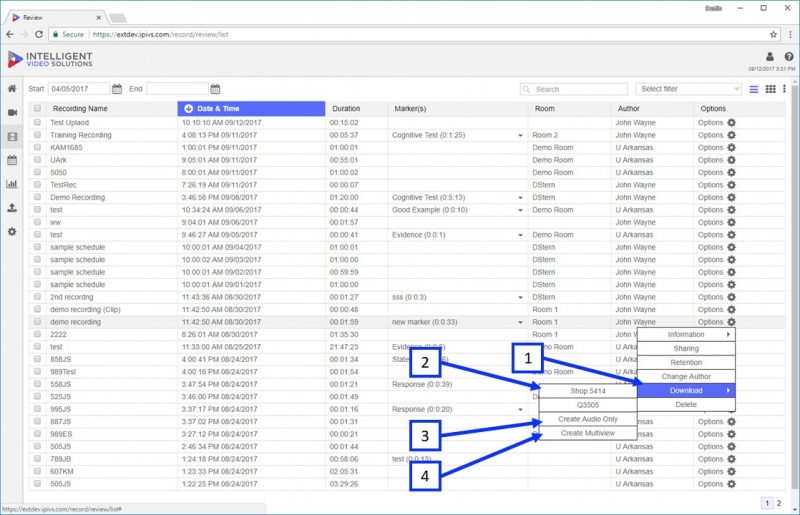
- ) Options: clicking on options will bring up a sub menu of options based on user rights as shown above.
- ) Information: selecting this will allow the user to view / edit information associated with the recording. Clicking the arrow and choosing pdf will make a pdf and download it to the users download folder, including the information & markers associated with the recording.
- ) Sharing: allows the user to share the recording with users / user groups that normally would not have access to it.
- ) Retention: allows the user to change how long this recording is stored for before automatically being deleted.
- ) Change Author: allows the user to change the author of the recording. Changing the author will also change all the permissions associated with who has access to the recording (that is all based on author).
- ) Download: will bring up a sub menu with download options.
- ) Delete: will delete the recording.
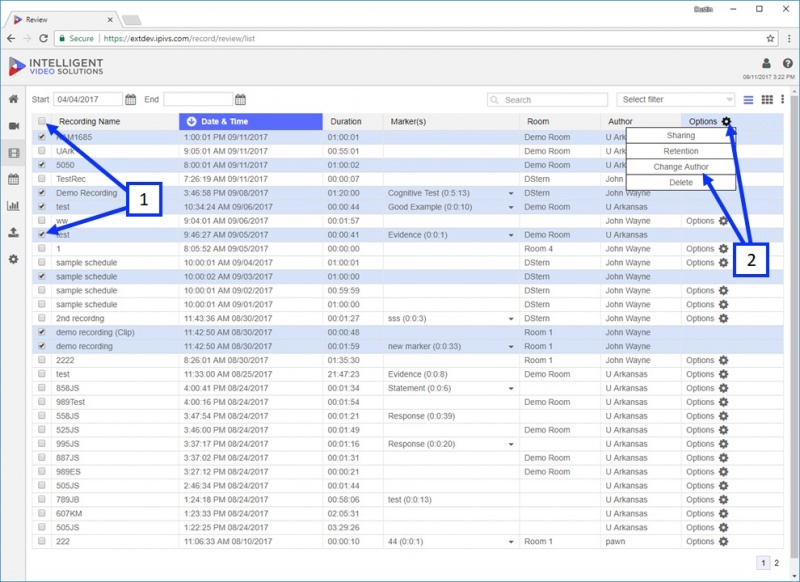
- ) Mult-Select: checking the checkbox to the left of a recording will select (highlight) the recording. Checking the top checkbox will select all the recordings on the page.
- ) Multi-Options: when one or more recordings are selected, the options button in the top column header will highlight. Clicking on that button will bring up a sub menu of actions that can be applied to all selected recordings.
Download
- ) Download: selecting Download will pull up a list of sub options as shown in the image above.
- ) Selecting a camera (if multiple cameras are associated each one will have its own link) will download that camera's video directly to the user's download folder. It is saved as a standard .mp4 file.
- ) Create Audio Only: this option will strip out the audio and convert it to an .mp3 file. Clicking this will launch a progress bar when the file has been generated this option will change from Create Audio Only to Audio. Clicking on Audio will download the .mp3 file.
- ) Create Multiview: this option will merge up to 4 video files together (the videos associated with the recording) to create a single mp4 file. Clicking this will launch a progress bar, when the file has been generated it will change from Create Multiview to Multiview clicking on Multiview will download the merged mp4 file.
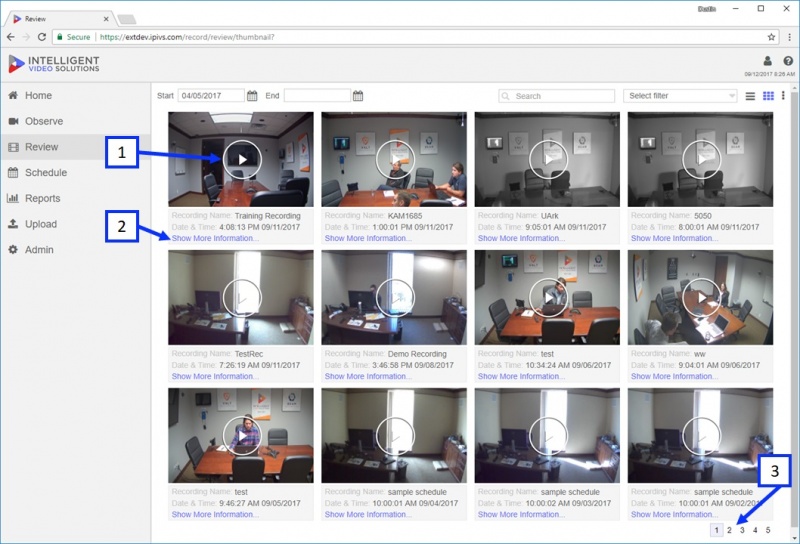
Thumbnail View
- ) Play: clicking the image will launch that recording in the video player.
- ) Show More Information: clicking this link will reveal additional information and options associated with the recording.
- ) Paginator: switch to another page of recordings
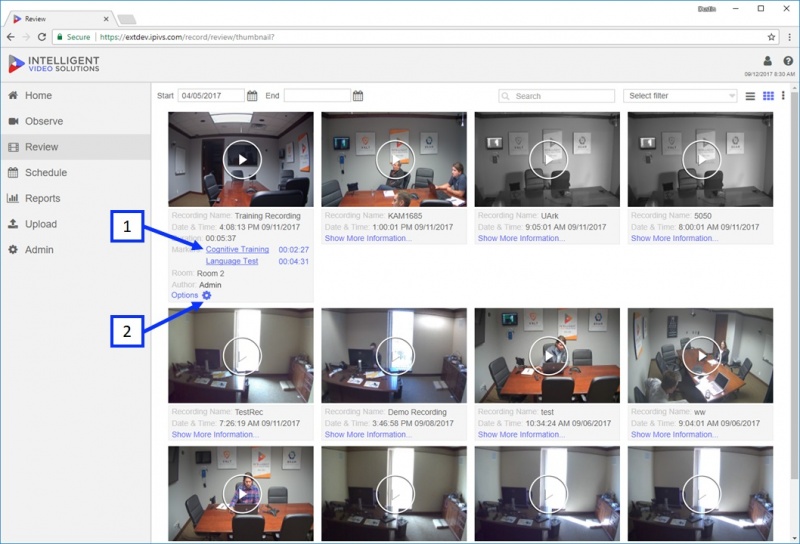
- ) Markers: after Show More Information is clicked, if any markers are present in the video, they will show up as shown above. Clicking on a marker will take the user to that point in the video.
- ) Options: clicking options will pull up a menu of actions that can be performed on the selected recording.
Video Player
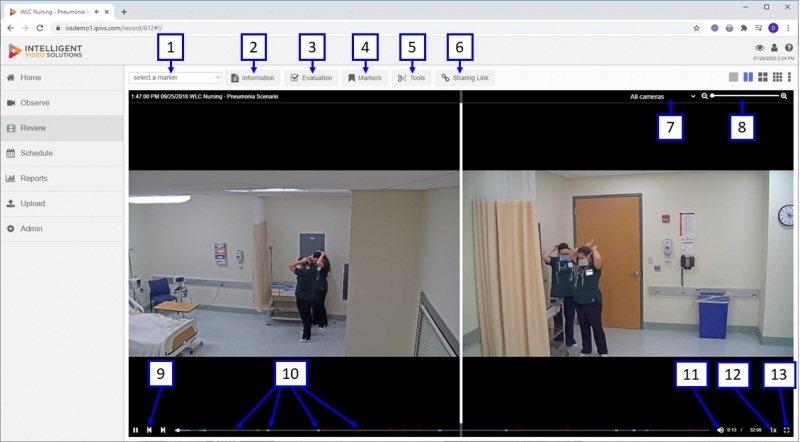
The Valt Video Player launches whenever a recording name is clicked within the Valt interface.
- ) Marker Dropdown: all markers associated with the recording will appear in the dropdown list. Selecting a marker name will jump the video to that specific marker.
- ) Information: clicking this button will pull up the information associated with the recording and allow the user to edit the information template, if they have the proper rights.
- ) Markers: this button pulls up the marker menu.
- ) Tools: this button pulls up the tools menu.
- ) Digital Zoom: this slider allows the user to digital zoom on the image. To adjust the view area, the user can click and drag around the image.
- ) Camera Selection: using this drop down menu, the user can switch to a specific camera or view all cameras as shown above.
- ) Play Button: clicking this icon will start playing back the recording.
- ) Player Controls: play button (will change to pause when playback is enabled), step back (goes back 10 seconds), step forward (goes forward 10 seconds).
- ) Slidebar: clicking and dragging this will scrub through the video.
- ) Marker Indicators: markers are plotted on the timeline with the designated marker color as shown above.
- ) Audio Level: this icon is used to control / mute the audio level.
- ) Full Screen: clicking this icon will pull up the video in full screen mode.
Markers
Markers like recording information have an associated template. Markers allow users to insert searchable information into a specific point within the recording. Markers also act as index points within the recording allowing users to easily navigate to that point during review much like chapters in a DVD. Markers can be added during live observation or review.
Marking During Observation
- ) If a user has proper rights they can click on a room where an active recording is going on and click the Mark button.
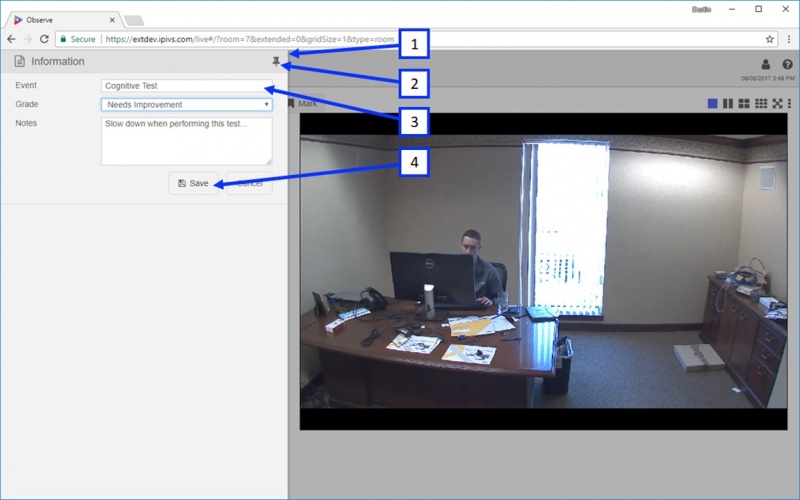
- ) When a user clicks on the Mark button it will bring up the marker template associated with the active user.
- ) Pin Icon: this button is used to pin the menu so it does not auto-collapse after a marker is added (after the user clicks save). This is very useful if a user intends to insert multiple markers while doing live observation.
- ) Marker Fields: these are input fields that allow users to associate searchable information with specific points within the video.
- ) Save: pressing Save will save the marker. Please note the marker is actually inserted when the original mark button is pressed not when save is pressed.
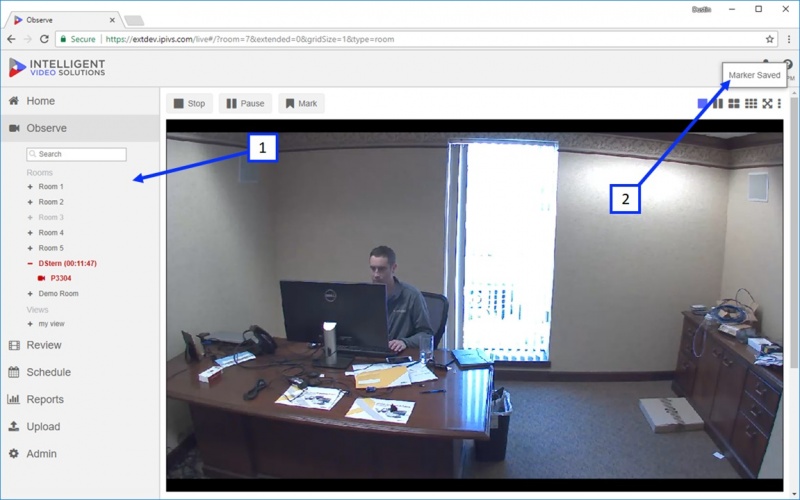
- ) After a marker is saved, unless the pin icon has been pressed, the marker template menu will automatically collapse as shown above.
- ) A notification will display for ~ 5 seconds, indicating the marker was saved.
Marking During Review
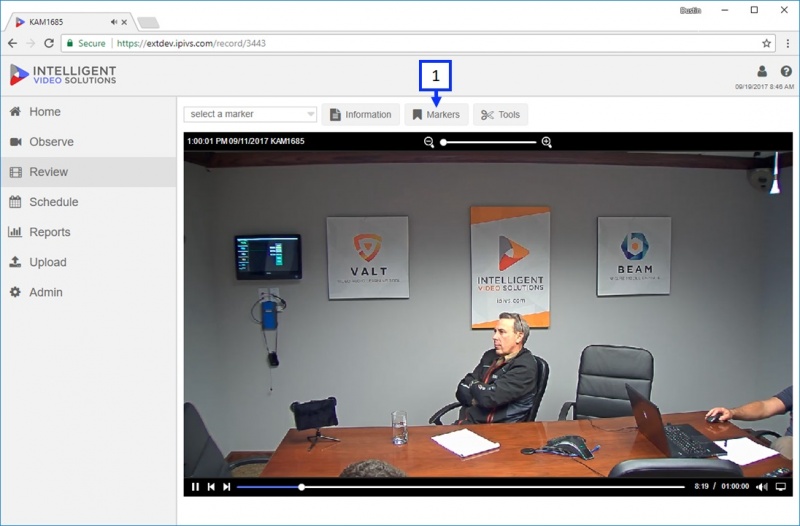
- ) Clicking on the Mark button will allow a user to enter new markers or view existing markers and associated information.
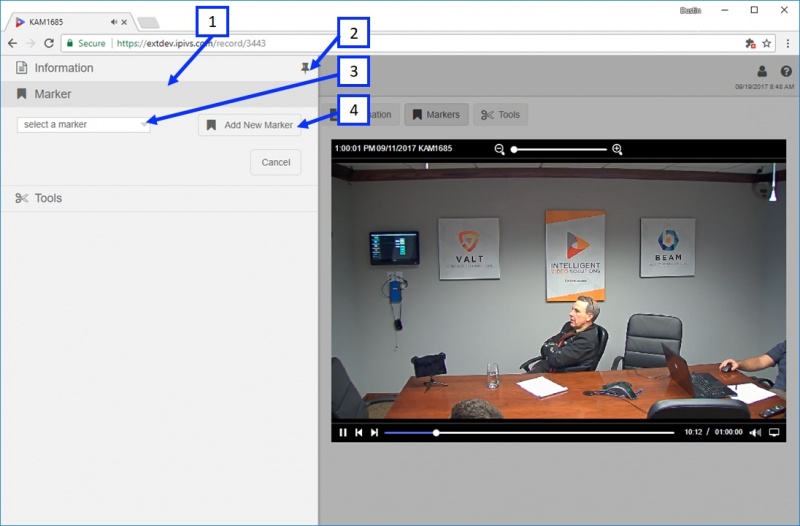
- ) Clicking on the Markers button will bring up the marker menu as shown above.
- ) The pin icon is used to pin this menu, so it does not auto collapse after a marker is added. This is useful if a user wants to add multiple markers easily.
- ) The marker drop down menu allows a user to jump to existing markers and view / edit associated information.
- ) Pressing Add new Marker will pull up the marker template.
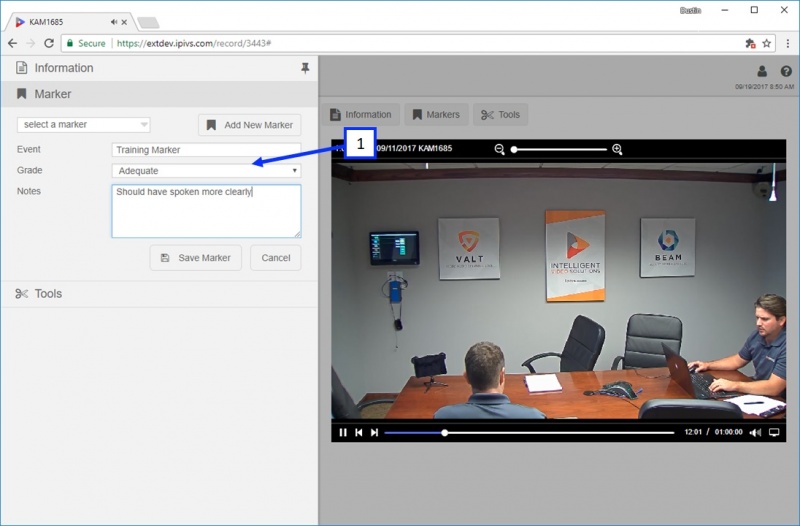
- ) After Add New Marker is clicked a user is prompted to fill in the marker template information as shown above.
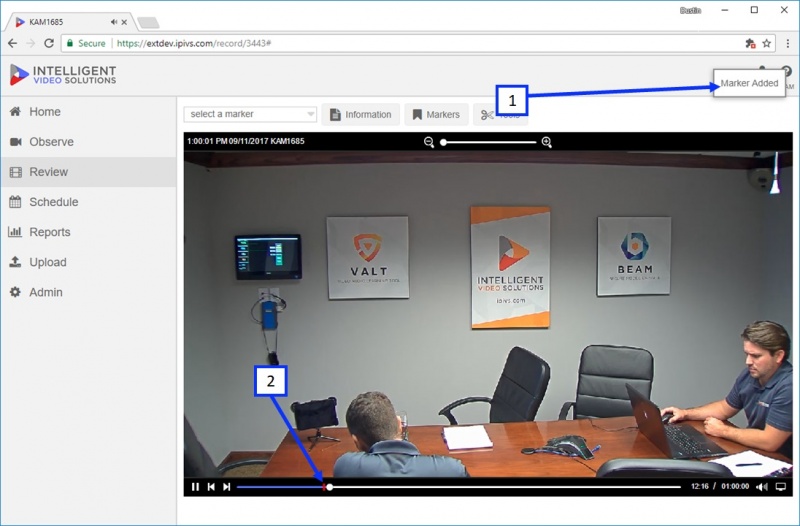
- ) Once a marker is added, a notification message will appear for ~ 5 seconds.
- ) The newly added marker will be visible on the timeline and will appear as the color associated with the marker template.
Schedule
This section is used to schedule future recordings. Schedules can automatically start / stop recordings on a single or recurring instance.
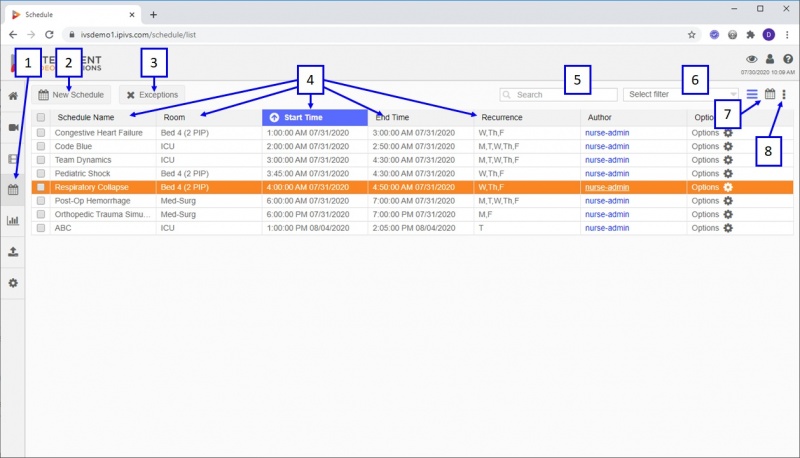
- ) Navigation Menu: the navigation menu may collapse, and only display icons when in the schedule section depending on browser width. To navigate to a different section click the associated icon.
- ) New Schedule: clicking on this button will pull up the new schedule menu.
- ) Exceptions: clicking this button will pull up the new exception menu, exceptions being days where all scheduled recordings are suspended (example: holidays).
- ) Schedule Column Headers: clicking on a schedule header will sort the schedules by that item.
- ) Schedule Search Box: narrows the results of shown schedules based on any information associated with that schedule.
- ) Filter: advanced search queries that are associated with a user account that can be saved and executed using this dropdown.
- ) View Mode: switch between list and calendar view for schedules by clicking the associated icon.
- ) Export Button: export schedule list to pdf or cvs.
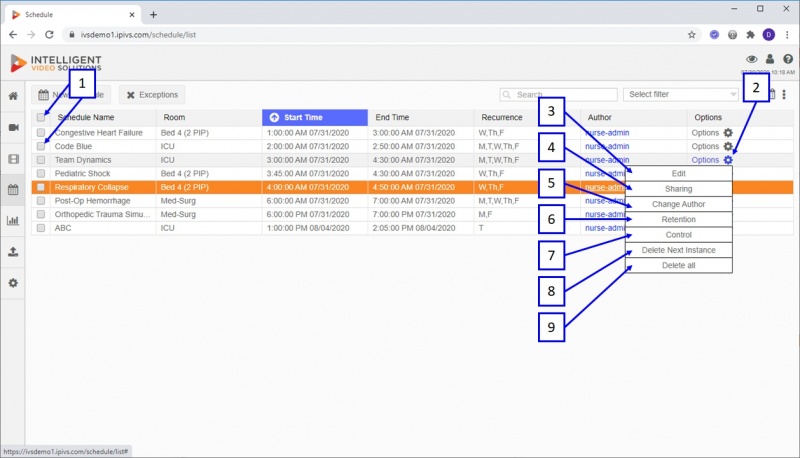
- ) Mult-Select: checking the checkbox to the left of a recording will select (highlight) the recording. Checking the top checkbox will select all the recordings on the page.
- ) Options: clicking the options button will pull up a sub menu that will display the functions the user has access to perform on the selected schedule.
- ) Edit: pulls up the schedule menu allowing the user to edit any of the schedule attributes.
- ) Delete Next Instance: deletes just the next instance of the schedule (if a schedule is set to run every Monday, clicking this button would delete next Mondays recording, and roll to the following Monday as the next scheduled start time).
- ) Delete All: removes the schedule and deletes all future recordings (does not affect past recordings created by the schedule).
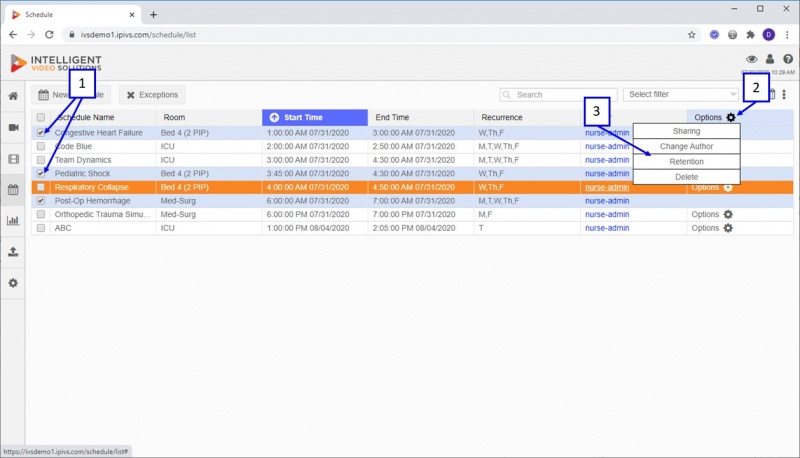
- ) Multi-Select: allows users to make changes to multiple schedules at once, checking items will highlight and enable the Multi-Options button as shown above.
- ) Multi-Options: clicking this button will open up a sub menu of options depending on the user rights that can be applied to the selected schedules.
- ) Option Menu: Sharing, Retention and Delete are options that can be applied to the selected schedules. Note only the options the active user has access to will appear.
Calendar View
The calendar view for the schedule section is a graphical way to look at upcoming schedules. A user group's default view can be set to either list or calendar for the schedule section.
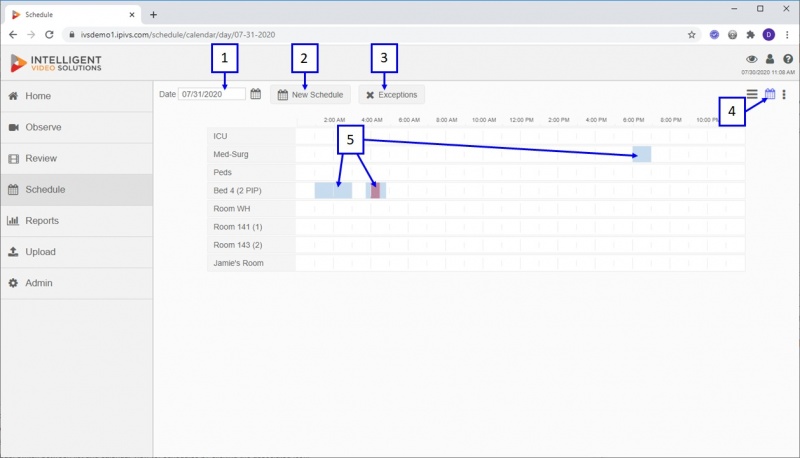
- ) New Schedule: clicking on this button will pull up the new schedule menu.
- ) Exceptions: clicking this button will pull up the new exception menu, exceptions being days where all scheduled recordings are suspended (example: holidays).
- ) Year: using the arrows you can toggle to future / previous year.
- ) View Mode: switch between list and calendar view for schedules by clicking the associated icon.
- ) Day: clicking on a day will take the user to that specific days schedules. Days with at least one associated schedule will show up highlighted blue as shown in the above image.
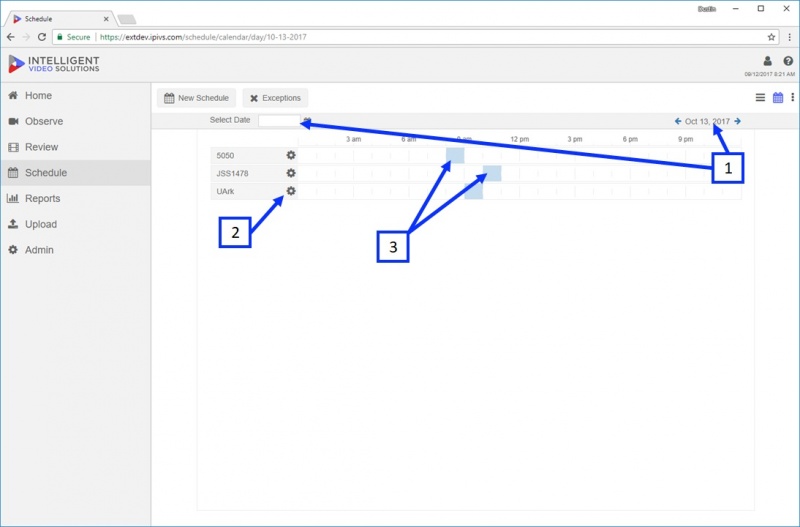
- ) Select a day using the Select Date dialog box or forward/back arrows.
- ) Options: schedule options can be accessed by clicking the Option button same as in list view.
- ) The time associated with the schedule will show up blocked as blue, if there is a schedule overlap or conflict with another schedule it will show up as blocked red.
Add Schedule
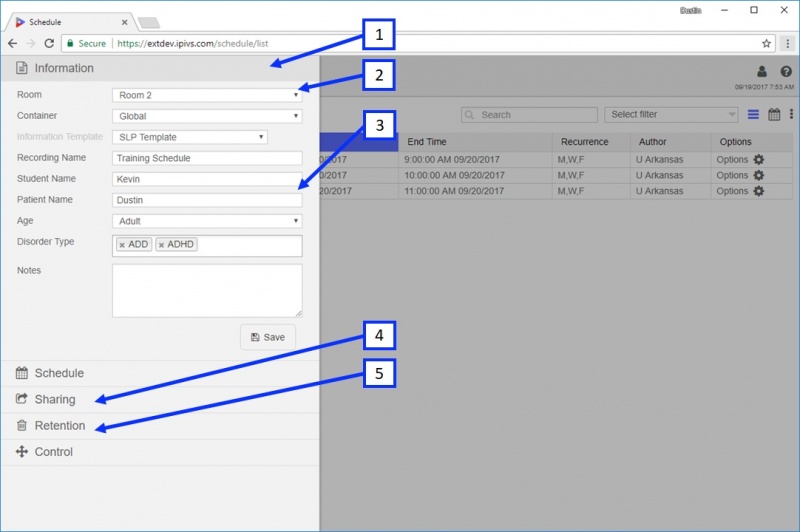
- ) Clicking New Schedule will bring up the information menu as shown above.
- ) Select a room for the schedule.
- ) Fill in the information template.
- ) Videos associated with the recording can be shared with users who normally would not have access using the Sharing section.
- ) Retention of video files created by the schedule can be modified from the default using the Retention section.
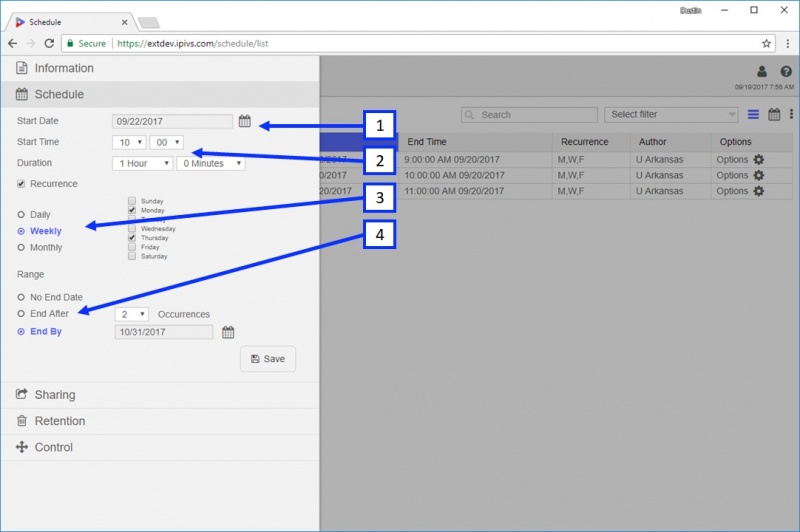
- ) Select a date for the schedule to start on.
- ) Select a time for the schedule to start on.
- ) The schedule can be repeated on specific days using the Recurrence option as shown above.
- ) The schedule can automatically end on a specific day by selecting an option under range.
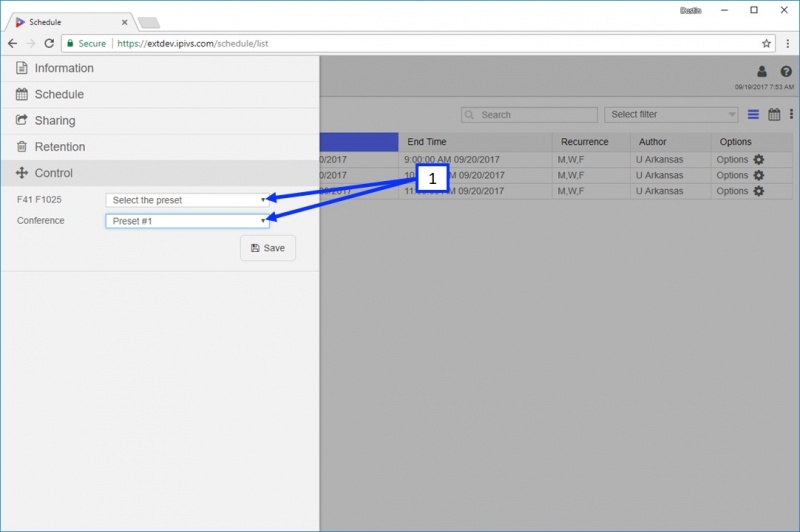
- ) A user can move PTZ camera(s) associated with the schedule to a preset position using the Control section as shown above.
Reports
Reports are used to parse data from the system. Three types of reports are available: Usage, Information and Alerts.
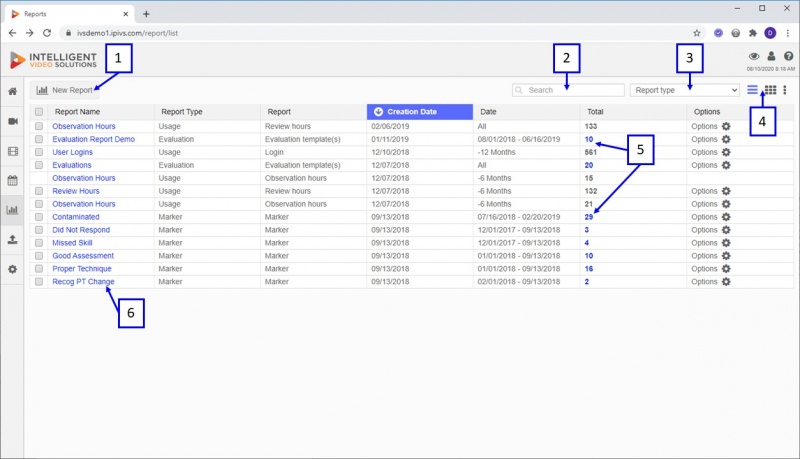
- ) New Report: clicking on this button will bring up the new report menu.
- ) Search: this is used to narrow results, the search box applies to all information associated with reports.
- ) Report Type: filter the displayed reports based on type using this drop down menu.
- ) View Mode: allows a user to toggle between list and thumbnail report view modes.
- ) Data Links: clicking on the data links will take the user to the corresponding data set (within logs or review sections).
- ) Report Name: clicking on the report name will bring up the report graph.
Information
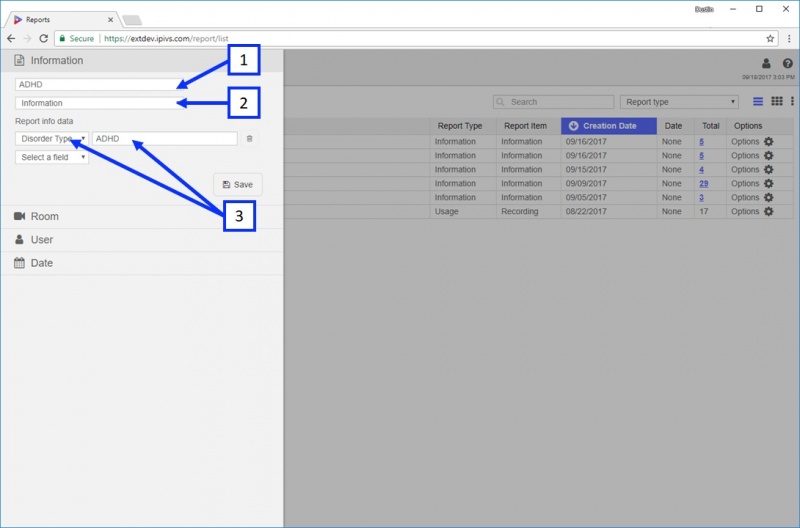
- ) Report Name: used to name the report, this name should be descriptive.
- ) Report Type: the report can be Information, Usage, or Alert the sections below will toggle based on the selected report type.
- ) Report Info: select information or marker fields at assign matching data.
Room(s)
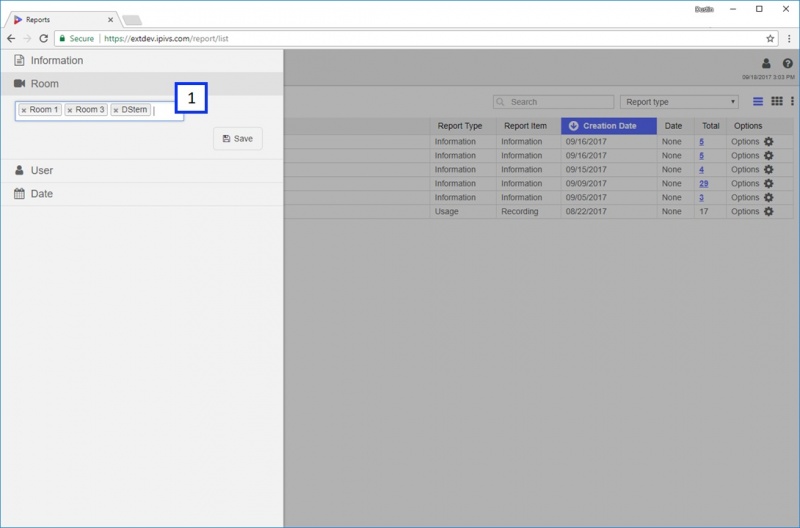
- ) Select rooms to include in this report, note leaving this section blank will include all rooms.
User(s)
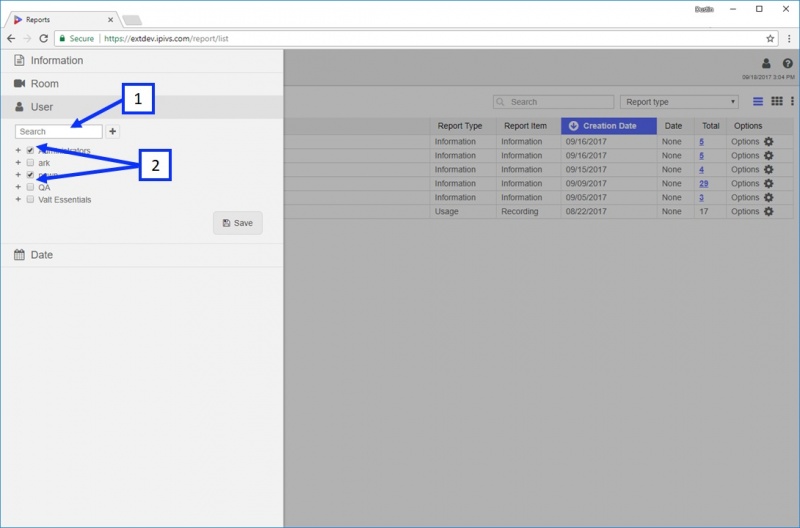
- ) Search: narrow list based on user or user group.
- ) Select user(s) or user group(s) recordings to include in this report, note leaving this section blank will include all users recordings.
Thumbnail View
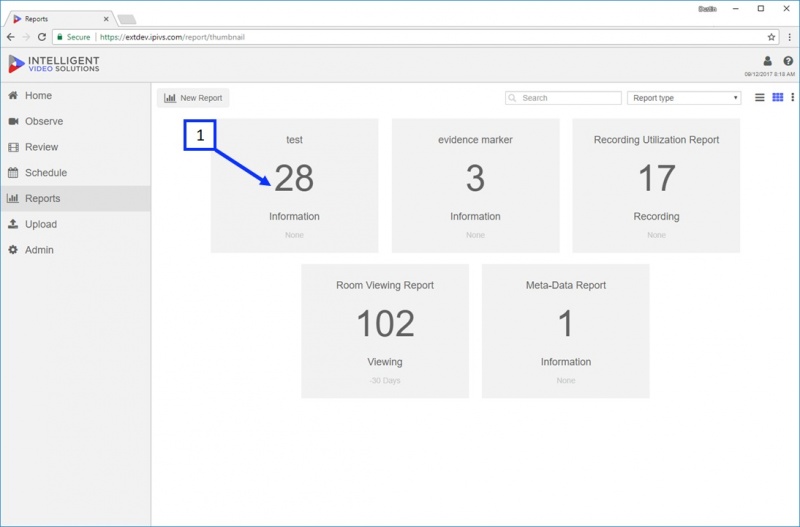
The report thumbnail view provides much of the report related information in a thumbnail layout as shown below.
- ) Clicking on the report tile will bring up the report graph.
Report Graph
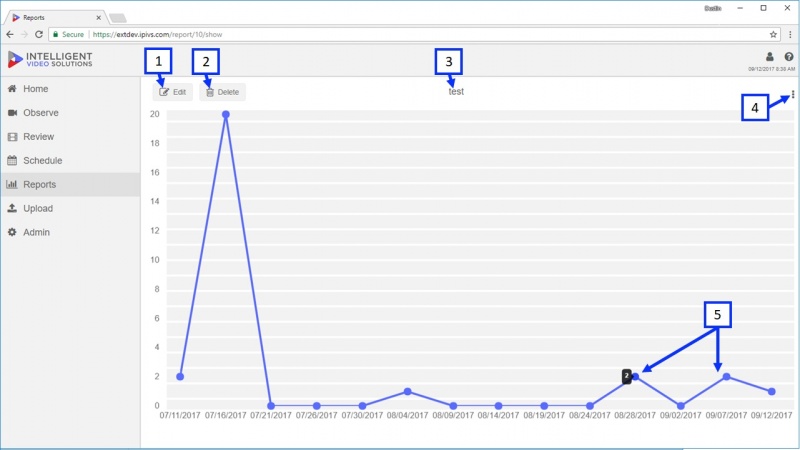
The report graph provides a line graph version of the data set. Clicking on individual dots will pull up the corresponding data.
- ) Edit: allows a user to edit the report information.
- ) Delete: removes the report.
- ) Title: displays the report name.
- ) Export: exports the graphical report to pdf.
- ) The dots on the line graph represent data points, clicking on any of the dots will pull up the corresponding data in either the review or log section of the application.
Upload
The upload option allows users to upload .mp4 (H264/AAC) or .asf (H264/MLAW) video files into the Valt system.
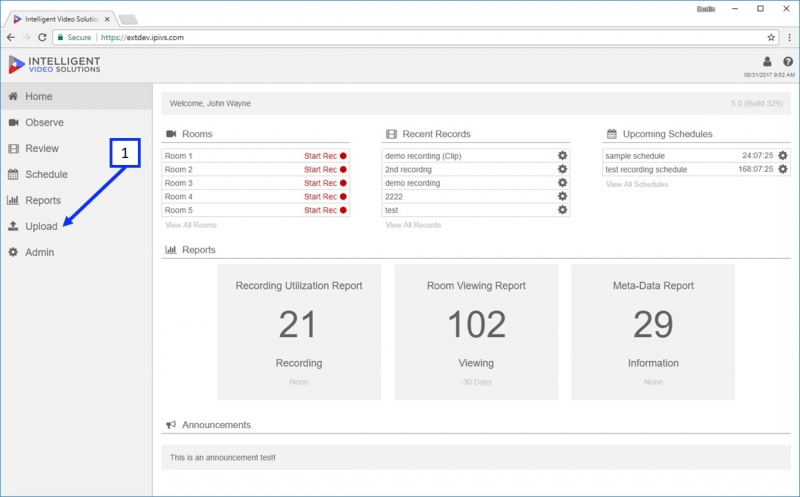
- ) To open the upload menu click the Upload button.
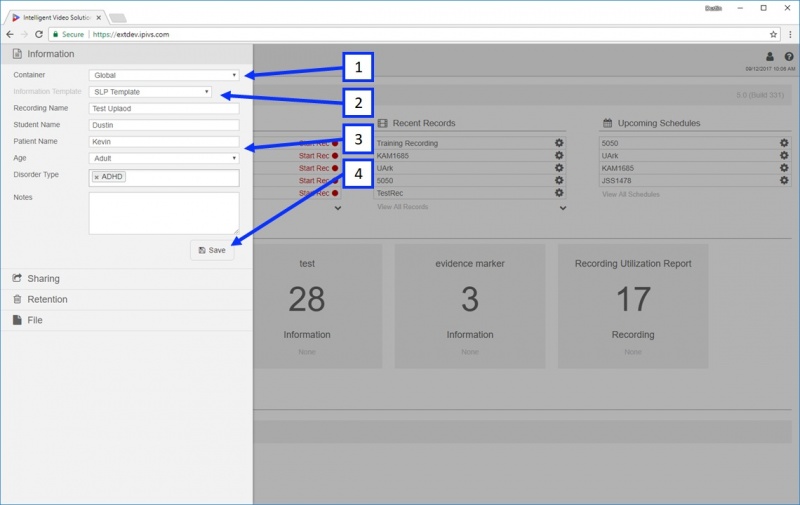
- ) Container: if the active user has access to more than one container they can select the container using this drop down menu. If they only have access to a single container this option will not be present.
- ) Information Template: if the active user has access to more than one information template, they will be able to select which one to use. If they only have access to a single information template, this option will not be present.
- ) Information: this is the searchable information that will be assigned to the uploaded video.
- ) Save: pressing Save will start the upload process. Note you will not be able to press Save until a file has been selected.
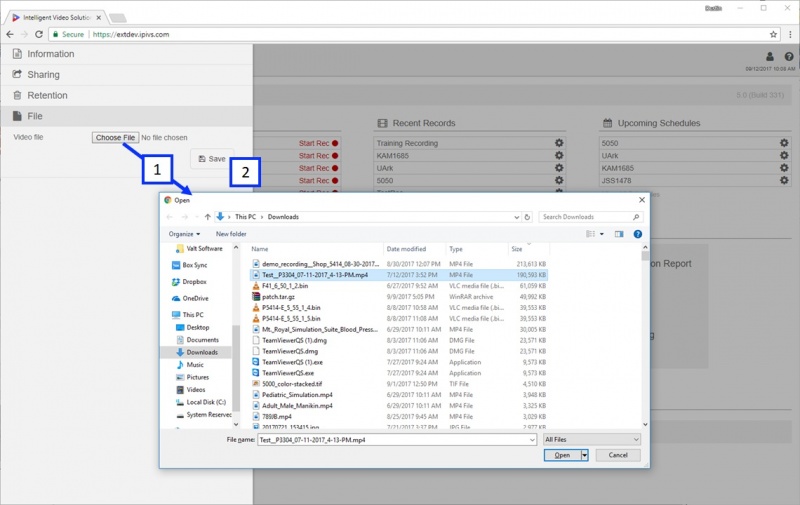
- ) Clicking on File, followed by Choose File, will pop open the browse dialog box. Browse to the file, and then click Open.
- ) Save: clicking Save will start the upload process.
- ) Working Indicator: this indicates the application is working on something.
- ) Progress Bar: this displays the upload / conversion progress.
- ) When an upload completes it will be visible under the Review section.
