VALT Administrator Guide 5.5
Contents
General
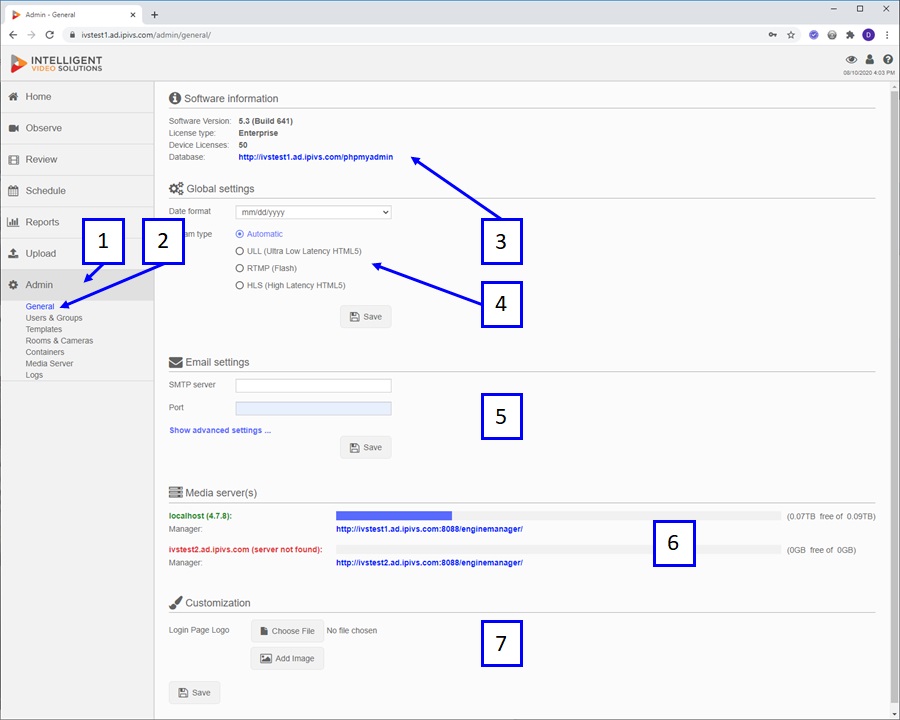
The general section under Admin provides a snapshot of the software along with some management links as shown below.
- Admin: if a user has administrative rights they will be able to click on the Admin section.
- General Link: the default section that will load once a user clicks on admin is General assuming they have access to this Admin section. The general system provides some basic application and system information.
- Software Information: this displays the software version, license type, number of licenses and a link to a database management tool (phpmyadmin).
- Global Settings: this allows a user to toggle settings that apply to all users. The date format and video streaming method for live observation.
- Email Settings: these are the connection settings to be used for email alerts.
- Media Server(s): this displays all the media servers associated with the software instance, the amount of storage used / remaining on each, and a management link for the video engine on each media server. Note if a media server is online it will have a green name, if it is offline the name will appear in red as shown above.
- Customization: this allows a user to customize the login page with alternative graphics and links.
Templates
Templates within VALT are used to tie searchable & reportable information to videos. A template(s) is assigned to a user group, where when that user starts or schedules a recording their set of templates will automatically get assigned to the associated recording(s). There are three types of templates listed below (Information, Marker, Evaluation). Each template type has a set of fields that can be used in the creation of the template. A template can consist of any number of fields and field types. These templates can be created and customized to meet a wide range of unique applications and workflows.
Information Templates
Information forms are typically used at the start of a recording to define information about that recording. Information templates can also be modified in the review section after a recording has been completed.
Information Field Types
When creating or modifying an information template there are a variety of field types that can be used. See below for reference.
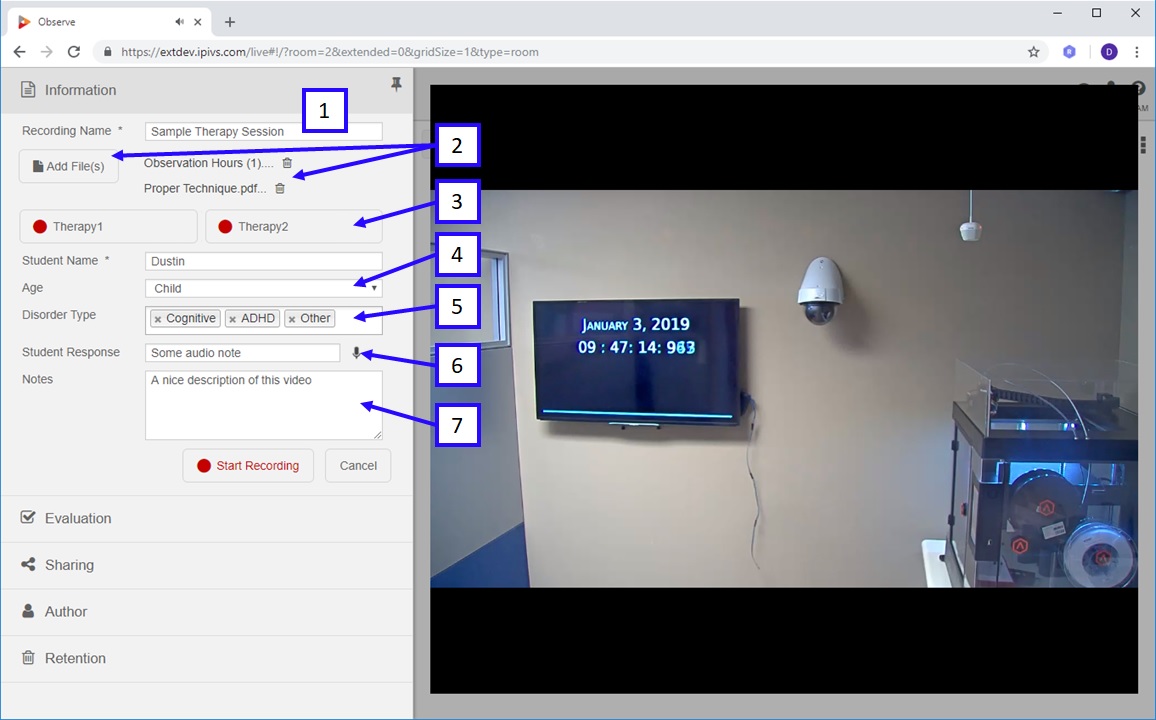
- Text: This field is a freeform text box with a title. This field is limited to 128 characters.
- Files: This field adds a button to the template that allows users to upload any number of .pdf, docx, and xlsx files. These files generate links within the template that can be used to download the uploaded files.
- Quick Record: This field creates a titled clickable button on the information form. If a user clicks this button it titles the recording with the button name and bypasses // ignores all other fields.
- Drop Down: This field is a drop down list with a title. Any number of drop down options can be defined, but only a single one can be selected when a user is filling out the template.
- Multi-Select: This field is a searchable drop down list with a title. Any number of drop down options can be defined, and any number can be selected when a user is filling out this template.
- Audio: This field is freeform text box with a title that includes icons for recording an audio note. If a recorded audio note is present, the user will have the option to play it back or delete it using associated icons.
- Note: This field is a larger freeform text box with a title. This field is limited to 500 characters.
Creating a New Information Template
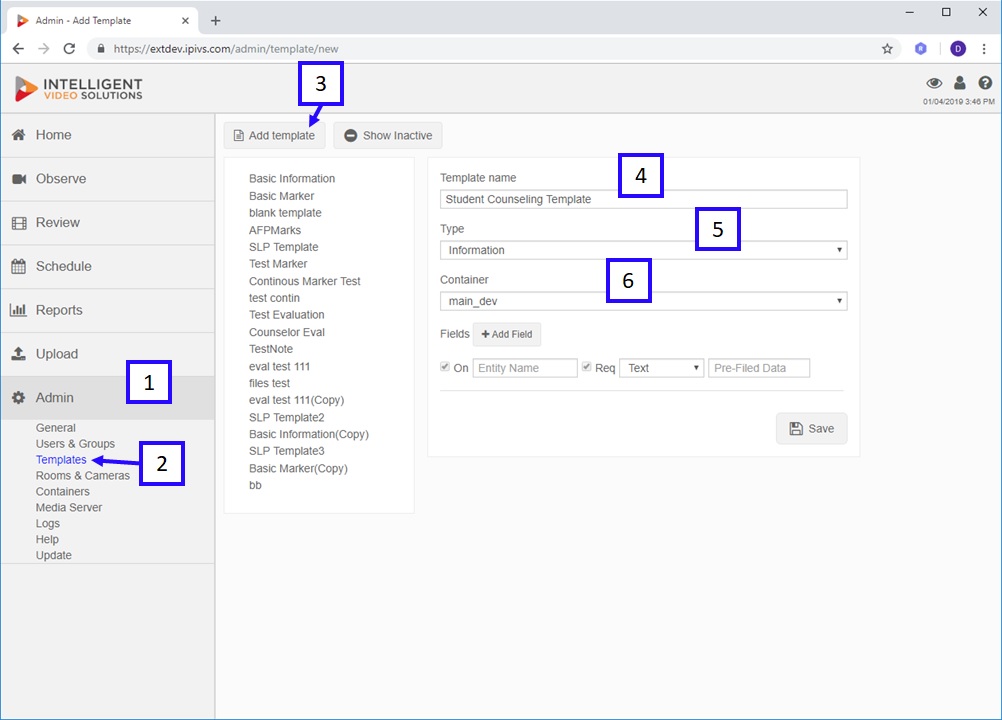
- Click the Admin button on the main navigation menu.
- Select Templates.
- Press Add Template.
- Enter a template name.
- Select the template type (Information).
- Select the container.
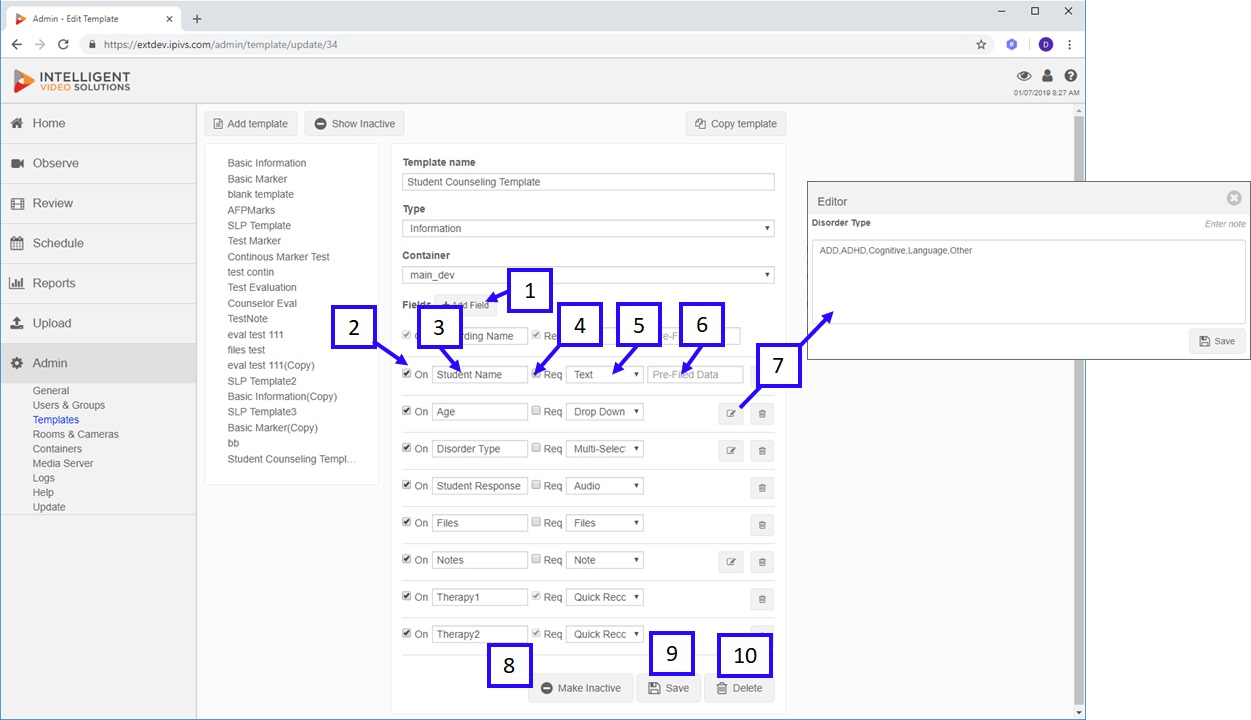
- The Add Field button is used to create new fields within the template as shown above. There is no limit to the number of fields you can associate with a single template.
- To enable a field within a template, the On checkbox must be checked.
- This dialog box is used to title the field.
- If the Req box is checked for the field it forces the user to input data into that field.
- This drop down box defines the field type.
- This dialog box can be set to pre-populate the template form with data for that field.
- This Edit button is used to launch the editor. This button appears for Drop Down, Multi-Select & Notes field types. For Drop Down & Multi-Select fields, it is used to define the user options within the form. This can be done by seperating each option with a comma as shown above. For the notes field, it can be used to pre-populate the data within the Notes text box field on the Information template form.
- This button deactivates the template so it is not shown and cannot be applied to user groups.
- This button saves the template.
- This button deletes the template, this button will only appear if there are no user groups using this template and if no recordings or schedules have been created using this template. If any of those conditions are true the only option to remove the template would be to deactivate (hide) the template.
Marker Templates
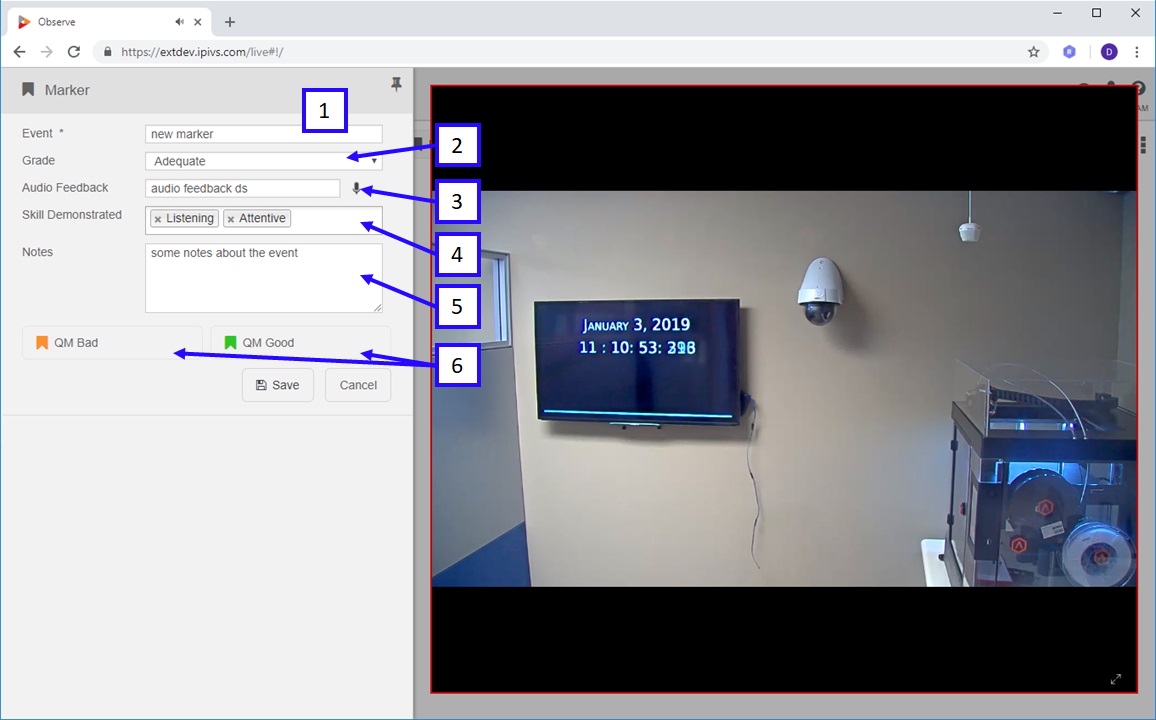
Markers are used to tie information to specific points in a recording. Markers can be added during a recording or after the fact when reviewing a video recording. Markers create key point within the video that allow users to easily jump right to that point within a longer video (much like chapters in a DVD). The data associated with a marker can be overlaid as text on the video during playback.
Marker Field Types
- Text: This field is a freeform text box with a title. This field is limited to 128 characters.
- Drop Down: This field is a dropdown list with a title. Any number of drop down options can be defined but only a single one can be selected when a user is filling out the marker form.
- Audio: This field is freeform text box with a title that includes icons for recording an audio note. If a recorded audio note is present, the user will have the option to play it back or delete it using associated icons.
- Multi-Select: This field is a searchable drop down list with a title. Any number of drop down options can be defined, and any number can be selected when a user is filling out this template.
- Note: This field is a larger freeform text box with a title. This field is limited to 500 characters.
- Quick Mark: This field creates a titled clickable button on the marker form. If a user clicks this button, it inserts a marker and titles the marker with the button this action bypasses // ignores all other fields.
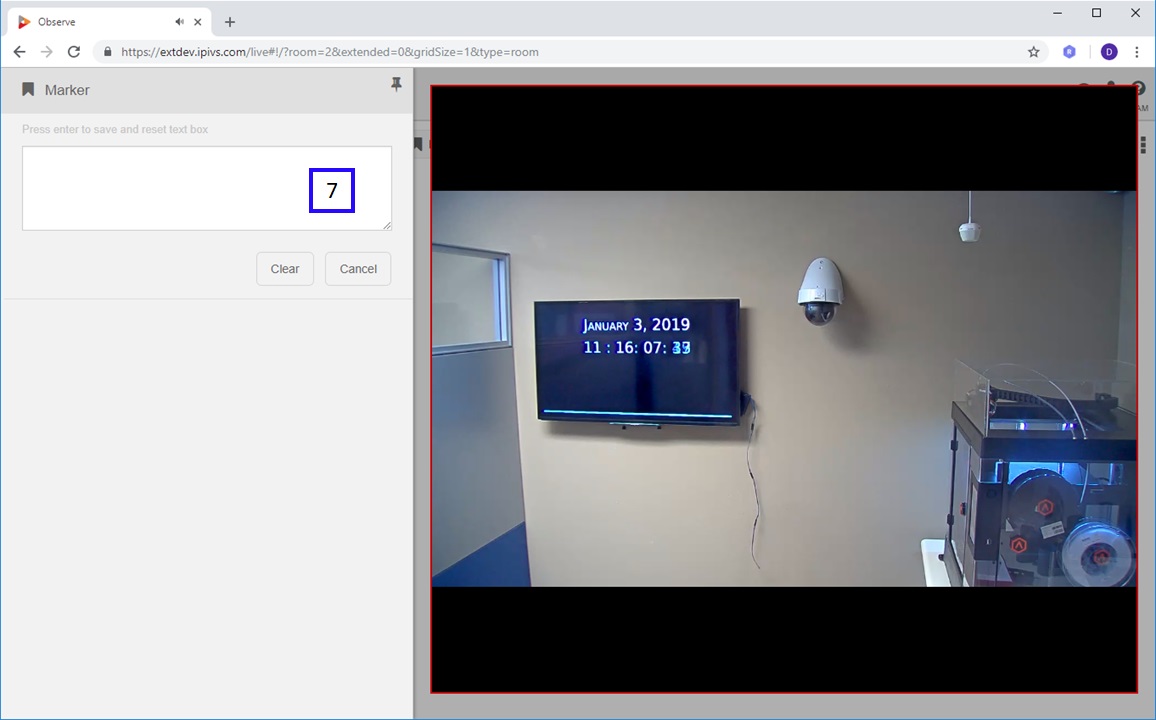
- Continous Marker: This field is only available as the first field within the marker template. Changing to this changes the formatting of the marker. When the mark button is pressed it brings up the form as shown below and changes the behavior. To insert a marker a user can now simply type and press enter. The marker is always inserted when they begin to type. This method is generally used when the workflow requires that many markers are being inserted.
Creating a New Marker Template
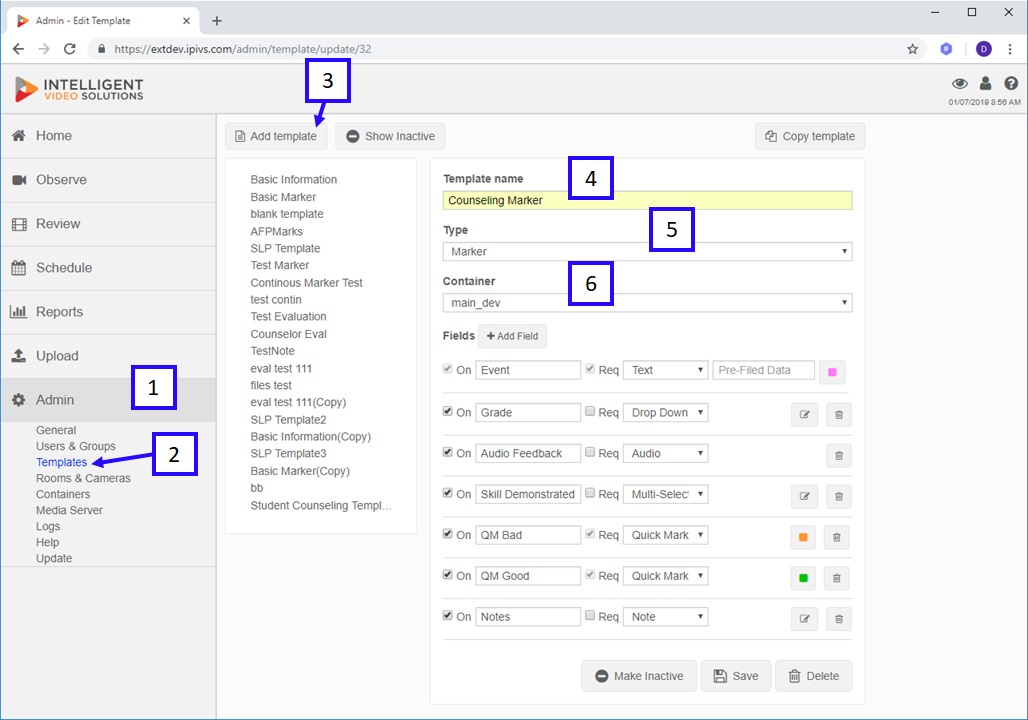
- Click the Admin button on the main navigation menu.
- Select Templates.
- Press Add Template.
- Enter a template name.
- Select the template type (Information).
- Select the container.
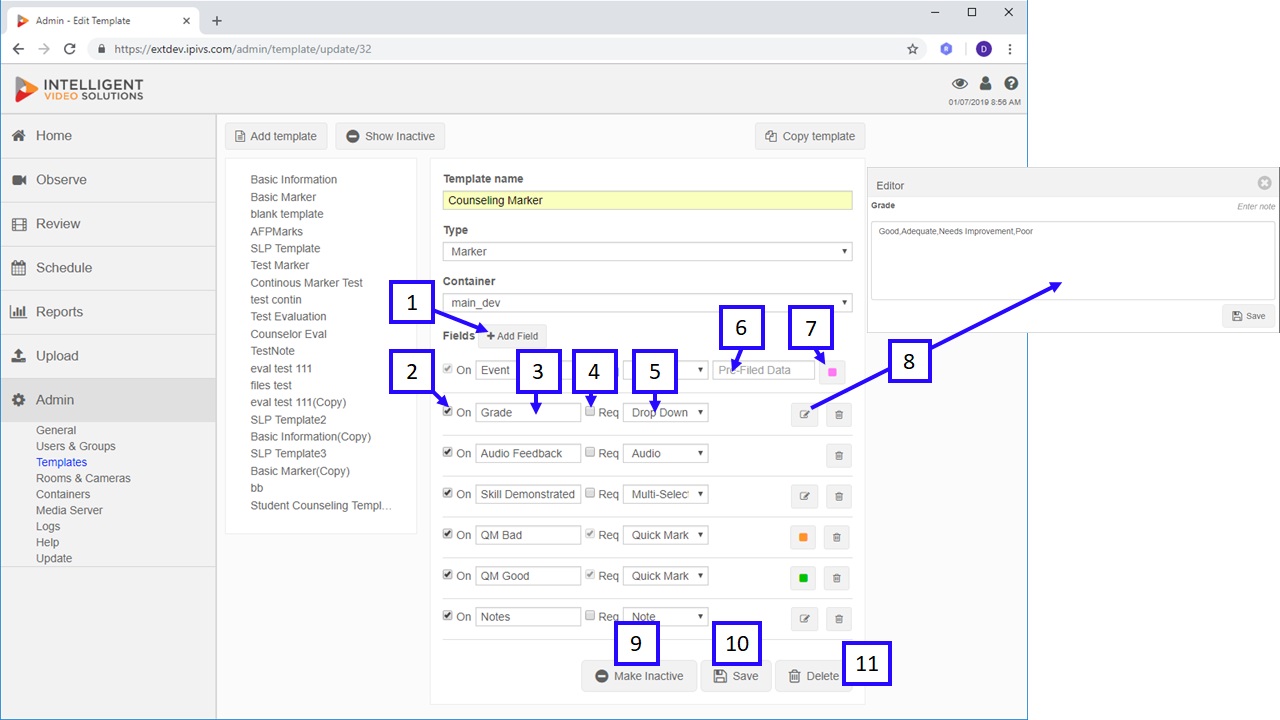
- The Add Field button is used to create new fields within the template as shown above. There is no limit to the number of fields you can associate with a single template.
- To enable a field within a template form the On checkbox must be checked.
- This dialog box is used to title the field.
- If the Req box is checked for the field it forces the user to input data into that field.
- This drop down box defines the field type.
- This dialog box can be set to pre-populate the template form with data for that field.
- This button is used to define the marker color that shows up on the timeline when a marker is inserted.
- This Edit button is used to launch the editor. This button appears for Drop Down, Multi-Select & Notes field types. For Drop Down & Multi-Select fields, it is used to define the user options within the form. This can be done by seperating each option with a comma as shown above. For the notes field, it can be used to pre-populate the data within the notes text box field on the information template form.
- This button deactivates the template so it is not shown and cannot be applied to user groups.
- This button saves the template.
- This button deletes the template and will only appear if there are no user groups using this template, and if no recordings or schedules have been created using this template. If any of those conditions are true, the only option to remove the template would be to deactivate (hide) the template.
Evaluation Templates
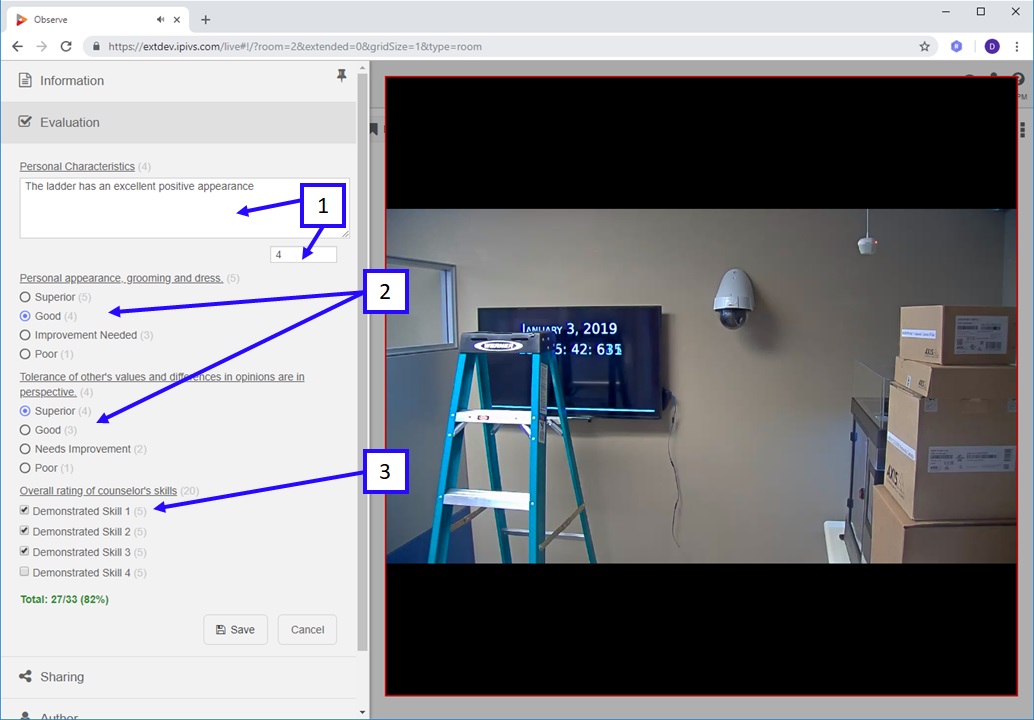
Evaluation templates are typically used during a recording, or after a recording is completed. An evaluation form acts much like an information form in that it is used to tie a single set of information into the recording. The big difference between an evaluation and information form is that numeric values can be assigned to the fields within an evaluation form. This allows scoring to be done on each item and the overall form. Evaluation also allow unique reports to be run against them that are based on score %.
Evaluation Template Fields
When creating or modifying an evaluation template, there are a variety of field types that can be used. See below for reference.
- Description: This field is a larger freeform text box with a question. This field is limited to 500 characters and allows the numerical value or score to be entered in the box below.
- Single select: This field consists of radio button(s) each with a description and associated score. This field type allows a user to select a single option as shown below.
- Multi Checkbox: This field consists of checkboxes each with a description and associated score. This field type allows a user to select multiple boxes as shown below.
Creating a New Evaluation Template
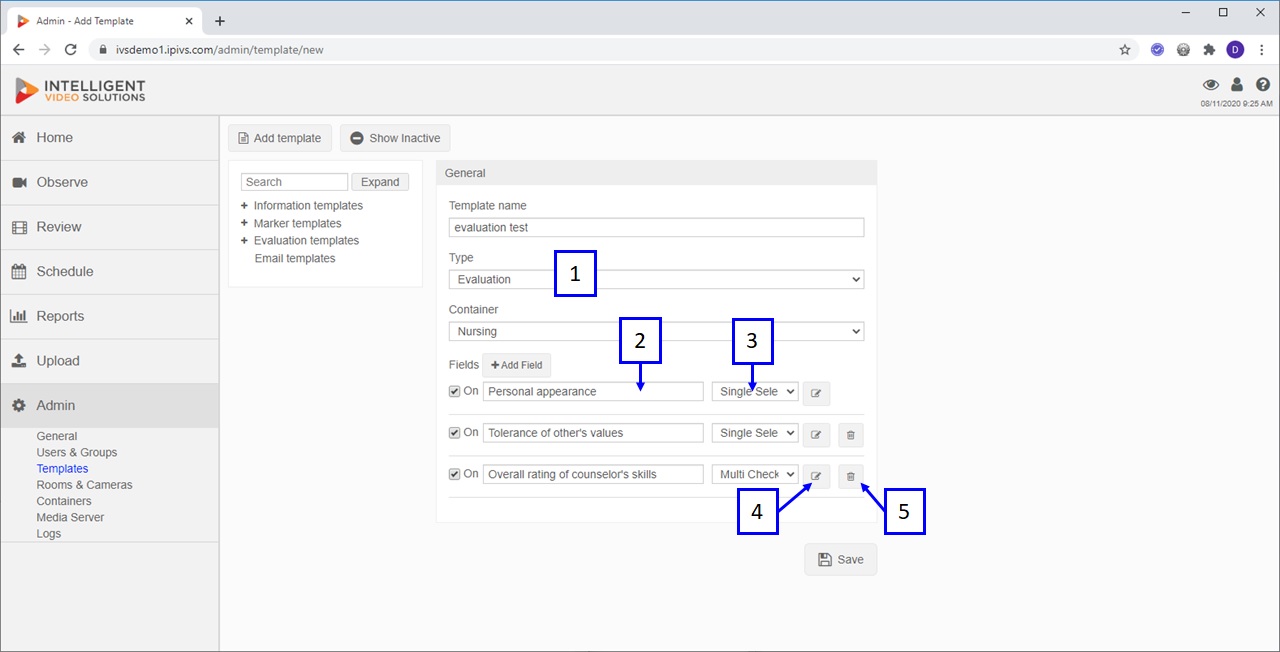
- Select Evaluation as the template type
- Add and name fields appropriately
- Select the field type, options include: Single Select, Multi Checkbox and Description.
- Edit button allows the user to enter the value along with options.
- Delete button deletes the field.
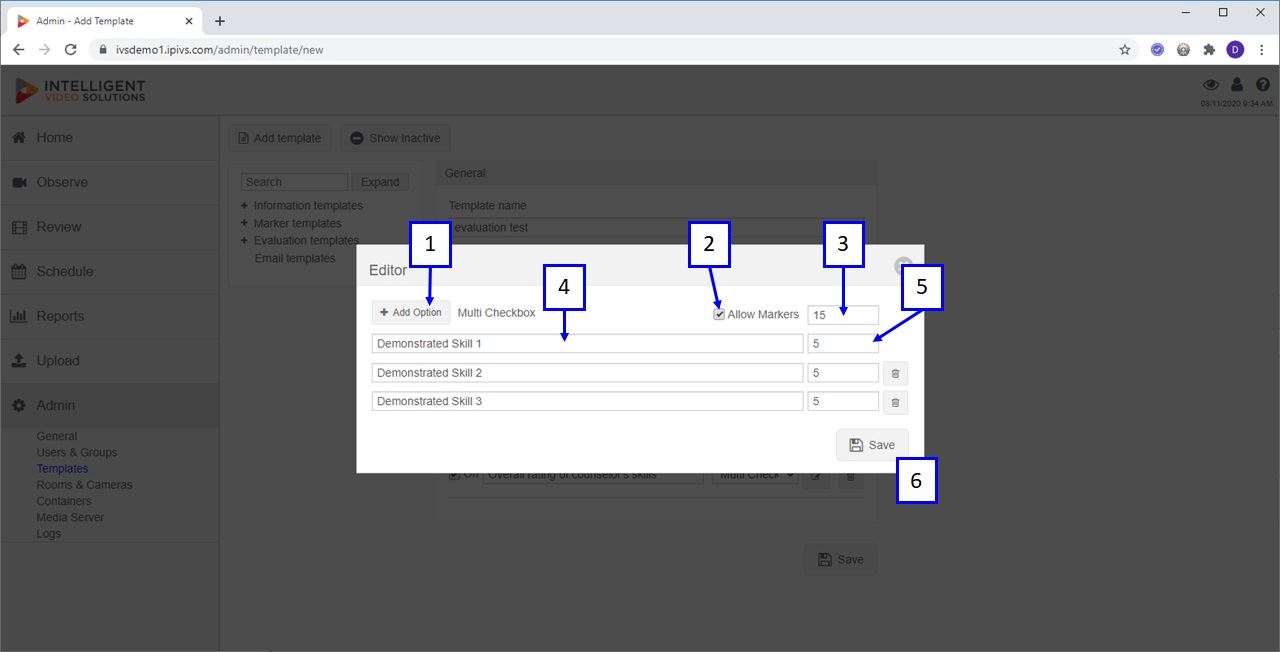
- Add Option: this button adds additional options to the field.
- Allow Markers: this checkbox allows users to plot and call markers from this field within the evaluation form.
- This dialog box defines the total maximum point value for the field.
- This dialog box is used to name the option.
- This dialog box defines the point value for the associated option.
- Press Save to save the field, note once the template is complete the user will also press save at the template level.
Assigning a Template
Templates are always assigned to user groups, with the individual users then being added to the user groups
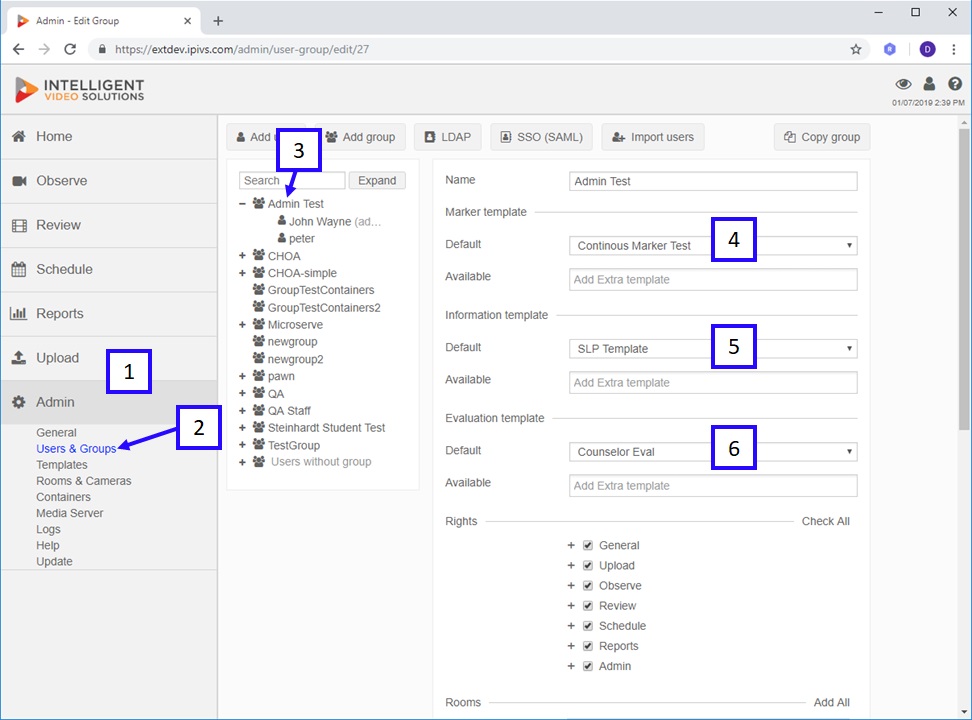
- Click the Admin button on the main navigation menu.
- Select Users & Groups.
- Click on the user group.
- Select a default marker template using the drop down menu, and additional marker templates can be added in the dialog box below allowing the user(s) to select a different template to be used for a specific recording or schedule.
- Select a default information template using the drop down menu, and additional information templates can be added in the dialog box below allowing the user(s) to select a different template to be used for a specific recording or schedule.
- Select a default evaluation template using the drop down menu, and additional evaluation templates can be added in the dialog box below allowing the user(s) to select a different template to be used for a specific recorded video.
Rooms
Rooms act as containers for a camera or group of cameras. Rooms can be recorded using a contact closure / card reader, schedule, or on demand through the user interface. Rooms are also assignable from a user permission perspective.
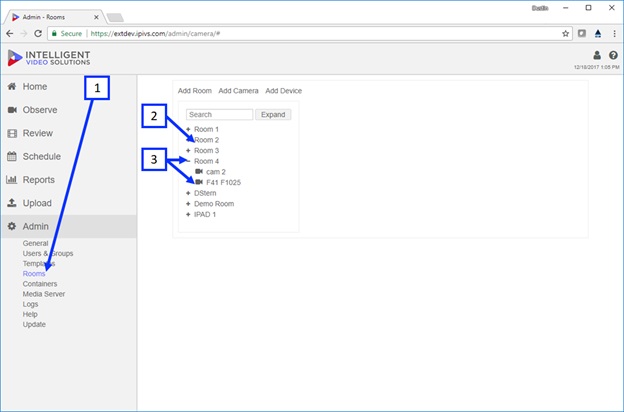
- Clicking on the Rooms link under Admin will take you to the section displayed above.
- Clicking on a room name will allow a user to edit the room name / settings.
- Expanding a room will reveal the camera(s) associated with a room, while clicking on a camera will allow a user to edit the camera name / settings.
Clicking on a room name or clicking Add Room will pull up the room settings as shown below.
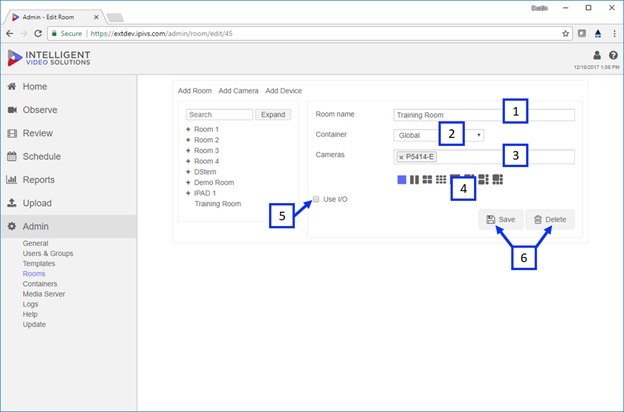
- Room Name: a room name can be entered here. This name will be the identifier that will be used throughout the rest of the system.
- Container: this specifies the container the template will use. Users are only able to see objects that are in the same container or a sub container.
- Cameras: this is used to associate cameras to a room.
- View Type: this can be used to define a view type default for the room, if no option is selected the system will automatically use the assumed best fit view type for the number of cameras.
- Use I/O: this checkbox should be checked if you are using a push button to start / stop recordings. When this is checked a sub menu with options will appear.
- Save / Delete: Once a room is configured pressing Save will save the changes.
Clicking on a camera name or clicking Add Camera will pull up the camera settings shown below.
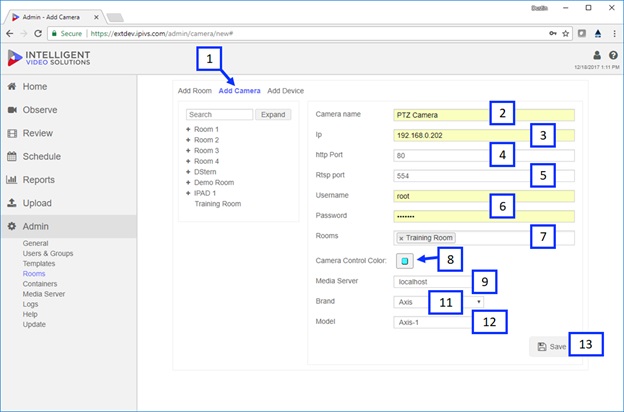
- Add Camera: to add a new camera click the Add Camera button, if the system has available device licenses available a menu will pop up as shown above.
- Camera Name: this is a label that can be assigned to the camera, this name will be used throughout the rest of the system.
- IP: the DNS name or IP address of the camera should be entered here.
- HTTP Port: this is the port that will be used to authenticate to the camera (note: the default should be 80 unless changed within the camera).
- RTSP Port: this is the port that will be used to stream video between the camera and server (note: the default should be 554 unless changed within the camera).
- Username / Password: enter a admin username and password for the camera.
- Rooms: this can be used to assign the camera to room(s).
- Camera Control Color: the control color can be changed using this color picker. Controls are overlaid on top of the video when enabled and include digital zoom and PTZ.
- Media Server: this option is used to define what server the camera is connected to.
- Brand: this drop down specifies what camera type is being used.
- Model: this drop down specifies what model camera is being used.
- Save: once the camera settings are set pressing Save will commit the settings / changes.
Clicking on a camera name or clicking Add Device will pull up the device settings shown below.
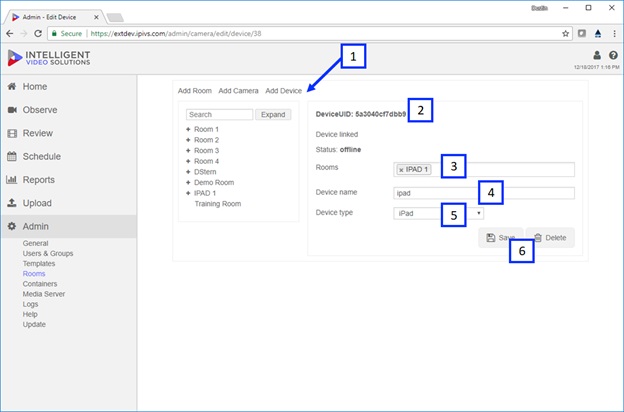
- Add Device: to add a new device click the Add Device button, if the system has available device licenses available a menu will pop up as shown above.
- Device UID: if an iPhone / iPad is being added the device UID will need to be entered on the client side.
- Rooms: this is used to add the device to room(s).
- Device Name: this is a label that can be assigned to the device. This name will be used throughout the rest of the system.
- Device Type: this is used to define the type of device.
- Save / Delete: make sure to click Save after settings are changed to commit the changes.
Containers
Containers are used to segment objects. A user is only able to see objects (rooms, templates, user groups) in their container or a sub container. Containers are typically implemented when multiple departments with administrator(s) of each department are sharing a single software instance.
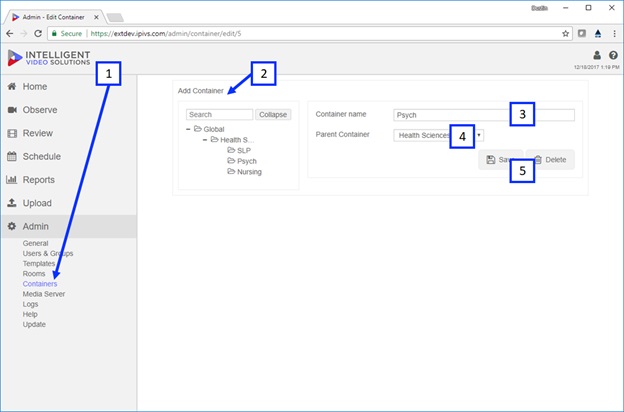
- Clicking on the Containers link under Admin will take you to the section displayed above.
- Add Container: clicking on Add Container brings up the menu shown on the right above.
- Container Name: this is the container identifier for the container throughout the rest of the system.
- Parent Container: users have access to sub containers but not parent containers. To place a container under another use the Parent Container drop down menu.
- Save / Delete: Once a container is configured click Save to commit the changes.
Media Server
Media servers are used to stream video / connect to cameras and store video.
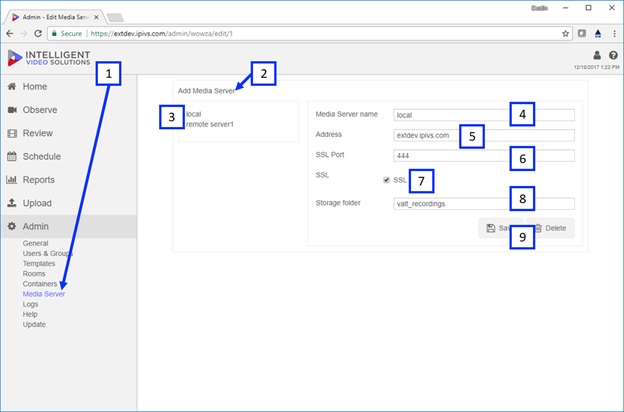
- Clicking on the Media Server link under Admin will take you to the section displayed above.
- Add Media Server: clicking on Add Container brings up the menu shown on the right above.
- This lists all the existing media servers configured for the software instance.
- Media Server Name: this is an identifier used throughout the system.
- Address: the IP address or DNS name of the server.
- SSL Port: if encrypted video is desired this designates the default port used (note: 444 is the default unless otherwise specified within configuration files and server firewall).
- SSL: this checkbox enables video encryption.
- Storage Folder: this designates the folder name that the video will be stored in (note: default is valt_recordings unless otherwise specified).
- Save function
Transcription
Prior to setting up transcription you will need an Amazon AWS account, an S3 storage bucket and a Access ID & Secret Key for API access.
AWS Transcription Setup

- Log into AWS with a root level account
- Click on the "S3" Storage service

- Press the "Create New Bucket" button

- Give the bucket a name
- Click the "Save" button

- Click on the account name then select "My Security Credentials"

- Click on the "Create New Access Key" button

- Download and save the Key file (you will need this to configure VALT later)
VALT Transcription Setup
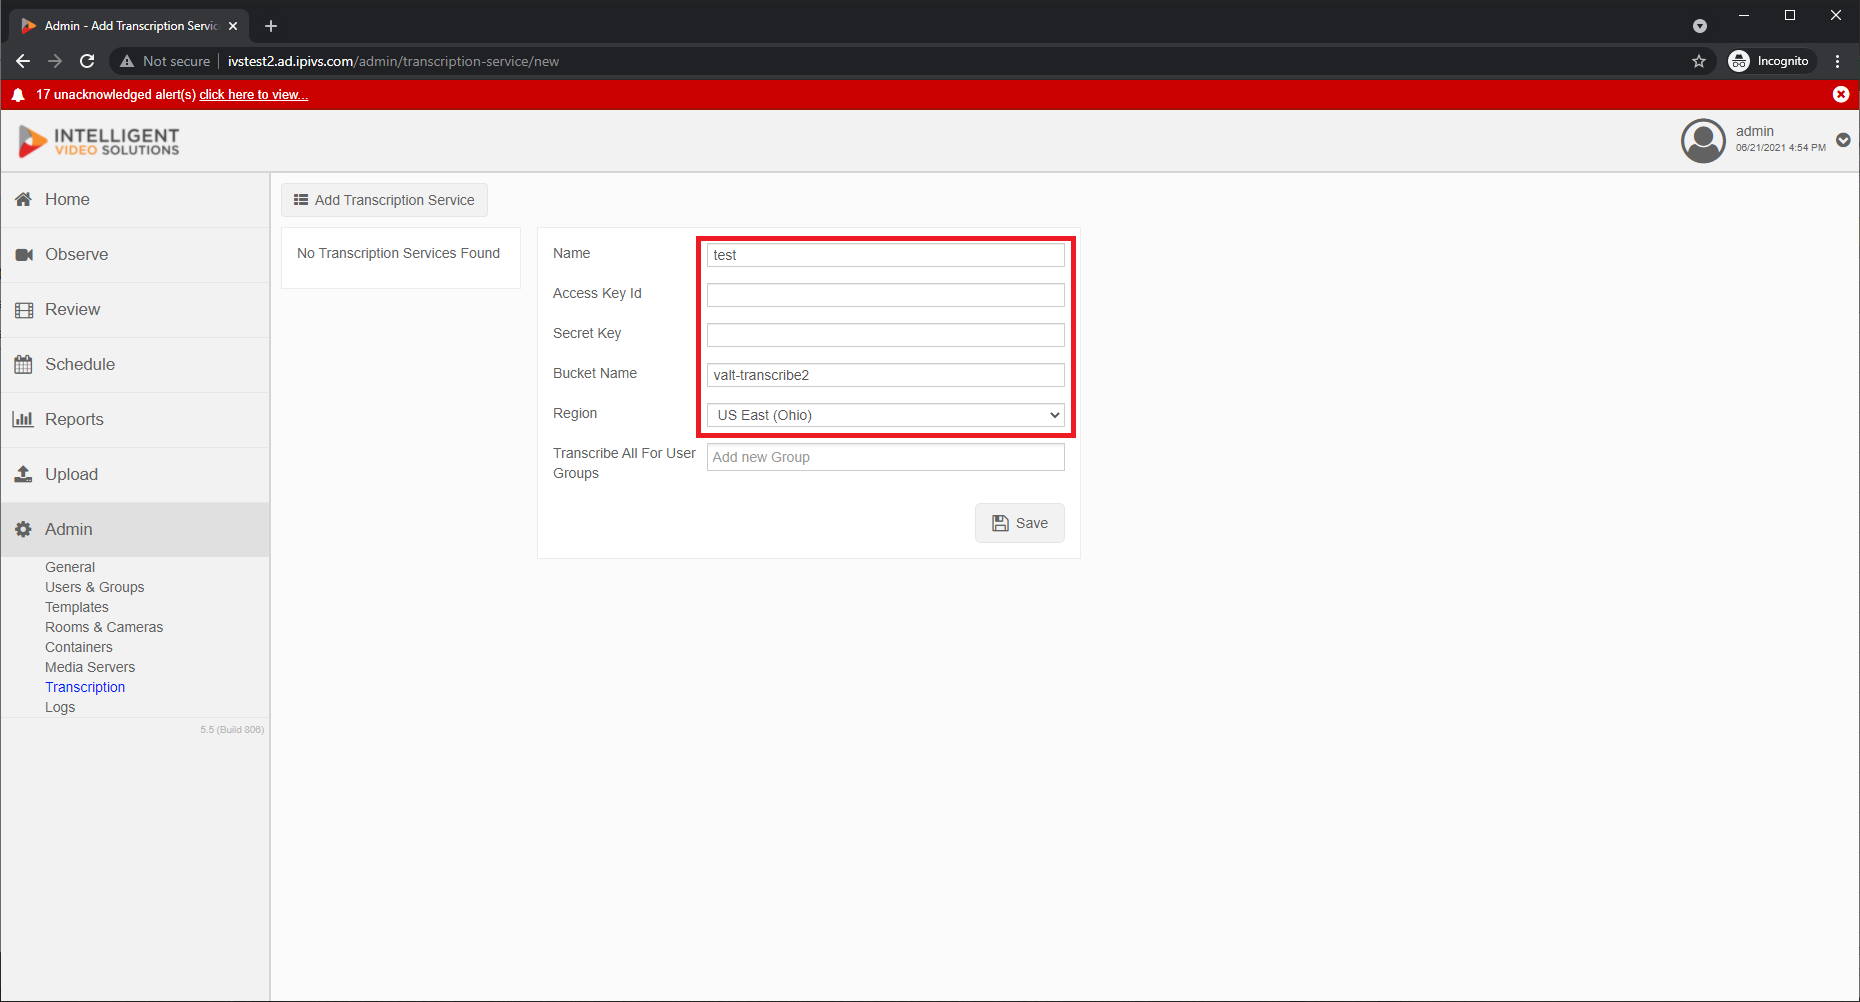
- Click on the "Admin" section then select "Transcription"
- Click on "Add Transcription Service"
- Enter a name (this is just a unique identifier used by VALT)
- Enter the Access Key ID gathered from AWS
- Enter the Secret Key that matches the Access Key from AWS
- Select the Region that the AWS bucket is set within
- Click "Save"
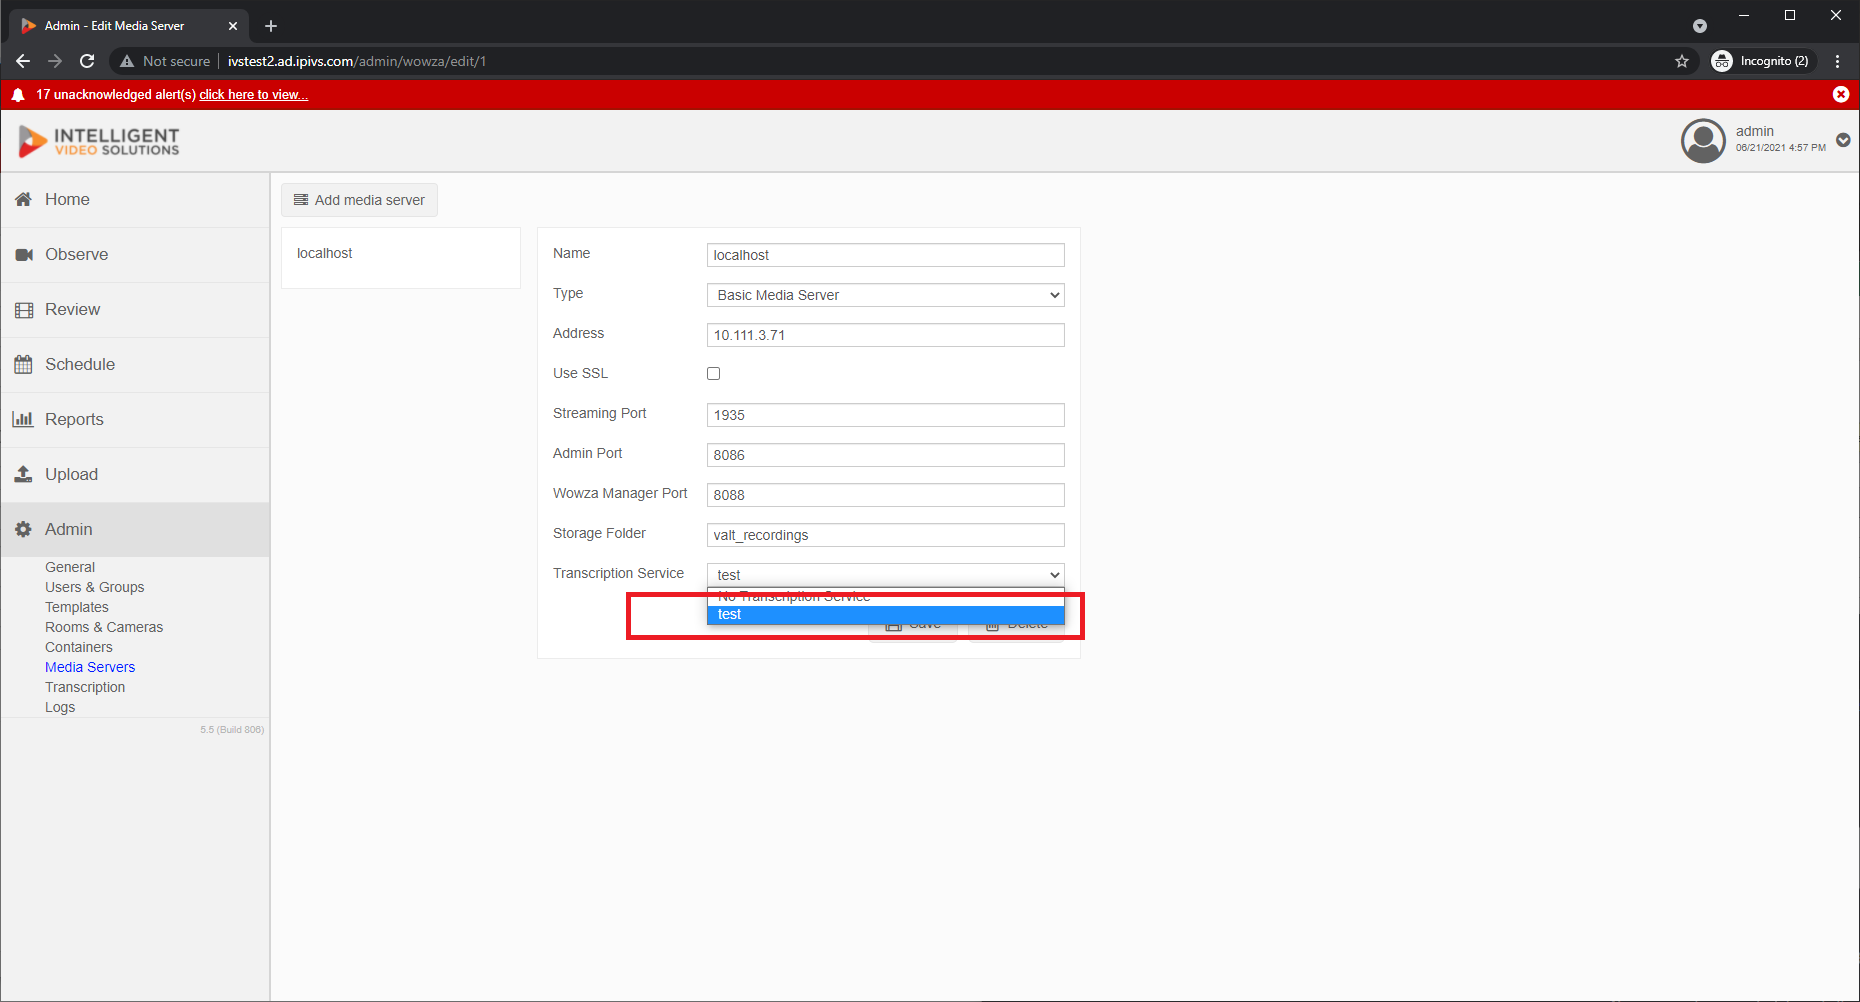
- Click on the "Admin" section then select "Media Servers"
- Click on a media server you want to associate with the newly created transcription service
- Click on the "Transcription Service" drop down and select the name of the transcription service
- Click "Save"
Users & Groups
The User and Groups section is where all the user management is done and where all the permissions are set up.
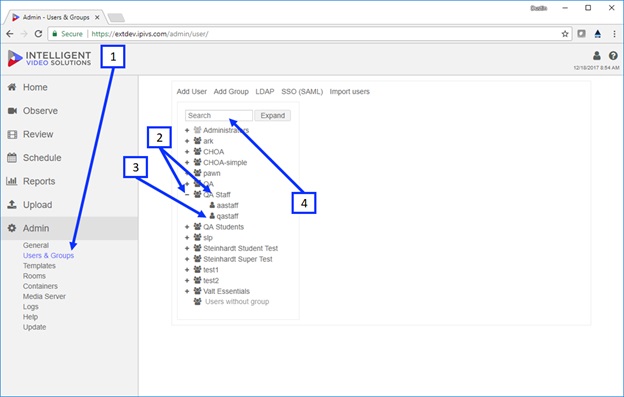
- Clicking on the Users & Groups link under Admin will take you to the section displayed above.
- Clicking on a group name will pull up the groups settings, clicking on the + next to a group will expand the group and reveal all the users associated with that group.
- Clicking on a user name will pull up the user settings.
- The search box can be used to quickly find a user or group
Group Management
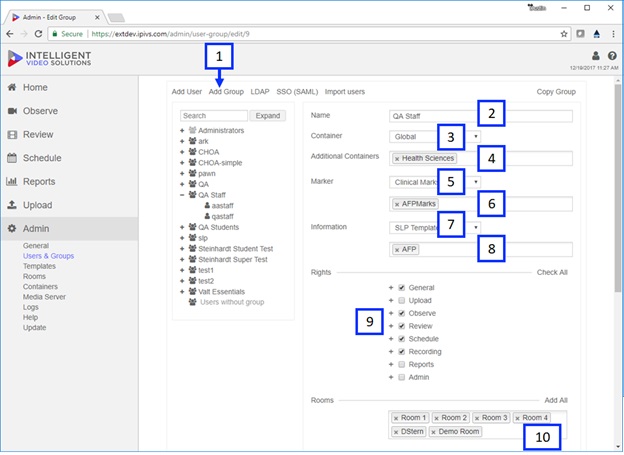
- Clicking on Add Group pulls up the group section on the right shown above.
- Group Name: this is used as an identifier for the group.
- Container: this specifies the container the user group will use. Users are only able to see objects that are in the same container or a sub container.
- Additional Containers: this is used to specify additional containers, any users within a group that has multiple containers would be able to see objects within both.
- Marker Template: this specifies the default marker template users within this group will use.
- Additional Marker Templates: this is used to specify additional marker templates, the additional templates will show up in a drop down that can be selected when a user clicks the mark button.
- Information Template: this specifies the default information template users within this group will use.
- Additional Information Templates: this is used to specify additional information templates, the additional templates will show up in a drop down that can be selected when a user clicks the record / schedule button.
- Rights: this section is used to designate what a user can do within the software, clicking the + next to any of the sections will reveal all the sub-rights.
- Rooms: this is used to assign access to rooms for users within the group. This access applies to both live and recorded video.

- Video Access: this section defines what videos users within this group have access to based on who authored the recordings. This applies to both live observation and review.
- Show Advanced Settings: clicking this link will expose additional user group settings.
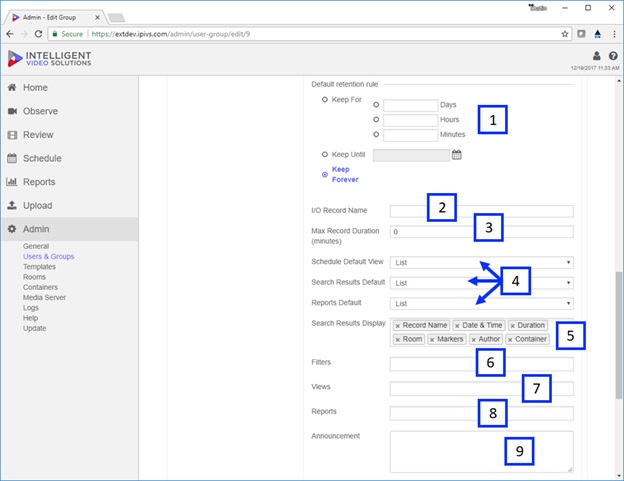
- Retention Rule: this is used to define how long recordings are kept on the system before they are automatically deleted. Changing this setting will retroactively affect existing recordings.
- I/O Record Name: if a user within this user group is configured to author a recordings started or stopped using a button this setting will create the default recording name for those recordings.
- Max Record Duration: this setting defines the maximum record length before a recording is automatically stopped.
- Default Views: for sections that offer different view layouts (list vs. thumbnail) the default preference for users within this group can be set here.
- Search Results Display: this is used to set the columns / information that is displayed at the top level when looking at the search results within the review section.
- Filters: filters are user specific by default but a filter (advanced search query) can be shared across a user group using this setting.
- Views: views are user specific by default but a view (custom camera layout) can be shared across a user group using this setting.
- Reports: reports are user specific by default but a report can be shared across a user group using this setting.
- Announcement: anything entered in this field will show up in the home screen under announcements for the users within the user group.
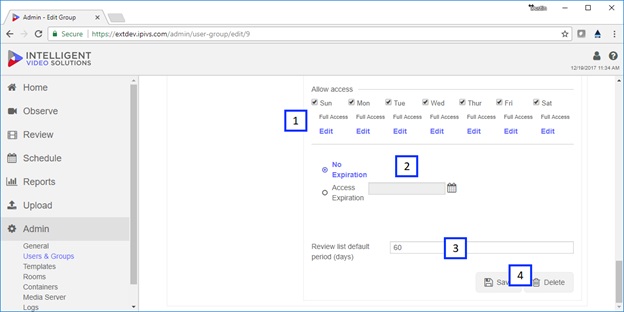
- Allow Access: this section can be used to restrict users to only be able to use the system during certain days or even certain times within certain days.
- Expiration Date: this can be used to remove access to the system for all users within the group on a certain date.
- Review list Default: this is the default number of days that are pulled up in the search query when a user within the group clicks the review button. The user can go back further to find older videos by adjusting the date range.
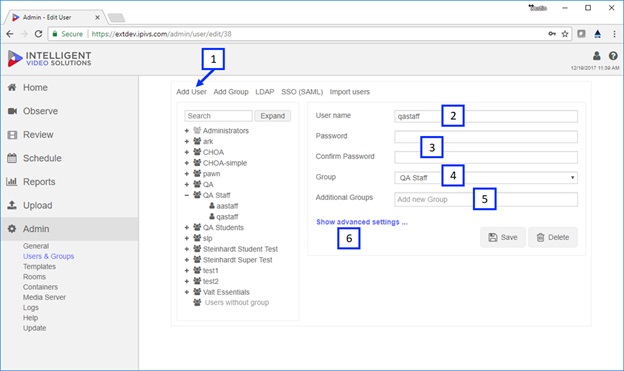
- Clicking on Add User pulls up the user section on the right shown above.
- User Name: to create a local user account enter a user name.
- Password / Confirm: assign the user a password.
- Group: this specified the user group the user will be a part of.
- Additional Groups: this is used if the user will be a part of more than a single group. From a rights and video access perspective, the settings within both groups will be merged.
- Show Advanced Settings: clicking this link will reveal additional user settings.

- SAML IDP: this auto populates when an SSO / SAML user is imported and defines the IDP to be used to authenticate this user against.
- Mobile Pin: this is used in conjunction with our BEAM application and provides a pin code that is associated with the user account for use with BEAM.
- Control Type: this is used to change the PTZ control type for a user.
- Card Number: this is used in conjunction with card reader(s) so the system knows what card number should be associated with a user.
- Rooms: you can use this section to grant access to rooms, these would be in addition to what the user already has access to based on their user group.
- Display Name: this can be used so a different identifier is used throughout the system other than the actual account name.
- Video Access: this section is used to grant access to live / recorded video based on who authored it for the user, this is in addition to what they already have access to based on their user group.
- Allow Access: this section is used to grant / restrict access to the system during certain times / days. This setting would be in addition to what is set on the group level.
LDAP Management
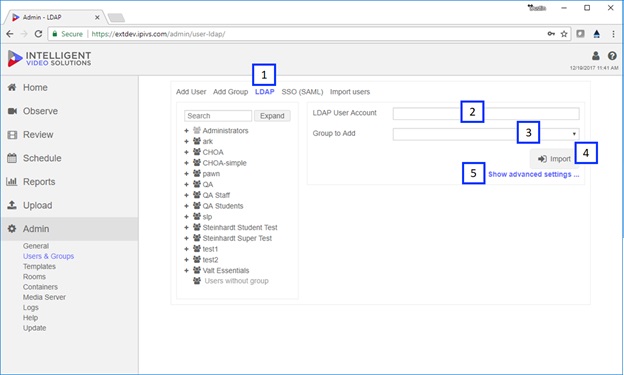
- Clicking on LDAP pulls up the user section on the right shown above.
- LDAP User Account: this can be used to import a single LDAP user, you will need to enter the full DN of the user account excluding the DC information. Example: CN=dstern,OU=Users
- Group to Add: this drop down menu is used to specify the group the LDAP user will be imported into.
- Import Button: clicking this will query LDAP and import the specified user.
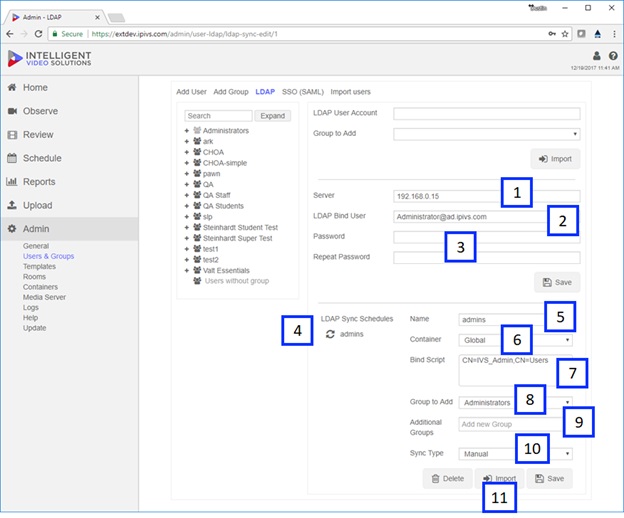
- Server: used to point to LDAP server / cluster using either the IP address or DNS name.
- LDAP Bind User: this is the account that will be used to bind / query LDAP.
- LDAP Bind Password: once the server, bind user, and password are entered pressing Save should result in a connected message.
- LDAP Sync Schedules: clicking on an existing sync schedule will pull the settings up on the right as shown. If no sync schedule is selected the settings will be blank.
- Name: this is an identifier for the sync schedule.
- Container: this drop down menu is used to specify a container for the sync schedule (this does not affect the imported users but just the sync schedule object).
- Bind Script: this is can be pointed to an OU or security group, the sync schedule will pull in all the matching user accounts. Example: CN=IVS_Admins,OU=User_Groups
- Group to Add: the users that match the bind script will be placed into this group automatically.
- Additional Groups: users that match the bind script will be placed into these groups as well.
- Sync Type: the sync can be set to Automatic or Manual. The automatic interval can be adjusted to any duration but is set to 24 hours by default.
- Import: this button is used to execute the sync and bring in the matching LDAP user accounts.
SSO Configuration
Import Users

- Clicking Import Users pulls up the section on the right shown above
- Group to Add: this drop down menu defines the user group the imported users will be associated with.
- Chose File: this button allows a user to browse to the file that contains the user data to be imported.
- Update: this button executes the import.
User Rights
The VALT system has a detailed user rights management system: almost every feature / function can be enabled or disabled based on requirements. Below is a list of the rights and an explanation on how each translates to the application.
Users & Groups Rights Table
| Permission | Group | User |
|---|---|---|
| General | X | |
| General: Home | X | |
| General: Alert | X | |
| General: Edit Profile | X | |
| General: Change Password | X | |
| General: Password Rules | X | |
| General: Notifications | X | |
| Upload | X | |
| Upload: Sharing | X | |
| Upload: Author | X | |
| Upload: Retention | X | |
| Observe | X | |
| Observe: Recording | X | |
| Observe: Recording: Start | X | |
| Observe: Recording: Prepare | X | |
| Observe: Recording: Pause | X | |
| Observe: Recording: Pause: All Authors | X | |
| Observe: Recording: Pause: Resume All Authors | X | |
| Observe: Recording: Stop All Authors | X | |
| Observe: Recording: Sharing | X | |
| Observe: Recording: Evaluation | X | |
| Observe: Recording: Evaluation: View Option Values | X | |
| Observe: Recording: Evaluation: View Field Values | X | |
| Observe: Recording: Evaluation: View Total Values | X | |
| Observe: Recording: Change Author | X | |
| Observe: Recording: Retention | X | |
| Observe: Recording: Options | X | |
| Observe: Recording: Options: All Authors | X | |
| Observe: Recording: Add Markers | X | |
| Observe: Recording: Delete Markers | X | |
| Observe: Recording: Prepare | X | |
| Observe: Recording: Pause | X | |
| Observe: Recording: Pause: All Authors | X | |
| Observe: Recording: Pause: Resume All Authors | X | |
| Observe: Search | X | |
| Observe: Multi-Record | X | |
| Observe: Views | X | |
| Observe: Views: Recording | X | |
| Observe: Talkback | X | |
| Observe: PTZ | X | |
| Observe: PTZ: Control | X | |
| Observe: PTZ: All Authors | X | |
| Observe: PTZ: Presets | X | |
| Observe: PTZ: Add/Delete | X | |
| Observe: Lock | X | |
| Observe: Lock: Unlock all Users | X | |
| Observe: Edit Sharing | X | |
| Observe: Edit Sharing: Create Link | X | |
| Review | X | |
| Review: Markers | X | |
| Review: Markers: View All Authors | X | |
| Review: Markers: Add | X | |
| Review: Markers: Edit | X | |
| Review: Markers: Remove | X | |
| Review: Markers: Overlay | X | |
| Review: Tools | X | |
| Review: Tools: Clip | X | |
| Review: Tools: Redact | X | |
| Review: Delete | X | |
| Review: Download | X | |
| Review: Download: Audio | X | |
| Review: Download: Multiview | X | |
| Review: Change Author | X | |
| Review: Edit Information | X | |
| Review: Evaluation | X | |
| Review: Evaluation: View Option Values | X | |
| Review: Evaluation: View Field Values | X | |
| Review: Evaluation: View Total Value | X | |
| Review: Evaluation: Edit | X | |
| Review: Edit Sharing | X | |
| Review: Edit Sharing: Link | X | |
| Review: Change Author | X | |
| Review: Edit Retention | X | |
| Schedule | X | |
| Schedule: Add | X | |
| Schedule: Exceptions | X | |
| Schedule: Edit | X | |
| Schedule: Edit: All Authors | X | |
| Schedule: Delete | X | |
| Schedule: Sharing | X | |
| Schedule: Change Author | X | |
| Schedule: Retention | X | |
| Schedule: Control | X | |
| Schedule: View All Authors | X | |
| Reports | X | |
| Reports: Add | X | |
| Reports: Edit | X | |
| Reports: Delete | X | |
| Admin | X | |
| Admin: General | X | |
| Admin: General: Software Information | X | |
| Admin: General: Global Settings | X | |
| Admin: General: Media Servers | X | |
| Admin: General: Customization | X | |
| Admin: Templates | X | |
| Admin: Rooms | X | |
| Admin: Users & Groups | X | |
| Admin: Users & Groups: LDAP | X | |
| Admin: Users & Groups: LDAP: User Import | X | |
| Admin: Users & Groups: LDAP: Servers | X | |
| Admin: Users & Groups: LDAP: Sync Schedules | X | |
| Admin: Users & Groups: SSO | X | |
| Admin: Logs | X | |
| Admin: Help | X | |
| Admin: Media Servers | X | |
| Admin: Containers | X | |
| Admin: Update | X | |
| Admin: Multi-Delete | X | |
| Rooms | X | X |
| Video Access | X | X |
| Default Retention Rule | X | |
| I/O Record Name | X | |
| Max Record Duration | X | |
| Schedule View | X | |
| Reports View | X | |
| Search Results View | X | |
| Search Results Display Columns | X | |
| Filters | X | |
| Views | X | |
| Restricted Access | X | X |
| Expiration Date | X | X |
| Review List Period | X | |
| X | ||
| Mobile PIN | X | |
| Card Number | X | |
| SSO/SAML IDP | X | |
| Display Name | X | |
| Control Type | X |
Logs
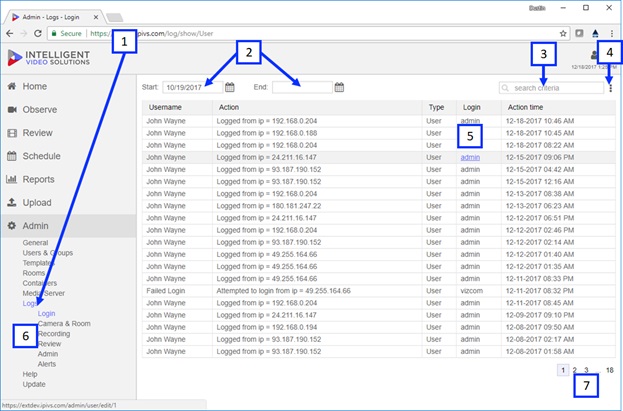
- Clicking on the Logs link under Admin will take you to the section displayed above.
- Start / End: this defines the date range of search results being displayed.
- Search Box: typing information into this box will display matching results.
- Export Button: clicking this button will allow a user to export the search results in either cvs or pdf format.
- Some of the items in the logs will link to the items, these links will appear when you hover over the item as shown above.
- Users can navigate to different log types using the log submenu.
- If more than one page of logs is available, the paginator in the bottom right can be used to cycle through the pages.