Valt Administrator Guide 5.2
Contents
Templates
Templates within VALT are used to tie searchable & reportable information to videos. A template(s) is assigned to a user group, where when that user starts or schedules a recording their set of templates will automatically get assigned to the associated recording(s). There are three types of templates listed below (Information, Marker, Evaluation). Each template type has a set of fields that can be used in the creation of the template. A template can consist of any number of fields and field types. These templates can be created and customized to meet a wide range of unique applications and workflows.
Information Templates
Information forms are typically used at the start of a recording to define information about that recording. Information templates can also be modified in the review section after a recording has been completed.
Information Field Types
When creating or modifying an information template there are a variety of field types that can be used. See below for reference.
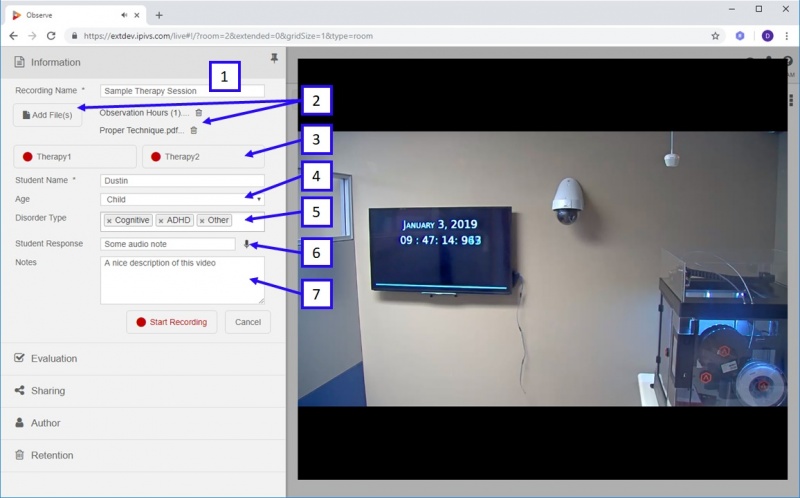
1.) Text: This field is a freeform text box with a title. This field is limited to 128 characters.
2.) Files: This field adds a button to the template that allows users to upload any number of .pdf, docx, and xlsx files. These files generate links within the template that can be used to download the uploaded files.
3.) Quick Record: This field creates a titled clickable button on the information form. If a user clicks this button it titles the recording with the button name and bypasses // ignores all other fields.
4.) Drop Down: This field is a drop down list with a title. Any number of drop down options can be defined, but only a single one can be selected when a user is filling out the template.
5.) Multi-Select: This field is a searchable drop down list with a title. Any number of drop down options can be defined, and any number can be selected when a user is filling out this template.
6.) Audio: This field is freeform text box with a title that includes icons for recording an audio note. If a recorded audio note is present, the user will have the option to play it back or delete it using associated icons.
7.) Note: This field is a larger freeform text box with a title. This field is limited to 500 characters.
Creating a New Information Template
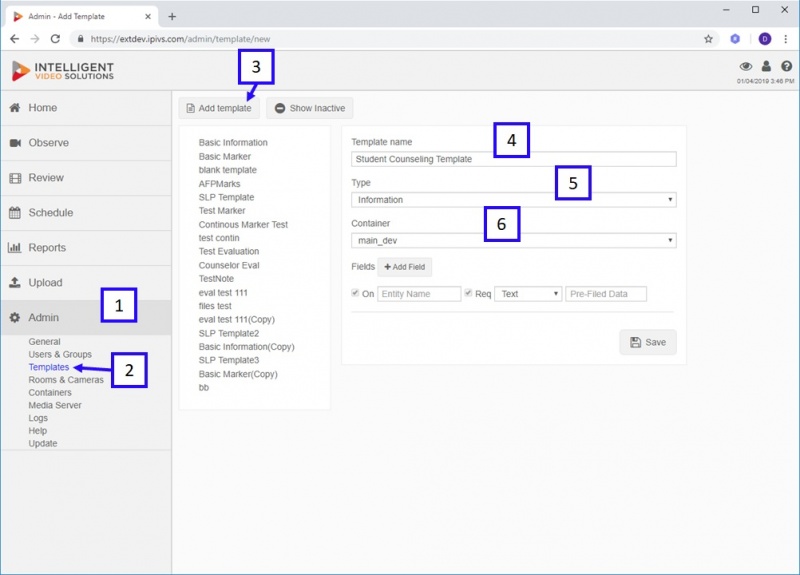
- ) Click the Admin button on the main navigation menu.
- ) Select Templates.
- ) Press Add Template.
- ) Enter a template name.
- ) Select the template type (Information).
- ) Select the container.
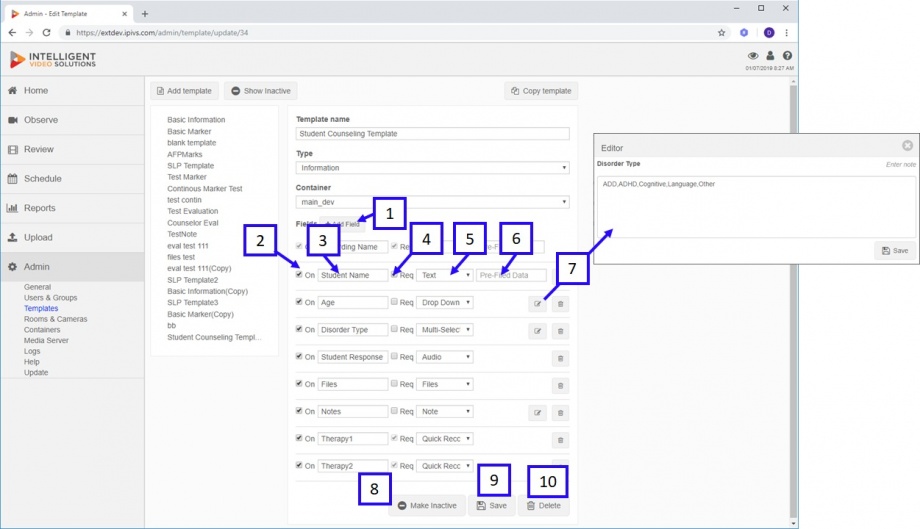
- ) The Add Field button is used to create new fields within the template as shown above. There is no limit to the number of fields you can associate with a single template.
- ) To enable a field within a template, the On checkbox must be checked.
- ) This dialog box is used to title the field.
- ) If the Req box is checked for the field it forces the user to input data into that field.
- ) This drop down box defines the field type.
- ) This dialog box can be set to pre-populate the template form with data for that field.
- ) This Edit button is used to launch the editor. This button appears for Drop Down, Multi-Select & Notes field types. For Drop Down & Multi-Select fields, it is used to define the user options within the form. This can be done by seperating each option with a comma as shown above. For the notes field, it can be used to pre-populate the data within the Notes text box field on the Information template form.
- ) This button deactivates the template so it is not shown and cannot be applied to user groups.
- ) This button saves the template.
- ) This button deletes the template, this button will only appear if there are no user groups using this template and if no recordings or schedules have been created using this template. If any of those conditions are true the only option to remove the template would be to deactivate (hide) the template.
Marker Templates
Markers are used to tie information to specific points in a recording. Markers can be added during a recording or after the fact when reviewing a video recording. Markers create key point within the video that allow users to easily jump right to that point within a longer video (much like chapters in a DVD). The data associated with a marker can be overlayed as text on the video during playback.
Marker Field Types
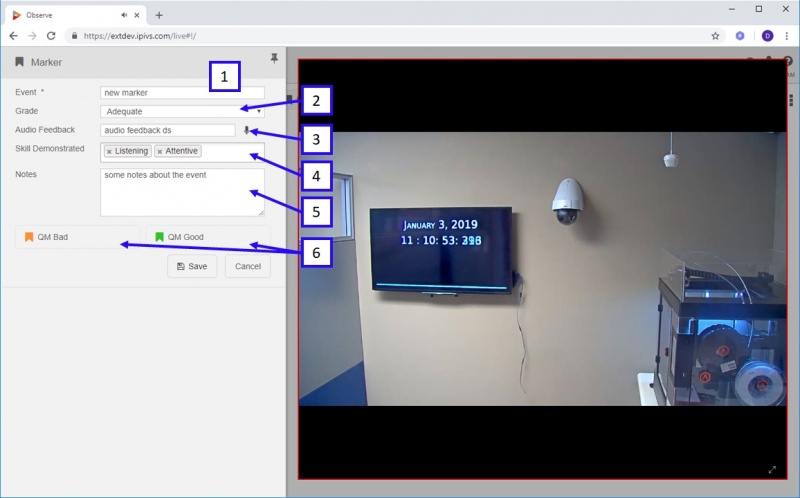
1.) Text: This field is a freeform text box with a title. This field is limited to 128 characters.
2.) Drop Down: This field is a dropdown list with a title. Any number of drop down options can be defined but only a single one can be selected when a user is filling out the marker form.
3.) Audio: This field is freeform text box with a title that includes icons for recording an audio note. If a recorded audio note is present, the user will have the option to play it back or delete it using associated icons.
4.) Multi-Select: This field is a searchable drop down list with a title. Any number of drop down options can be defined, and any number can be selected when a user is filling out this template.
5.) Note: This field is a larger freeform text box with a title. This field is limited to 500 characters.
6.) Quick Mark: This field creates a titled clickable button on the marker form. If a user clicks this button, it inserts a marker and titles the marker with the button this action bypasses // ignores all other fields.
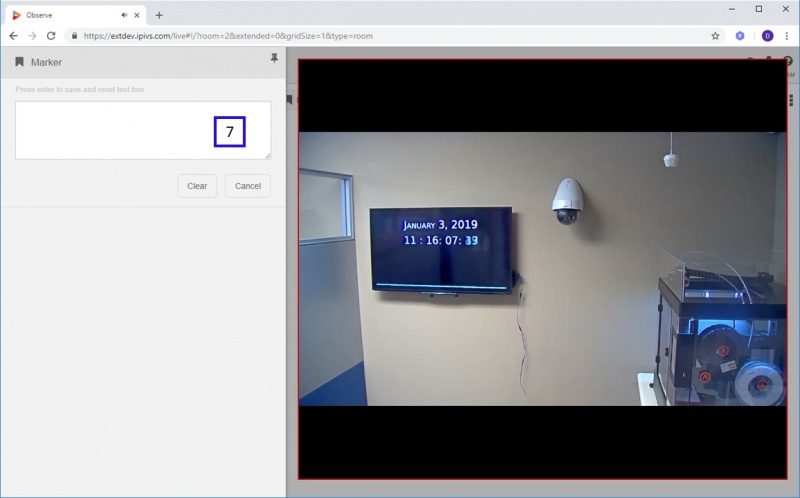
7.) Continous Marker: This field is only available as the first field within the marker template. Changing to this changes the formatting of the marker. When the mark button is pressed it brings up the form as shown below and changes the behavior. To insert a marker a user can now simply type and press enter. The marker is always inserted when they begin to type. This method is generally used when the workflow requires that many markers are being inserted.
Creating a New Marker Template
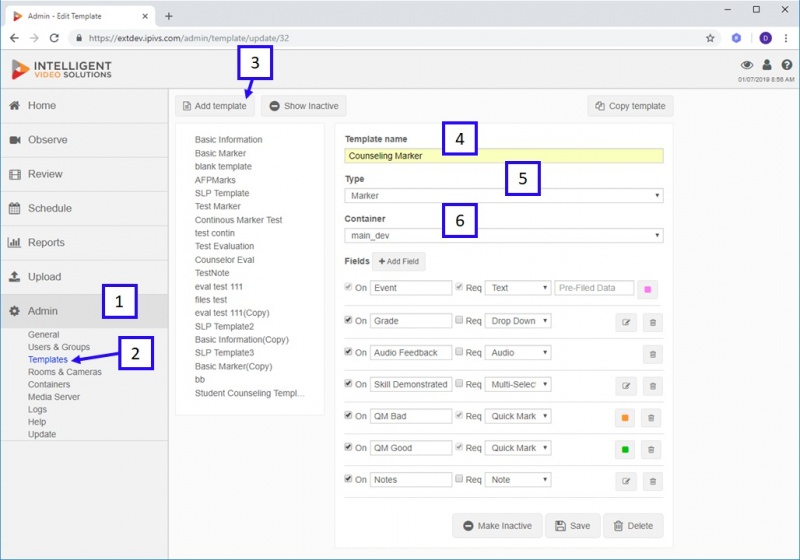
- ) Click the Admin button on the main navigation menu.
- ) Select Templates.
- ) Press Add Template.
- ) Enter a template name.
- ) Select the template type (Information).
- ) Select the container.
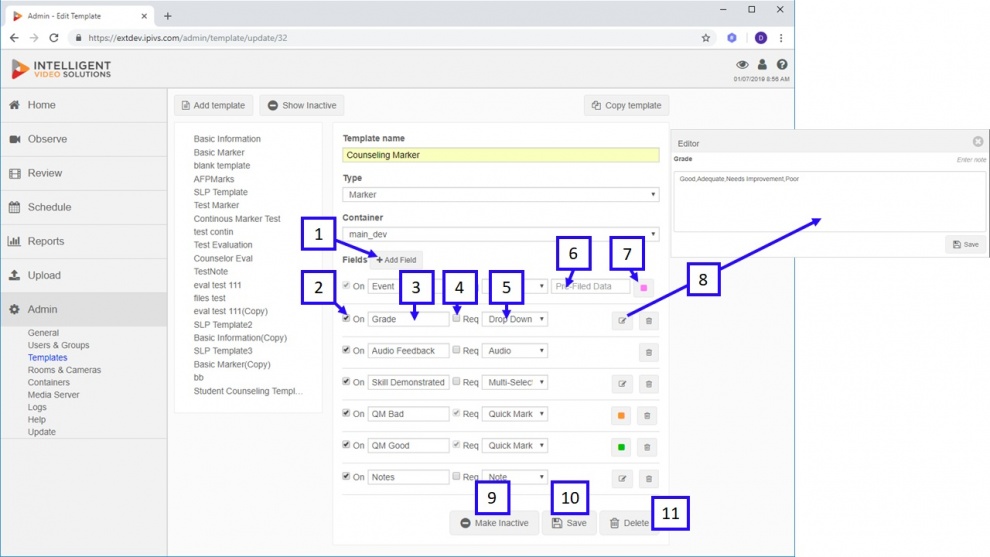
- ) The Add Field button is used to create new fields within the template as shown above. There is no limit to the number of fields you can associate with a single template.
- ) To enable a field within a template form the On checkbox must be checked.
- ) This dialog box is used to title the field.
- ) If the Req box is checked for the field it forces the user to input data into that field.
- ) This drop down box defines the field type.
- ) This dialog box can be set to pre-populate the template form with data for that field.
- ) This button is used to define the marker color that shows up on the timeline when a marker is inserted.
- ) This Edit button is used to launch the editor. This button appears for Drop Down, Multi-Select & Notes field types. For Drop Down & Multi-Select fields, it is used to define the user options within the form. This can be done by seperating each option with a comma as shown above. For the notes field, it can be used to pre-populate the data within the notes text box field on the information template form.
- ) This button deactivates the template so it is not shown and cannot be applied to user groups.
- ) This button saves the template.
- ) This button deletes the template and will only appear if there are no user groups using this template, and if no recordings or schedules have been created using this template. If any of those conditions are true, the only option to remove the template would be to deactivate (hide) the template.
Evaluation Templates
Evaluation templates are typically used during a recording, or after a recording is completed. An evaluation form acts much like an information form in that it is used to tie a single set of information into the recording. The big difference between an evaluation and information form is that numeric values can be assigned to the fields within an evaluation form. This allows scoring to be done on each item and the overall form. Evaluation also allow unique reports to be run against them that are based on score %.
Evaluation Template Fields
When creating or modifying an evaluation template, there are a variety of field types that can be used. See below for reference.
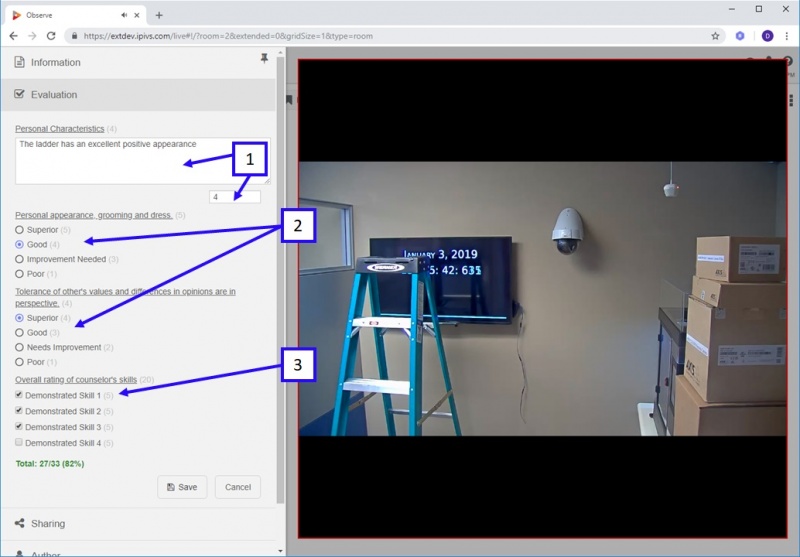
1.) Description: This field is a larger freeform text box with a question. This field is limited to 500 characters and allows the numerical value or score to be entered in the box below.
2.) Single select: This field consists of radio button(s) each with a description and associated score. This field type allows a user to select a single option as shown below.
3.) Multi Checkbox: This field consists of checkboxes each with a description and associated score. This field type allows a user to select multiple boxes as shown below.
Creating a New Evaluation Template
Assigning a Template
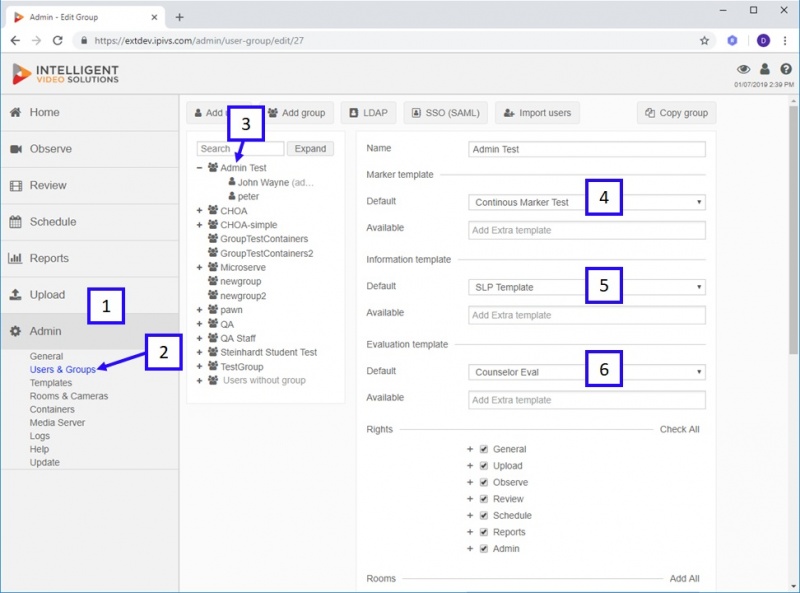
Templates are always assigned to user groups, with the individual users then being added to the user groups.
- ) Click the Admin button on the main navigation menu.
- ) Select Users & Groups.
- ) Click on the user group.
- ) Select a default marker template using the drop down menu, and additional marker templates can be added in the dialog box below allowing the user(s) to select a different template to be used for a specific recording or schedule.
- ) Select a default information template using the drop down menu, and additional information templates can be added in the dialog box below allowing the user(s) to select a different template to be used for a specific recording or schedule.
- ) Select a default evaluation template using the drop down menu, and additional evaluation templates can be added in the dialog box below allowing the user(s) to select a different template to be used for a specific recorded video.
