Difference between revisions of "Bluetooth Talkback"
IVSWikiBlue (talk | contribs) |
IVSWikiBlue (talk | contribs) |
||
| (9 intermediate revisions by the same user not shown) | |||
| Line 1: | Line 1: | ||
| − | {{img - no_click | file = | + | ==Device== |
| + | {{img - no_click | file = Monoprice 38071.png | width = 900px}} | ||
| − | == | + | ===Specs=== |
| − | < | + | <table class="simple_table"> |
| − | + | <tr> | |
| − | + | <th>Model</th> | |
| − | + | <th>38071</th> | |
| − | + | </tr> | |
| − | + | <tr> | |
| − | + | <td>Bluetooth® Version</td> | |
| − | + | <td>5</td> | |
| − | + | </tr> | |
| − | + | <tr> | |
| − | + | <td>Supported Bluetooth Profiles</td> | |
| − | </ | + | <td>A2DP, AVRCP</td> |
| − | + | </tr> | |
| − | + | <tr> | |
| − | + | <td>Bluetooth Range</td> | |
| − | < | + | <td>Up to 32 feet (10 meters)</td> |
| − | + | </tr> | |
| − | + | <tr> | |
| − | + | <td>Bluetooth Pairing Name</td> | |
| − | + | <td>BTI-039</td> | |
| − | + | </tr> | |
| − | + | <tr> | |
| − | + | <td>Supported Receiver Codecs</td> | |
| − | + | <td>aptXTM, aptX HD, aptX Low Latency, AAC, SBC</td> | |
| − | + | </tr> | |
| − | + | <tr> | |
| − | + | <td>Supported Transmitter Codecs</td> | |
| − | + | <td>aptXTM, aptX HD, aptX Low Latency, SBC</td> | |
| − | </ | + | </tr> |
| + | <tr> | ||
| + | <td>Battery Capacity</td> | ||
| + | <td>350mAh</td> | ||
| + | </tr> | ||
| + | <tr> | ||
| + | <td>Charging Time</td> | ||
| + | <td>About 2 hours</td> | ||
| + | </tr> | ||
| + | <tr> | ||
| + | <td>Operating Time</td> | ||
| + | <td>AUX RX: about 17.5 hours<br>AUX TX: about 20 hoursS/PDIF RX: about 12.5 hours<br>S/PDIF TX: about 14 hours</td> | ||
| + | </tr> | ||
| + | <tr> | ||
| + | <td>Standby Time</td> | ||
| + | <td>About 120 hours</td> | ||
| + | </tr> | ||
| + | <tr> | ||
| + | <td>Operating Temperature</td> | ||
| + | <td>+14 — +131°F (-10 — +55°C)</td> | ||
| + | </tr> | ||
| + | <tr> | ||
| + | <td>Dimensions</td> | ||
| + | <td>2.8″ x 2.8″ x 0.9″ (71 x 71 x 22 mm)</td> | ||
| + | </tr> | ||
| + | <tr> | ||
| + | <td>Weight</td> | ||
| + | <td>1.3 oz. (36g)</td> | ||
| + | </tr> | ||
| + | </table> | ||
===Pairing Devices=== | ===Pairing Devices=== | ||
| − | + | {{:Pairing Bluetooth Talk Back}} | |
| − | |||
| − | |||
| − | |||
| − | |||
| − | |||
| − | |||
===Testing the System=== | ===Testing the System=== | ||
| Line 45: | Line 69: | ||
#Ensure your transmitter and receiving device are properly connected. | #Ensure your transmitter and receiving device are properly connected. | ||
#Test the talkback unit is working by activating the talkback function within the VALT Software and having a partner to communicate with. | #Test the talkback unit is working by activating the talkback function within the VALT Software and having a partner to communicate with. | ||
| − | + | {{img | file = VALT Talkback Button.png | width = 960px}} | |
</div> | </div> | ||
| + | |||
| + | ==More Information== | ||
| + | {{:Monoprice Bluetooth Information}} | ||
Latest revision as of 16:20, 5 January 2023
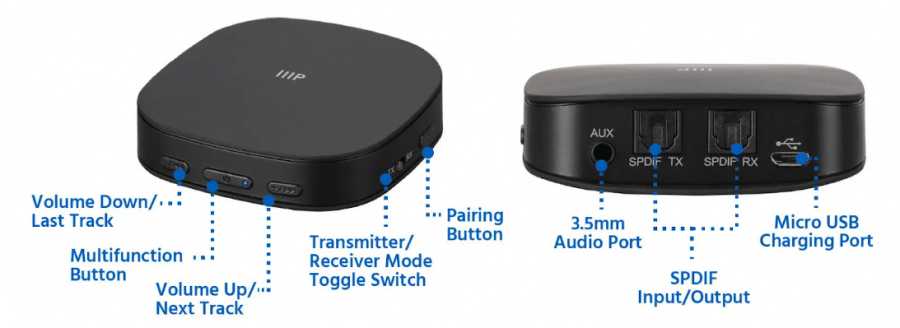
Device

Specs
| Model | 38071 |
|---|---|
| Bluetooth® Version | 5 |
| Supported Bluetooth Profiles | A2DP, AVRCP |
| Bluetooth Range | Up to 32 feet (10 meters) |
| Bluetooth Pairing Name | BTI-039 |
| Supported Receiver Codecs | aptXTM, aptX HD, aptX Low Latency, AAC, SBC |
| Supported Transmitter Codecs | aptXTM, aptX HD, aptX Low Latency, SBC |
| Battery Capacity | 350mAh |
| Charging Time | About 2 hours |
| Operating Time | AUX RX: about 17.5 hours AUX TX: about 20 hoursS/PDIF RX: about 12.5 hours S/PDIF TX: about 14 hours |
| Standby Time | About 120 hours |
| Operating Temperature | +14 — +131°F (-10 — +55°C) |
| Dimensions | 2.8″ x 2.8″ x 0.9″ (71 x 71 x 22 mm) |
| Weight | 1.3 oz. (36g) |
Pairing Devices
Perform the following steps to pair the transmitter with Bluetooth headphones
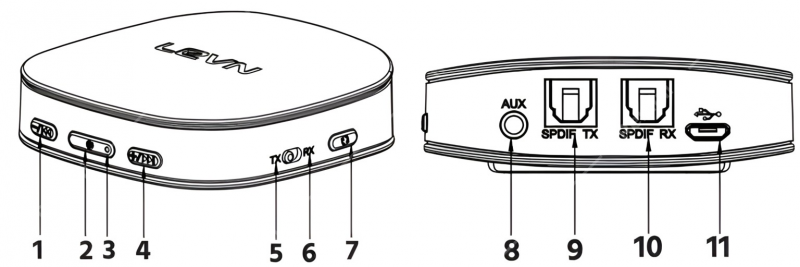
- If the Bluetooth unit is powered on, press and hold the power button (#2 above) to turn off the device. The LED (#3 above) on the unit will flash red twice.
- Wait at least three seconds and then slide the TX/RX switch (#5 & #6 above) to the TX position (#5 above)
- Press and hold the power button to turn the unit back on. The LED will flash blue twice
- Press the pair button (#7 above). The LED will begin to rapidly flash blue to indicate the device is paired in TX mode.
- Power the audio device that will be receiving signal and place it in its Bluetooth pairing mode. The devices will pair and connect within five to thirty seconds and the LED will slowly blink blue when connected
Testing the System
- Ensure your transmitter and receiving device are properly connected.
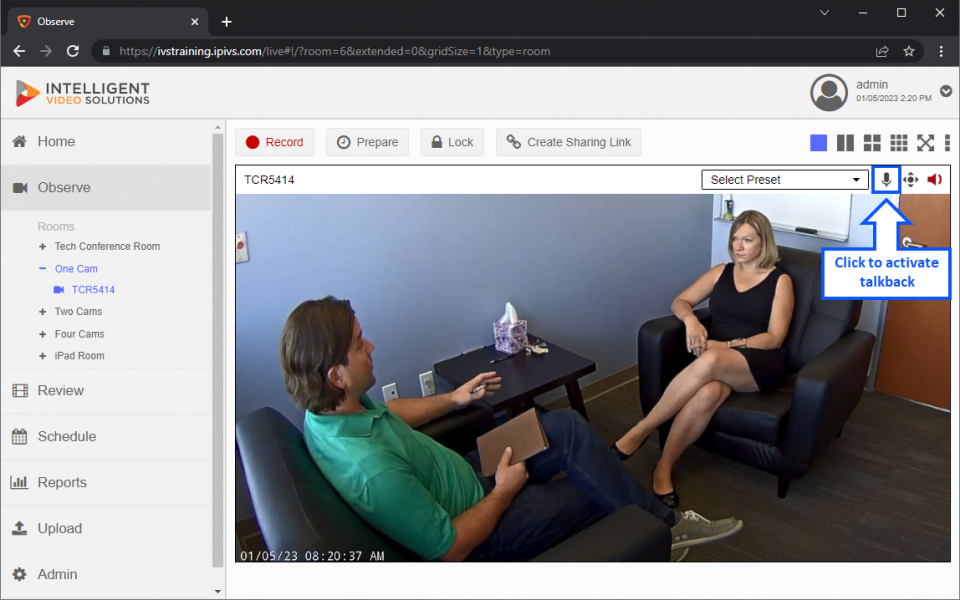
- Test the talkback unit is working by activating the talkback function within the VALT Software and having a partner to communicate with.

