Difference between revisions of "IVS Wiki:Privacy Switch - Add Recipients"
IVSWikiBlue (talk | contribs) |
IVSWikiBlue (talk | contribs) |
||
| Line 1: | Line 1: | ||
{{Article - Manual | content = | {{Article - Manual | content = | ||
<h1>Introduction</h1> | <h1>Introduction</h1> | ||
| − | Some of the rules point to a recipient at a specific IP address, so the camera must have a recipient set up, even for itself. In the case of a room with multiple cameras, the master camera will need a recipient set up for all other cameras in the room as well. | + | Some of the rules point to a recipient at a specific IP address, so the camera must have a recipient set up, even for itself. |
| + | |||
| + | |||
| + | {{Aside | content = In the case of a room with multiple cameras, the master camera will need a recipient set up for all other cameras in the room as well.}} | ||
| + | |||
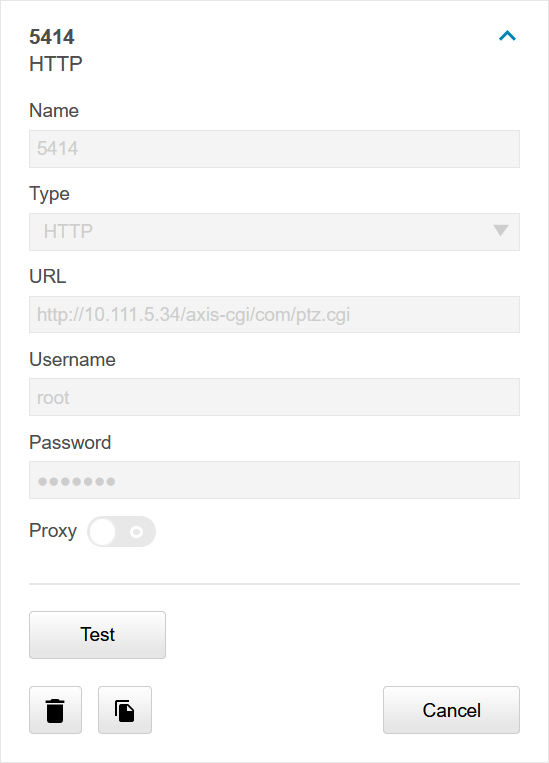
{{Manual lvl 2 | title = Adding Self | content = | {{Manual lvl 2 | title = Adding Self | content = | ||
| − | # Click on | + | {{Flexbox | left = |
| − | + | # Click on <b>Setup</b>. | |
| − | # Click on | + | # Click on <b>Events</b>. |
| − | # Click on | + | # Click on <b>Recipients</b>. |
| − | # Click on | + | # Click on <b>Add</b>. |
| − | # | + | # Add <b>Self</b> in the name field. |
| − | # | + | # In <b>Recipient</b>, type |
| − | <pre>http://127.0.0.1/axis-cgi/param.cgi</pre> | + | #:<pre>http://127.0.0.1/axis-cgi/param.cgi</pre> |
| − | or | + | #::or |
| − | <pre>http://IPADDRESS/axis-cgi/param.cgi</pre> | + | #:<pre>http://IPADDRESS/axis-cgi/param.cgi</pre> |
| − | # | + | # Type in the login credentials for the camera. |
| − | # | + | # Click <b>Test</b>. |
| − | # | + | # Click <b>Close</b>. |
| + | | right = {{img | file = Privacy10.png}} }} | ||
}} | }} | ||
| Line 23: | Line 28: | ||
{{Manual lvl 2 | title = Adding Remote Cameras | content = }} | {{Manual lvl 2 | title = Adding Remote Cameras | content = }} | ||
| − | {{Manual lvl 3 | title = Fixed Cameras | content = }} | + | {{Manual lvl 3 | title = Fixed Cameras | content = |
| + | {{Flexbox | left = | ||
| + | # Click on <b>Setup</b>. | ||
| + | # Click on <b>Events</b>. | ||
| + | # Click on <b>Recipients</b>. | ||
| + | # Click on <b>Add</b>. | ||
| + | # Add <b>Remote</b> in the name field. | ||
| + | #: <em>For rooms with multiple remote cameras, be sure to give them unique names.</em> | ||
| + | # In <b>Recipient</b>, type | ||
| + | #:<pre>http://IPADDRESS/axis-cgi/param.cgi</pre> | ||
| + | # Type in the login credentials for the camera. | ||
| + | # Click <b>Test</b>. | ||
| + | # Click <b>Close</b>. | ||
| + | | right = {{img | file = Privacy10.png}} }} | ||
| + | }} | ||
Revision as of 12:01, 15 March 2025
Introduction
Some of the rules point to a recipient at a specific IP address, so the camera must have a recipient set up, even for itself.
✎
In the case of a room with multiple cameras, the master camera will need a recipient set up for all other cameras in the room as well.
Adding Self
- Click on Setup.
- Click on Events.
- Click on Recipients.
- Click on Add.
- Add Self in the name field.
- In Recipient, type
http://127.0.0.1/axis-cgi/param.cgi
- or
http://IPADDRESS/axis-cgi/param.cgi
- Type in the login credentials for the camera.
- Click Test.
- Click Close.
Adding Remote Cameras
Fixed Cameras
- Click on Setup.
- Click on Events.
- Click on Recipients.
- Click on Add.
- Add Remote in the name field.
- For rooms with multiple remote cameras, be sure to give them unique names.
- In Recipient, type
http://IPADDRESS/axis-cgi/param.cgi
- Type in the login credentials for the camera.
- Click Test.
- Click Close.
PTZ Cameras
When a PTZ camera is being used as a secondary camera, one must add a separate recipient, just for the PTZ rules, using the following information.
http://IPADDRESS/axis-cgi/com/ptz.cgi
Remote PTZ rules
To create the Remote PTZ rules, add the following parameters:
NAME: action VALUE: update
NAME: gotoserverpresetname VALUE: presetname (Typically named Privacy or Home)
Make a copy of the newly generated Action rule, and modify the second parameter to reflect either Privacy or Home; whichever one was not chosen before.