Difference between revisions of "IVS Wiki:VALT 6 Manual - Observe"
IVSWikiBlue (talk | contribs) |
IVSWikiBlue (talk | contribs) |
||
| (47 intermediate revisions by the same user not shown) | |||
| Line 8: | Line 8: | ||
Here you will be able to do the following: | Here you will be able to do the following: | ||
| + | |||
| + | |||
{{Aside - Warning | hue = 50 | content = Not all features may be applicable for your application.}} | {{Aside - Warning | hue = 50 | content = Not all features may be applicable for your application.}} | ||
| + | |||
| + | |||
*Perform [[#Live Observation|live observation]] | *Perform [[#Live Observation|live observation]] | ||
*[[#Start a Recording|Start]] and [[#Stop a Recording|stop]] recordings | *[[#Start a Recording|Start]] and [[#Stop a Recording|stop]] recordings | ||
*Control [[#Move Camera (PTZ)|Pan/Tilt/Zoom cameras]] | *Control [[#Move Camera (PTZ)|Pan/Tilt/Zoom cameras]] | ||
*[[#Talkback|Talkback]] into a room | *[[#Talkback|Talkback]] into a room | ||
| + | |||
{{Top of Page}} | {{Top of Page}} | ||
| Line 26: | Line 31: | ||
</ol> | </ol> | ||
| − | {{Aside - Helpful | content = See the <b>search</b> feature in action! {{Try it out | link = https://app.storylane.io/share/qhybuoxgfho1}} }} | + | |
| + | {{Aside - Helpful | hue = 260 | content = See the <b>search</b> feature in action! {{Try it out | link = https://app.storylane.io/share/qhybuoxgfho1}} }} | ||
}} | }} | ||
| + | |||
{{Top of Page}} | {{Top of Page}} | ||
| Line 43: | Line 50: | ||
}} | }} | ||
{{img - resize | file = VALT 6.3 Manual-Observe 02.png}} | {{img - resize | file = VALT 6.3 Manual-Observe 02.png}} | ||
| + | |||
{{Top of Page}} | {{Top of Page}} | ||
| Line 54: | Line 62: | ||
{{img - resize | file = VALT 6.3 Manual-Observe 03.png}} | {{img - resize | file = VALT 6.3 Manual-Observe 03.png}} | ||
| + | |||
{{Top of Page}} | {{Top of Page}} | ||
| Line 64: | Line 73: | ||
</ol> | </ol> | ||
}} | }} | ||
| + | |||
{{Aside | content = Recording happens at the room level.}} | {{Aside | content = Recording happens at the room level.}} | ||
{{img - resize | file = VALT 6.3 Manual-Observe 09.png}} | {{img - resize | file = VALT 6.3 Manual-Observe 09.png}} | ||
| + | |||
{{Top of Page}} | {{Top of Page}} | ||
| Line 79: | Line 90: | ||
</ol> | </ol> | ||
}} | }} | ||
| + | |||
{{Top of Page}} | {{Top of Page}} | ||
| Line 84: | Line 96: | ||
{{Manual lvl 2 | title = Camera Control | content = | {{Manual lvl 2 | title = Camera Control | content = | ||
| − | Each video feed will have a variety of options for control. These controls can vary depending on the type of camera/device. | + | Each video feed will have a variety of options for control. These controls can vary depending on the type of [[VALT_Devices|camera/device]]. |
| − | *Pan-Tilt-Zoom (PTZ) camera | + | |
| − | *Fixed camera | + | |
| + | *[[VALT_Devices#PTZ_Cameras|Pan-Tilt-Zoom (PTZ) camera]] | ||
| + | *[[VALT_Devices#Fixed_Cameras|Fixed camera]] | ||
}} | }} | ||
| − | |||
{{Manual lvl 3 | title = Digital Zoom | content = | {{Manual lvl 3 | title = Digital Zoom | content = | ||
| Line 95: | Line 108: | ||
A digital zoom will only take the existing pixels and make them larger. This means there is no increase in image quality. | A digital zoom will only take the existing pixels and make them larger. This means there is no increase in image quality. | ||
| − | {{Aside - Helpful | content = Want to see <b>Digital Zoom</b> in action? {{Try it out | link = https://app.storylane.io/share/qhybuoxgfho1}} }} | + | |
| + | |||
| + | {{Aside - Helpful | hue = 260 | content = Want to see <b>Digital Zoom</b> in action? {{Try it out | link = https://app.storylane.io/share/qhybuoxgfho1}} }} | ||
}} | }} | ||
| Line 103: | Line 118: | ||
{{img - resize | file = VALT 6.3 Manual-Observe 10_0.png | width = 960px}} | {{img - resize | file = VALT 6.3 Manual-Observe 10_0.png | width = 960px}} | ||
#Click anywhere on the video feed of your PTZ camera, to open the stream controls. | #Click anywhere on the video feed of your PTZ camera, to open the stream controls. | ||
| − | #Click on the {{img - icon | file = Camera_Control.png | width = 18px}} <strong> | + | #Click on the {{img - icon | file = Camera_Control.png | width = 18px}} <strong>Move camera</strong> icon. |
#Position the {{img - icon | file = Bullseye.png | width = 18px}} <strong>bullseye</strong> on the desired location. | #Position the {{img - icon | file = Bullseye.png | width = 18px}} <strong>bullseye</strong> on the desired location. | ||
#*Left click to center view on that point. | #*Left click to center view on that point. | ||
#*Mouse scroll wheel is used to zoom in and out. | #*Mouse scroll wheel is used to zoom in and out. | ||
| − | {{Aside - Helpful | content = Want to see <b>Camera Control (PTZ)</b> in action? {{Try it out | link = https://app.storylane.io/share/qbficrisonph}} }} | + | |
| + | {{Aside - Helpful | hue = 260 | content = Want to see <b>Camera Control (PTZ)</b> in action? {{Try it out | link = https://app.storylane.io/share/qbficrisonph}} }} | ||
}} | }} | ||
| Line 116: | Line 132: | ||
The preset dropdown enables users to quickly navigate to predefined locations with specific camera zoom levels. | The preset dropdown enables users to quickly navigate to predefined locations with specific camera zoom levels. | ||
}} | }} | ||
| + | |||
| + | {{img - resize | file = VALT 6.3 Manual-Observe 22.png}} | ||
{{Manual lvl 4 | title = Create Presets | content = | {{Manual lvl 4 | title = Create Presets | content = | ||
| Line 144: | Line 162: | ||
The {{img - icon | file = Fullscreen.png | width = 14px}} <strong>fullscreen</strong> icon allows you to expand the current camera view to fill the entire monitor screen. | The {{img - icon | file = Fullscreen.png | width = 14px}} <strong>fullscreen</strong> icon allows you to expand the current camera view to fill the entire monitor screen. | ||
}} | }} | ||
| + | |||
{{Top of Page}} | {{Top of Page}} | ||
| Line 150: | Line 169: | ||
{{Manual lvl 2 | title = Share Settings | content = | {{Manual lvl 2 | title = Share Settings | content = | ||
The {{img - icon | file = Link.png | width = 14px}} <strong>share settings</strong> icon allows you to share videos with users who do not have VALT Accounts. If a user without an account opens the link, they will only see the VALT room that was shared with them. | The {{img - icon | file = Link.png | width = 14px}} <strong>share settings</strong> icon allows you to share videos with users who do not have VALT Accounts. If a user without an account opens the link, they will only see the VALT room that was shared with them. | ||
| + | |||
| + | <center>{{img | file = VALT 6.3 Manual-Observe 20.png}}</center> | ||
| + | |||
| + | {{hr - 2}} | ||
{{Aside | content = A share link can be [[#Delete Sharing Link|deleted]] at any time.}} | {{Aside | content = A share link can be [[#Delete Sharing Link|deleted]] at any time.}} | ||
}} | }} | ||
| − | |||
{{Manual lvl 3 | title = Create Sharing Link | content = | {{Manual lvl 3 | title = Create Sharing Link | content = | ||
| Line 166: | Line 188: | ||
#*:<em>Specify the duration(Days/Hours) of time for which the link will be valid.</em> | #*:<em>Specify the duration(Days/Hours) of time for which the link will be valid.</em> | ||
#Click the ‘<strong>New Share Link</strong>’ button. | #Click the ‘<strong>New Share Link</strong>’ button. | ||
| − | {{Aside - Helpful | content = Check out the <b>share link</b> feature yourself! {{Try it out | link = https://app.storylane.io/share/acqkkq2zwvgm}} }} | + | |
| + | |||
| + | {{Aside - Helpful | hue = 260 | content = Check out the <b>share link</b> feature yourself! {{Try it out | link = https://app.storylane.io/share/acqkkq2zwvgm}} }} | ||
}} | }} | ||
| Line 182: | Line 206: | ||
#Click the {{img - icon | file = Delete.png}} <strong>Delete</strong> icon. | #Click the {{img - icon | file = Delete.png}} <strong>Delete</strong> icon. | ||
}} | }} | ||
| + | |||
{{Top of Page}} | {{Top of Page}} | ||
| Line 194: | Line 219: | ||
{{img - resize | file = VALT 6.3 Manual-Observe 08.png}} | {{img - resize | file = VALT 6.3 Manual-Observe 08.png}} | ||
| − | |||
{{Manual lvl 3 | title = Lock Room | content = | {{Manual lvl 3 | title = Lock Room | content = | ||
| Line 207: | Line 231: | ||
#Click the {{img - icon | file = Unlock.png | width = 16px}} <strong>unlock</strong> icon. | #Click the {{img - icon | file = Unlock.png | width = 16px}} <strong>unlock</strong> icon. | ||
}} | }} | ||
| + | |||
{{Top of Page}} | {{Top of Page}} | ||
| Line 217: | Line 242: | ||
}} | }} | ||
| − | |||
{{Manual lvl 3 | title = Matrix Views | content = | {{Manual lvl 3 | title = Matrix Views | content = | ||
| Line 240: | Line 264: | ||
#Click the {{img - icon | file = Delete.png}} <strong>Delete</strong> icon. | #Click the {{img - icon | file = Delete.png}} <strong>Delete</strong> icon. | ||
}} | }} | ||
| + | |||
{{Top of Page}} | {{Top of Page}} | ||
| Line 246: | Line 271: | ||
{{Manual lvl 2 | title = Hide Left Panel | content = | {{Manual lvl 2 | title = Hide Left Panel | content = | ||
The left panel on the left can be hidden to maximize usable space for video content. | The left panel on the left can be hidden to maximize usable space for video content. | ||
| − | #Click the {{img - icon | file = Hide_Panel.png | width = 16px}} <strong>Hide Panel</strong> icon to hide the Rooms/Views/Streams selection panel and to expand the camera streams to the left. | + | #Click the {{img - icon | file = Hide_Panel.png | width = 16px}} <strong>Hide Panel</strong> icon to hide the Rooms/Views/Streams selection panel and to expand the camera streams to the left.}} |
| + | |||
| + | {{img - resize | file = VALT 6.3 Manual-Observe 21.png}} | ||
| + | |||
| + | |||
| + | {{Top of Page}} | ||
| + | {{hr}} | ||
| + | |||
| + | <h1>Recording</h1> | ||
| + | There are several ways to initiate a recording using the VALT software. Recordings can started while observing a room through the software, using a physical [[VALT_Room_Controls#VALT_Record_Button|start/stop button]], [[VALT_Room_Controls#VALT_Card_Reader|RFID card readers]], a built in scheduler, or our [[VALT API#Room_Control|API]]. | ||
| + | |||
| + | |||
| + | Recording occurs at the [[#Open_a_Room|room]] level. | ||
| + | |||
| + | |||
| + | {{Aside - Warning | hue = 50 | content = The {{img - icon color | file = Record.png}} <strong>REC</strong> button will not be available if you are only [[#Open_a_Stream|viewing a stream]] or a new [[#Views|view]].}} | ||
| + | |||
| + | {{img - resize | file = VALT 6.3 Manual-Observe 23.png}} | ||
| + | |||
| + | |||
| + | {{Top of Page}} | ||
| + | {{hr}} | ||
| + | |||
| + | {{Manual lvl 2 | title = Start a Recording | content = The {{img - icon color | file = Record.png}} <strong>REC</strong> button is used to initiate an ad-hoc recording. Pressing this button will bring up the [[#Information|information template]]. | ||
| + | |||
| + | |||
| + | #Hover over a room. | ||
| + | #Click the {{img - icon color | file = Record.png}} <strong>REC</strong> icon. | ||
| + | #Enter in the appropriate information for the recording. | ||
| + | #Click the REC button. | ||
| + | |||
| + | |||
| + | {{Aside - Helpful | hue = 260 | content = Want to see how easy it is? {{Try it out | link = https://app.storylane.io/share/d4ufimatpt1x}} }} }} | ||
| + | |||
| + | {{hr - 2}} | ||
| + | |||
| + | {{Manual lvl 3 | title = Start Multiple Recordings | content = You can also start recordings in multiple rooms at the same time. | ||
| + | |||
| + | |||
| + | {{Aside | content = All the recordings started in this way will share the same information. <em>This can be changed later.</em>}} | ||
| + | |||
| + | |||
| + | #Click '<b>Select</b>' next to the room count. | ||
| + | #Check the boxes for all the rooms you wish to record in. | ||
| + | #Click the {{img - icon color | file = Record.png}} <strong>record</strong> button in the bottom left. | ||
| + | #Enter in the appropriate information for the recording. | ||
| + | #Click the REC button. | ||
| + | |||
| + | |||
| + | {{Aside - Helpful | hue = 260 | content = Check out our walkthrough on multi-room recording! {{Try it out | link = https://app.storylane.io/share/zvljhlxevrsf}} }} | ||
}} | }} | ||
| Line 252: | Line 326: | ||
{{hr}} | {{hr}} | ||
| − | < | + | {{Manual lvl 2 | title = Prepare a Recording | content = The {{img - icon | file = Prepare.png}} <strong>Prepare</strong> button is used to arm a room for an active recording. This option allows you to fill in all the [[VALT_User_Training_Guide_-_Templates#Information_Field_Types|information fields]] ahead of time and then use a [[VALT_Room_Controls#VALT_Record_Button|physical button]] or [[#Start a Recording|start recording button]] to initiate the recording.}} |
| + | |||
| + | {{hr}} | ||
| + | |||
| + | {{Manual lvl 2 | title = Recording Settings | content = | ||
| + | When [[#Start a Recording|starting]], [[#Prepare a Recording|preparing]], or watching a recording in progress, users can modify various settings for the reocrding. | ||
| + | |||
| + | |||
| + | These settings are allow the user to manipulate the following items.: | ||
| + | *[[#Information|Information]] | ||
| + | *[[#Evaluation|Evaluation]] | ||
| + | *[[#Sharing|Sharing]] | ||
| + | *[[#Author|Author]] | ||
| + | *[[#Retention|Retention]] | ||
| + | }} | ||
| − | |||
| − | |||
| − | |||
| − | |||
{{Manual lvl 3 | title = Information | content = | {{Manual lvl 3 | title = Information | content = | ||
| − | + | The <strong>Information</strong> tab allows users to assign data to a recording. This data can later be used to search for the recording. | |
| − | {{ | + | |
| − | This is the same template used when <b>preparing</b> or <b>scheduling</b> a recording. Each template can have multiple data fields, but at least one field is [[ | + | {{img - resize | file = VALT 6.3 Manual-Observe 13.png}} |
| − | {{Aside - Helpful | content = Want to learn more about [[ | + | |
| − | }} | + | This is the same template used when <b>preparing</b> or <b>scheduling</b> a recording. Each template can have multiple data fields, but at least one field is [[VALT User Training Guide - Templates#Information Templates#Required Fields|required]]. Users can be assigned multiple templates as needed. |
| + | |||
| + | |||
| + | {{Aside - Helpful | content = Want to learn more about [[VALT User Training Guide - Templates#Information Templates|Information Templates]]?}} | ||
| + | }} | ||
| + | |||
{{hr - 2}} | {{hr - 2}} | ||
| − | |||
{{Manual lvl 3 | title = Evaluation | content = | {{Manual lvl 3 | title = Evaluation | content = | ||
| − | This button pulls up the evaluation menu. Evaluation templates are typically used during a recording, or after a recording is completed. Numeric values can be assigned to the fields within an evaluation form. This allows scoring to be done on each item and the overall form. | + | This button pulls up the evaluation menu. Evaluation templates are typically used during a recording, or after a recording is completed. Numeric values can be assigned to the fields within an evaluation form. This allows scoring to be done on each item and the overall form. |
| − | + | ||
| + | {{img - resize | file = VALT 6.3 Manual-Observe 15.png}} | ||
| + | |||
| + | {{Aside - Helpful | content = Want to learn more about [[VALT User Training Guide - Templates#Evaluation Templates|Evaluation Templates]]?}} | ||
| + | }} | ||
{{hr - 2}} | {{hr - 2}} | ||
| − | |||
| − | |||
| − | |||
{{Manual lvl 3 | title = Sharing | content = | {{Manual lvl 3 | title = Sharing | content = | ||
| − | Allows the user to share the recording with users / user groups that normally would not have access to it.}} }} | + | Allows the user to share the recording with users / user groups that normally would not have access to it. |
| + | |||
| + | {{img - resize | file = VALT 6.3 Manual-Observe 17.png}} | ||
| + | }} | ||
{{hr - 2}} | {{hr - 2}} | ||
| − | |||
{{Manual lvl 3 | title = Author | content = | {{Manual lvl 3 | title = Author | content = | ||
| − | Allows the user to change the author of the recording. Changing the author will also change all the permissions associated with who has access to the recording <em>(that is all based on author)</em>. | + | Allows the user to change the author of the recording. Changing the author will also change all the permissions associated with who has access to the recording <em>(that is all based on author)</em>. |
| − | + | ||
| + | {{img - resize | file = VALT 6.3 Manual-Observe 18.png}} }} | ||
{{hr - 2}} | {{hr - 2}} | ||
| − | {{ | + | {{Manual lvl 3 | title = Retention | content = Allows the user to change how long this recording is stored for before automatically being deleted. |
| − | {{img - resize | file = VALT 6.3 Manual-Observe | + | |
| − | | | + | {{img - resize | file = VALT 6.3 Manual-Observe 19.png}} |
| − | {{Manual lvl | + | |
| + | <dl> | ||
| + | <dt>Default:</dt> | ||
| + | <dd>Whatever the author's user group retention settings are set to will be automatically used.</dd> | ||
| + | |||
| + | <dt>Keep For:</dt> | ||
| + | <dd>Allows a user to define a number of days, hours, or minutes to keep a recording for.</dd> | ||
| + | |||
| + | <dt>Keep Until:</dt> | ||
| + | <dd>Allows users to select a future date that the recording will be deleted on.</dd> | ||
| + | |||
| + | <dt>Keep Forever</dt> | ||
| + | <dd>Leaves the video on the system until it is manually deleted.</dd> | ||
| + | </dl> | ||
| + | |||
| + | |||
| + | {{Aside - Warning | content = Once a video is deleted from the system, it cannot be recovered.}} | ||
| + | }} | ||
| + | |||
| + | |||
| + | {{Top of Page}} | ||
| + | {{hr}} | ||
| + | |||
| + | {{Manual lvl 2 | title = Pause a Recording | content = The {{img - icon | file = Pause.png}} <strong>Pause</strong> icon will temporarily stop a live recording. | ||
| + | |||
| + | |||
| + | #Hover over a room that is currently recording. | ||
| + | #Press the {{img - icon | file = Pause.png}} <strong>Pause</strong> icon. | ||
| + | |||
| + | |||
| + | {{Aside - Warning | hue = 50 | content = Frequent or long pauses in a recording is not recommended.}} | ||
| + | }} | ||
| + | |||
| + | |||
| + | {{Top of Page}} | ||
| + | {{hr}} | ||
| + | |||
| + | {{Manual lvl 2 | title = Resume a Recording | content = When a live recording is paused, any events occurring in the room will not be captured. Recording can be resumed to continue video capture. During playback, any paused sections will be seamlessly omitted from the video | ||
| + | |||
| + | |||
| + | #Hover over a room that is currently paused | ||
| + | #Press the {{img - icon color | file = Record.png}} <strong>Resume</strong> icon. | ||
| + | }} | ||
| + | |||
| + | |||
| + | {{Top of Page}} | ||
| + | {{hr}} | ||
| + | |||
| + | {{Manual lvl 2 | title = Stop a Recording | content = Clicking the {{img - icon | file = Stop.png}} <strong>Stop</strong> icon will end a recording and immediately move it into [[IVS_Wiki:VALT_6_Manual_-_Review|Review]]. | ||
| + | |||
| + | |||
| + | #Hover over a room that is currently recording. | ||
| + | #Press the {{img - icon | file = Stop.png}} <strong>Stop</strong> icon. | ||
| + | |||
| + | |||
| + | {{Aside - Helpful | hue = 260 | content = <b>Did you know?</b> You can start and stop recordings from the [[IVS_Wiki:VALT_6_Manual_-_Home|Homepage]]. {{Try it out | link = https://app.storylane.io/share/blbhcupd84qj}} }} | ||
| + | }} | ||
| + | |||
| + | {{hr - 2}} | ||
| + | |||
| + | {{Manual lvl 3 | title = Stop Multiple Recordings | content = You can also stop recordings in multiple rooms at the same time. | ||
| + | |||
| + | |||
| + | #Click '<b>Select</b>' next to the room count. | ||
| + | #Check the boxes for all the rooms you wish to stop recordings in. | ||
| + | #Click the {{img - icon | file = Stop.png}} <strong>Stop All</strong> button in the bottom left. | ||
| + | |||
| + | |||
| + | {{Aside - Helpful | hue = 260 | content = Check out our walkthrough on multi-room recording! {{Try it out | link = https://app.storylane.io/share/zvljhlxevrsf}} }} | ||
| + | }} | ||
{{Top of Page}} | {{Top of Page}} | ||
{{hr}} | {{hr}} | ||
| − | |||
| − | |||
| − | |||
| − | |||
| − | |||
| − | |||
| − | |||
| − | |||
| − | |||
| − | {{Manual lvl 2 | title = | + | {{Manual lvl 2 | title = Comments | content = Users are able to leave comments in the video. These comments are attached to the user leaving the comment and are timestamped in the videos timeline.}} |
| − | {{ | + | |
| − | {{Manual lvl 3 | title = Add | content = | + | {{img - resize | file = VALT 6.3 Manual-Observe 24.png}} |
| − | + | ||
| − | + | {{Manual lvl 3 | title = Add | content = Comments can be added in many ways. The most simple, is a standard comment. | |
| − | + | ||
| − | + | ||
| − | {{ | + | #Go to a room that is recoding. |
| − | {{ | + | #Click on the {{img - icon | file = Comment.png}} <strong>Comments</strong> button. |
| − | {{ | + | #Click on the text field in the bottom left of the screen. |
| + | #Enter the text for your comment. | ||
| + | #Press {{Keyboard | key = Enter}} or click on the {{img - icon color | file = Send Comment.png | width = 16px}} <strong>Send comment</strong> button. | ||
| − | {{Manual lvl 3 | title = Reply | content = }} | + | |
| − | {{Manual lvl 3 | title = Edit | content = }} | + | {{Aside - Helpful | content = Admins can grant access to comments in the User & Groups settings. |
| − | {{Manual lvl 3 | title = Delete | content = }} | + | <br> |
| + | <center>[https://valt.wistia.com/medias/q58nrw7yzv ▶️ Check out our video about enabling comments!]</center> }} | ||
| + | }} | ||
| + | |||
| + | {{hr - 2}} | ||
| + | |||
| + | {{Manual lvl 3 | title = Quick Markers | content = Selection of pre-defined comments for adding to a recording, set up in the Templates section of the VALT Settings.}} | ||
| + | |||
| + | {{hr - 2}} | ||
| + | |||
| + | {{Manual lvl 3 | title = Enable Audio Mode | content = This feature allows a user to record an audio comment instead of free text.}} | ||
| + | |||
| + | {{hr - 2}} | ||
| + | |||
| + | {{Manual lvl 3 | title = Add Mention | content = Use the {{img - icon | file = Mention.png}} <strong>Mention</strong> icon to direct a comment towards another VALT user. | ||
| + | |||
| + | |||
| + | {{Aside | content = Only the tagged user or group will see this comment.}} }} | ||
| + | |||
| + | {{hr - 2}} | ||
| + | |||
| + | {{Manual lvl 3 | title = Attach a File | content = The <strong>attach file</strong> icon allows users to include a file in the comments for others to download.}} | ||
| + | |||
| + | {{hr - 2}} | ||
| + | |||
| + | {{Manual lvl 3 | title = Open Comment Template | content = The {{img - icon | file = Hamburger.png}} <strong>hamburger</strong> button allows users to fill in pre-set fields, created in the [[VALT_User_Training_Guide_-_Templates#Comment_Templates|comments template]] section of the VALT Settings.}} | ||
| + | |||
| + | {{hr - 2}} | ||
| + | |||
| + | {{Manual lvl 3 | title = Select Color | content = You can use the {{img - icon color | file = Comment color.png}} <strong>color</strong> button to change the color of the marker on the timeline.}} | ||
| + | |||
| + | {{hr - 2}} | ||
| + | |||
| + | {{Manual lvl 3 | title = Reset Timestamp | content = During live observation of a recording, when typing a comment, the timestamp will correlate to the time the comment was started. Click the Reset Timestamp button to update the time to the current time.}} | ||
| + | |||
| + | {{hr - 2}} | ||
| + | |||
| + | {{Manual lvl 3 | title = Reply | content = Hover over a comment and click the {{img - icon | file = Reply.png}} <strong>Reply</strong> icon to direct a response that a specific post.}} | ||
| + | |||
| + | {{hr - 2}} | ||
| + | |||
| + | {{Manual lvl 3 | title = Edit | content = To make a change to an existing comment, hover over the comment and click the {{img - icon | file = Edit.png}} <strong>Edit</strong> icon.}} | ||
| + | |||
| + | {{hr - 2}} | ||
| + | |||
| + | {{Manual lvl 3 | title = Delete | content = Hover over a comment and click the {{img - icon | file = Delete.png}} <strong>Delete</strong> icon to delete the comment.}} | ||
| + | |||
| + | |||
| + | {{Top of Page}} | ||
}} | }} | ||
Latest revision as of 11:41, 11 March 2025
Contents
- 1 Introduction
- 2 Live Observation
- 3 Recording
Introduction
The Observe section is where live observation and recording takes place. On this page you can find the rooms, and streams that you have access to.
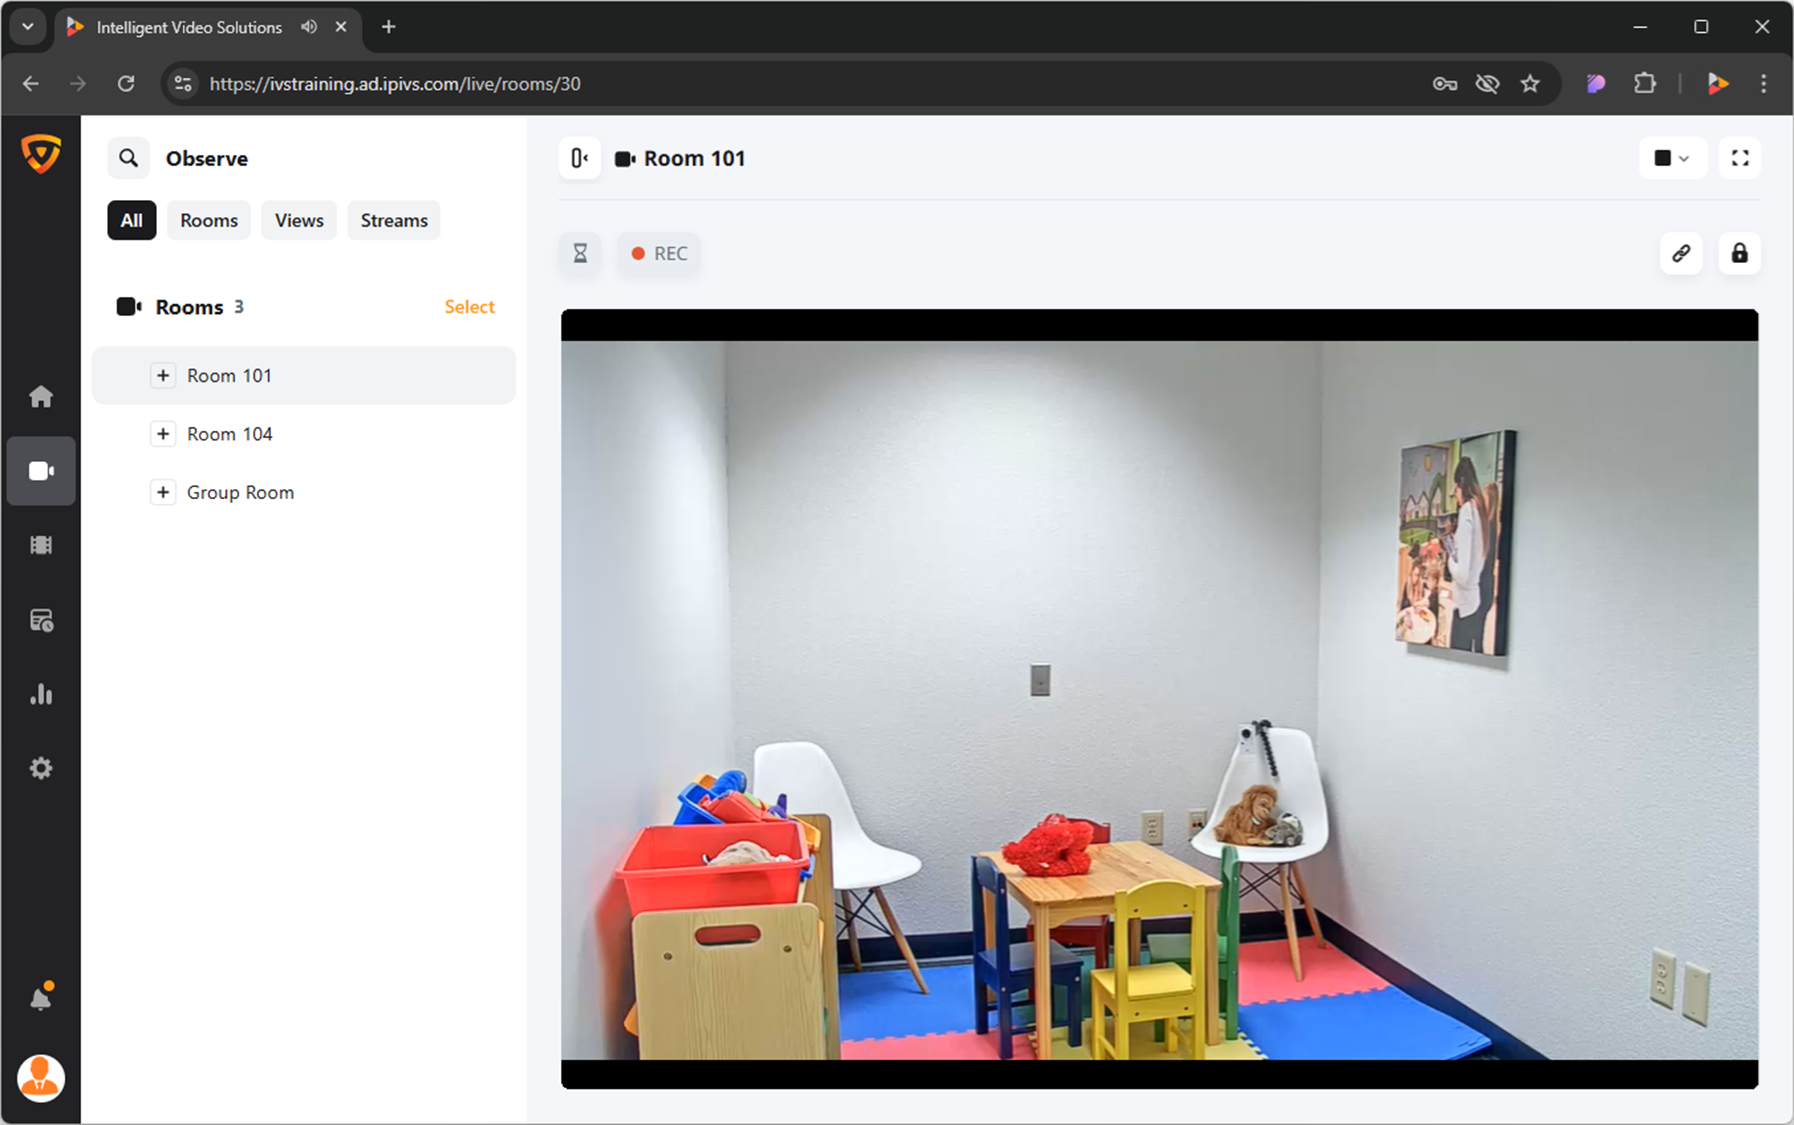
Here you will be able to do the following:
⚠Not all features may be applicable for your application.
- Perform live observation
- Start and stop recordings
- Control Pan/Tilt/Zoom cameras
- Talkback into a room
Live Observation
Search
The Search allows you to quickly find the specific room, device, or stream you are looking for.
- Click the
 Search icon in the top left corner.
 - Type the name of the room, device, or stream you are looking for.
- Look under Rooms for the search results.

Try it out!
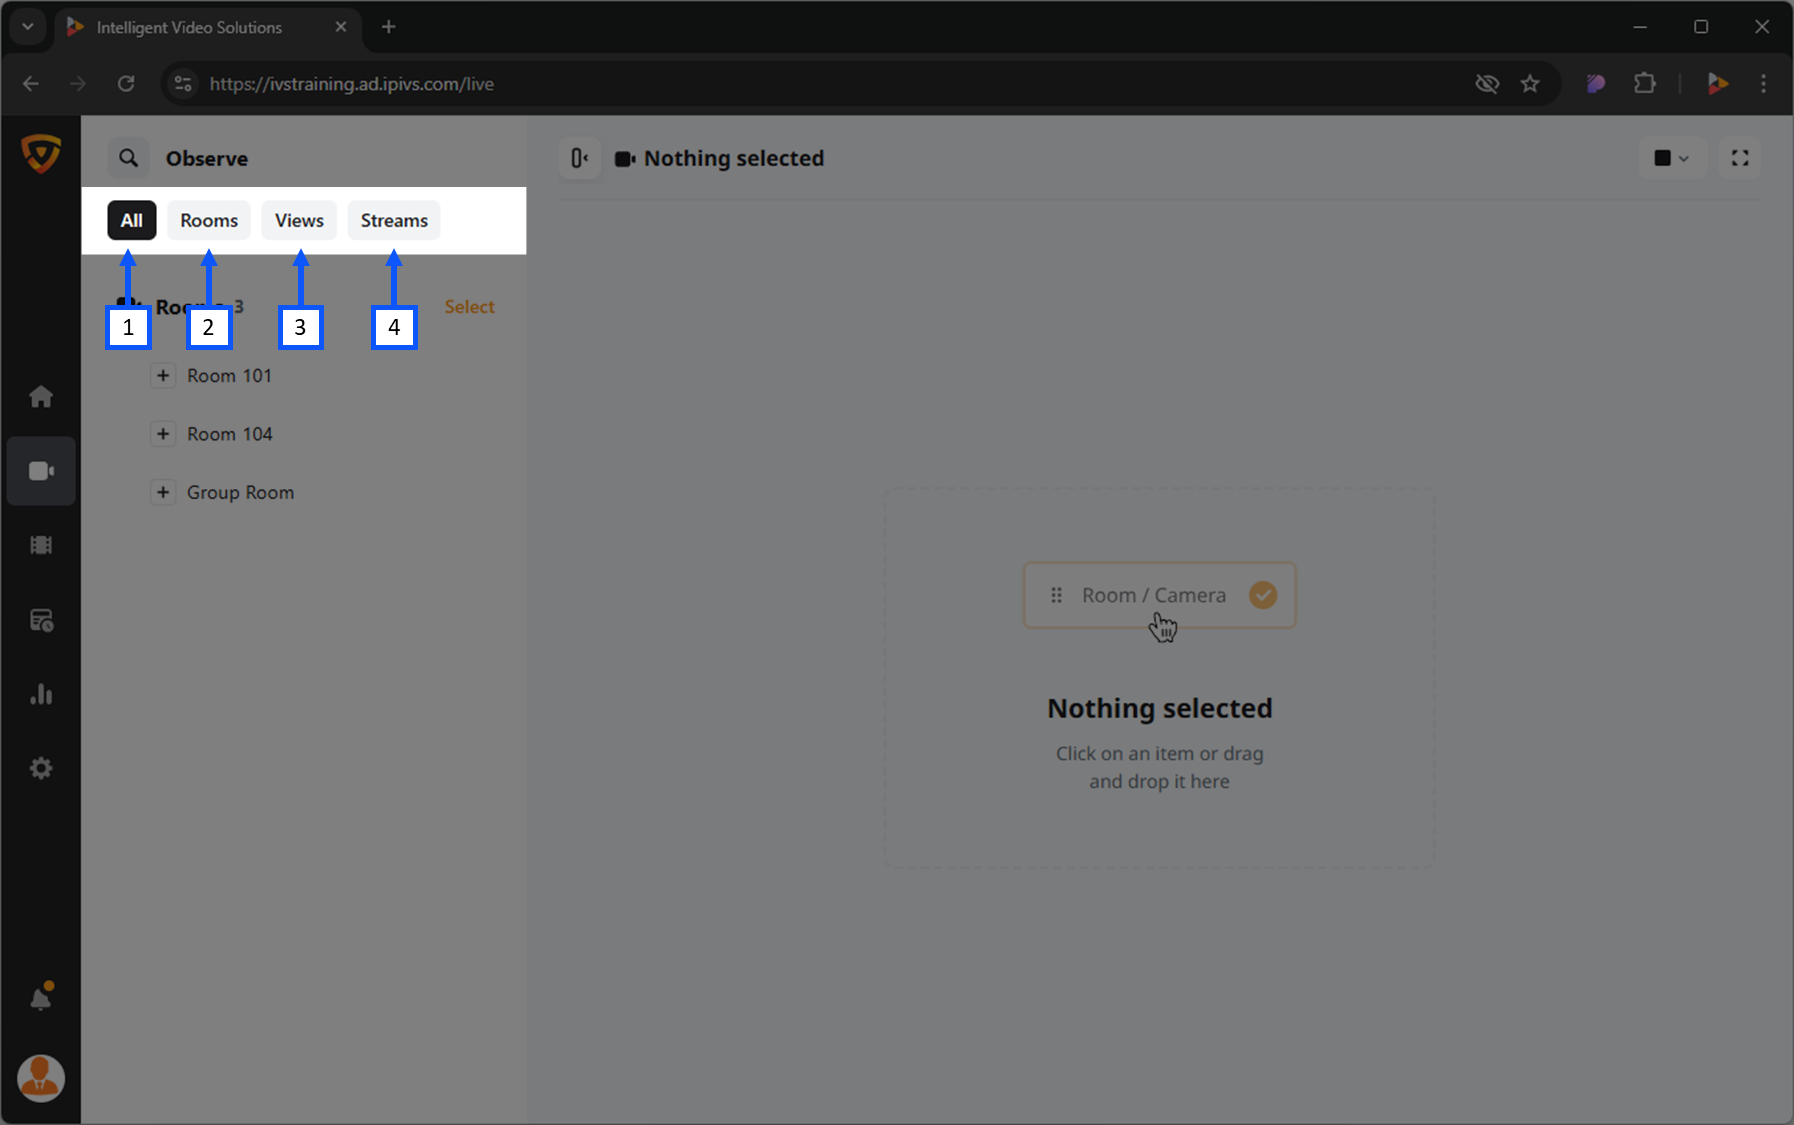
Filter
Users can filter their list to show only specific items.
- All (Default): Selecting this will show all available items.
- Rooms: Selecting this will display only the rooms available to the user.
- Rooms are created by the administrators of the system.
- Views: Selecting this will display any custom views available to the user.
- Views are saved collections of cameras and streams.
- Streams: Selecting this will display all available streams to the user.
- BEAM streaming would fit under this category.
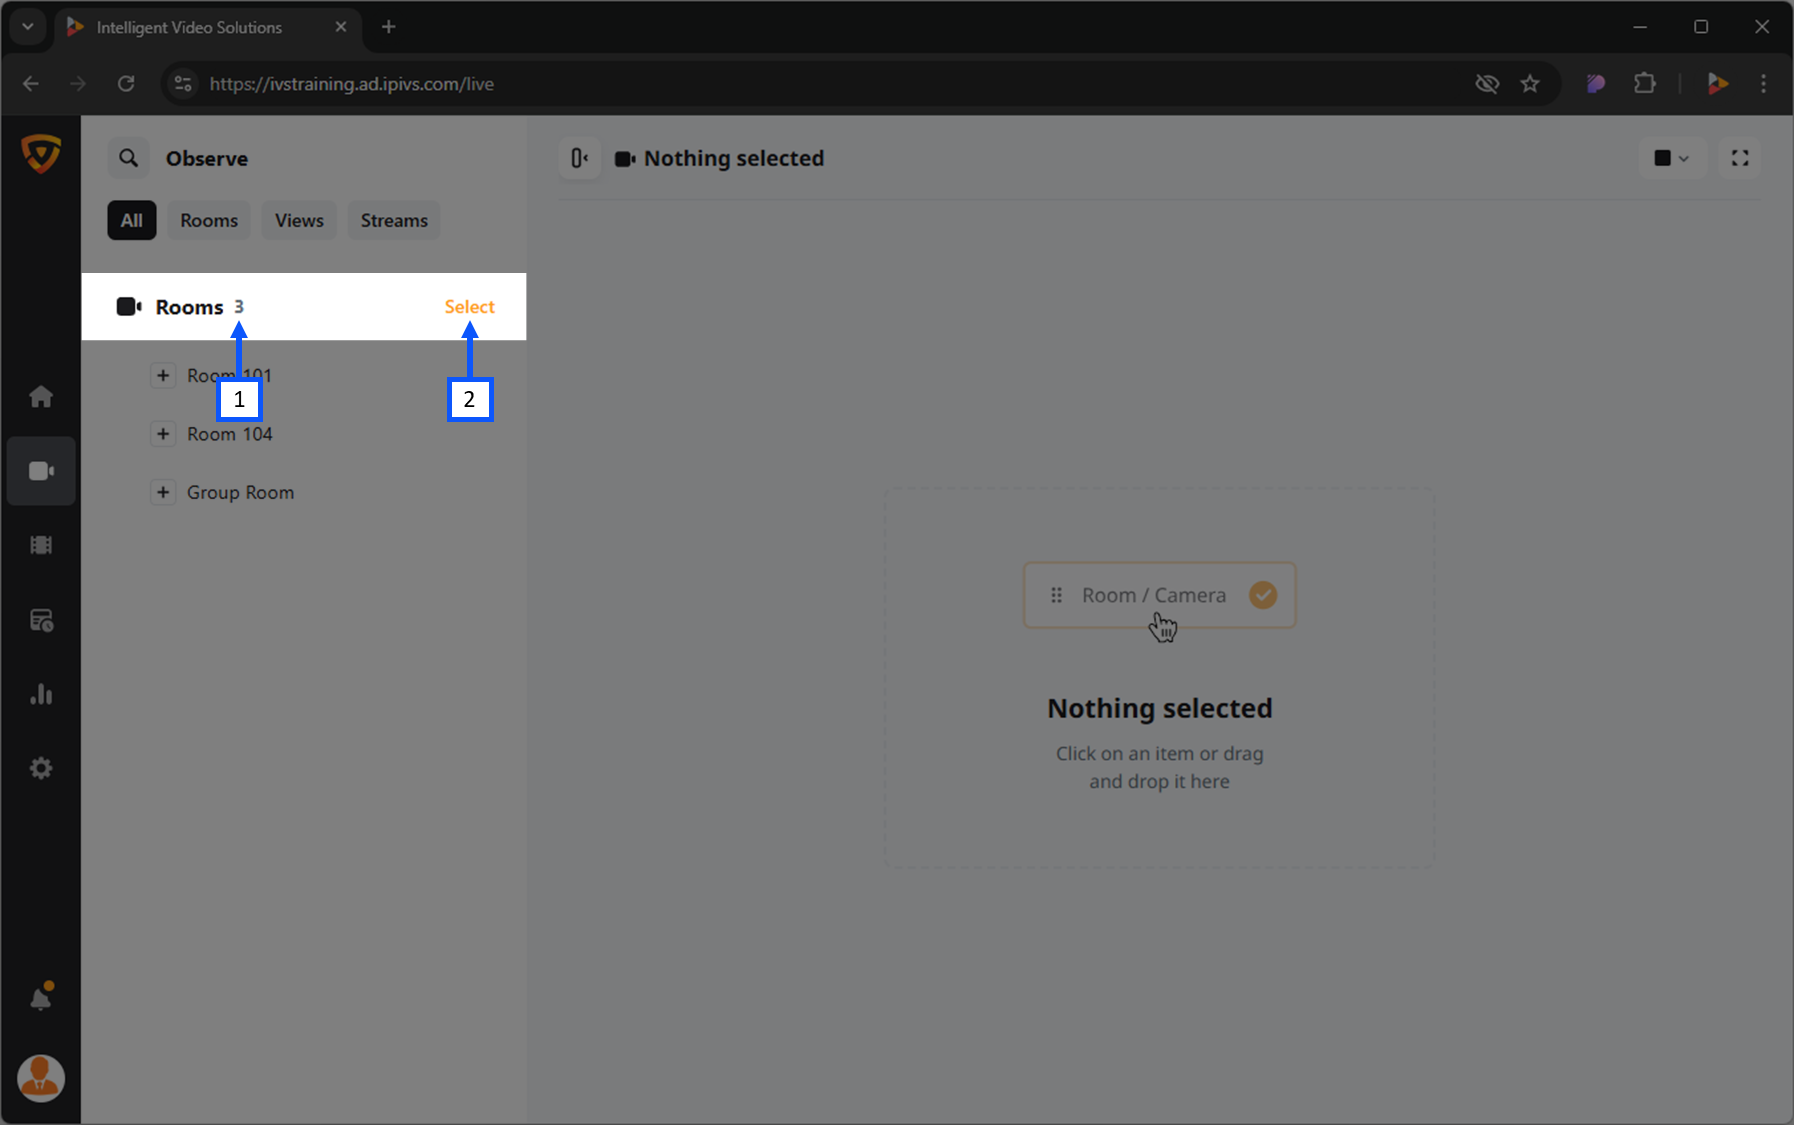
Select
The Select option allows users to start multiple recordings and stop multiple recordings in multiple rooms.
- Number of Rooms
- Select: Opens the selction tool to check multiple rooms to perform an action.
Open a Room
- Locate the room from the list.
- Click on the name of that room.
✎Recording happens at the room level.
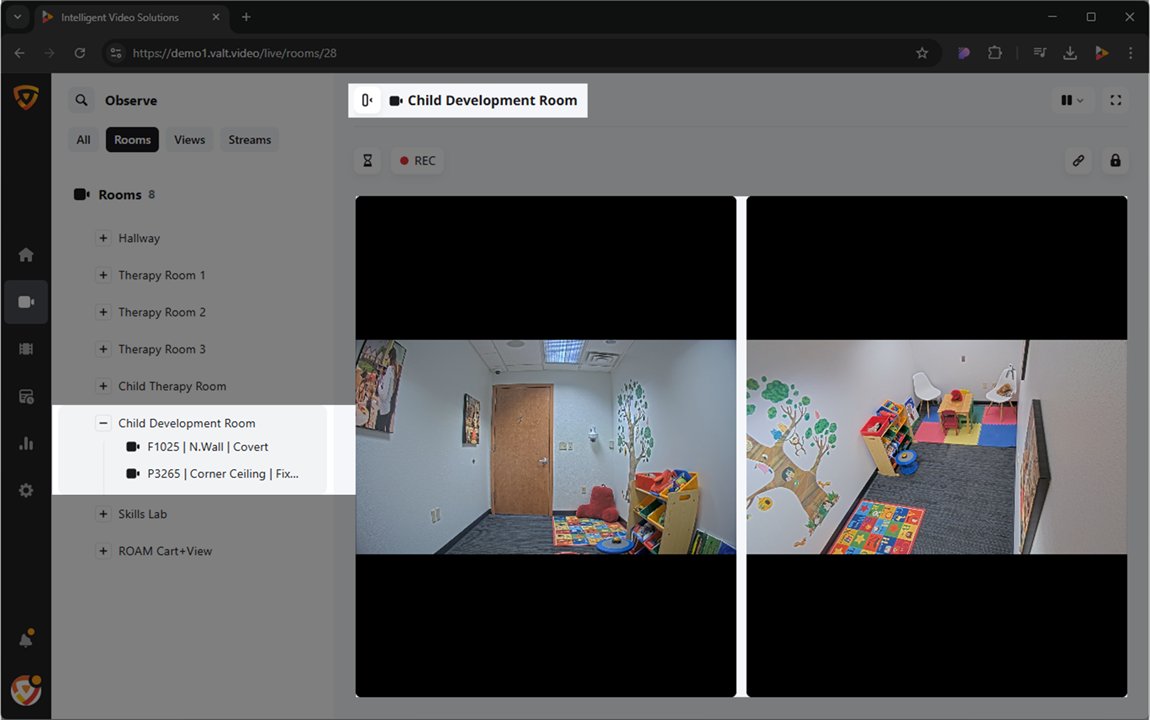
Open a Stream
- Locate a room that contains the desired stream.
- Expand the room by clicking the + Expand icon.
- Click on the name of the stream.
Camera Control
Each video feed will have a variety of options for control. These controls can vary depending on the type of camera/device.
Digital Zoom
Users can zoom in and out on any video feed using a digital zoom. This zooming is only viewable to the user performing the zoom. This means that it will not impact a recording and will not affect other users live observing the feed.
A digital zoom will only take the existing pixels and make them larger. This means there is no increase in image quality.
Try it out!
Move Camera (PTZ)
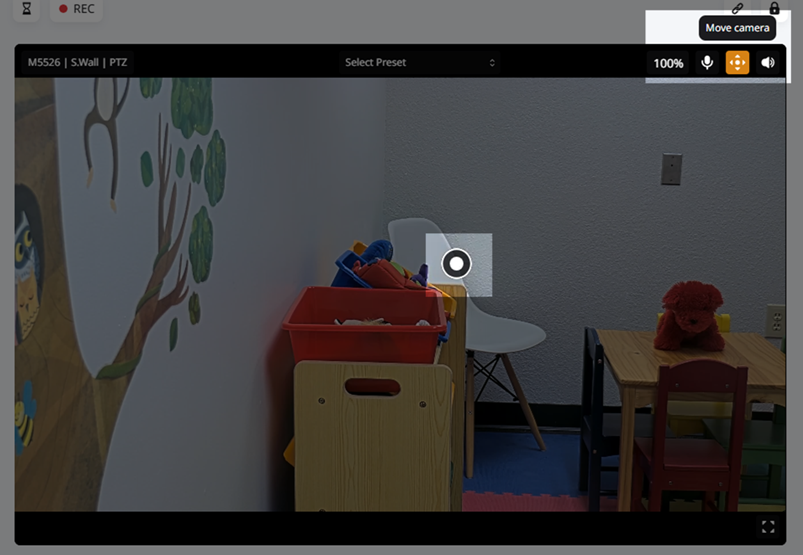
- Click anywhere on the video feed of your PTZ camera, to open the stream controls.
- Click on the
 Move camera icon.
 - Position the
 bullseye on the desired location.
- Left click to center view on that point.
- Mouse scroll wheel is used to zoom in and out.
Try it out!
Presets
The preset dropdown enables users to quickly navigate to predefined locations with specific camera zoom levels.

Create Presets
- Using the PTZ control, move the camera to the desired location.
- Click the 'Select Preset' dropdown and select 'Save Current'.
Delete Presets
- Click the 'Select Preset' dropdown.
- Hover over the preset to be deleted and click the
 Delete icon.
Talkback
Clicking the ![]() Talkback icon allows a user to talk back into a room using the audio output on the camera (assuming this output has been wired to a speaker or audio transmitter).
Talkback icon allows a user to talk back into a room using the audio output on the camera (assuming this output has been wired to a speaker or audio transmitter).
Sound Control
The ![]() speaker icon mutes / unmutes the audio for that camera. When viewing multiple cameras, the user can control which audio channel they are listening to using this button.
speaker icon mutes / unmutes the audio for that camera. When viewing multiple cameras, the user can control which audio channel they are listening to using this button.
Fullscreen Mode
The ![]() fullscreen icon allows you to expand the current camera view to fill the entire monitor screen.
fullscreen icon allows you to expand the current camera view to fill the entire monitor screen.
The ![]() share settings icon allows you to share videos with users who do not have VALT Accounts. If a user without an account opens the link, they will only see the VALT room that was shared with them.
share settings icon allows you to share videos with users who do not have VALT Accounts. If a user without an account opens the link, they will only see the VALT room that was shared with them.
✎A share link can be deleted at any time.
Create Sharing Link
- Click on the
 share settings icon.
 - Select an expiration for the sharing link.
- No expiration (default)
- Will never expire but can manually be removed later.
- End after date
- Select a date when the link will no longer be valid.
- End after period
- Specify the duration(Days/Hours) of time for which the link will be valid.
- No expiration (default)
- Click the ‘New Share Link’ button.
Try it out!
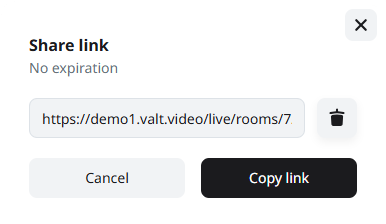
Copy Sharing Link
- Click on the share settings icon.
- Click the ‘Copy Link’ button.
Delete Sharing Link
- Click the share settings icon.
- Click the Delete icon.
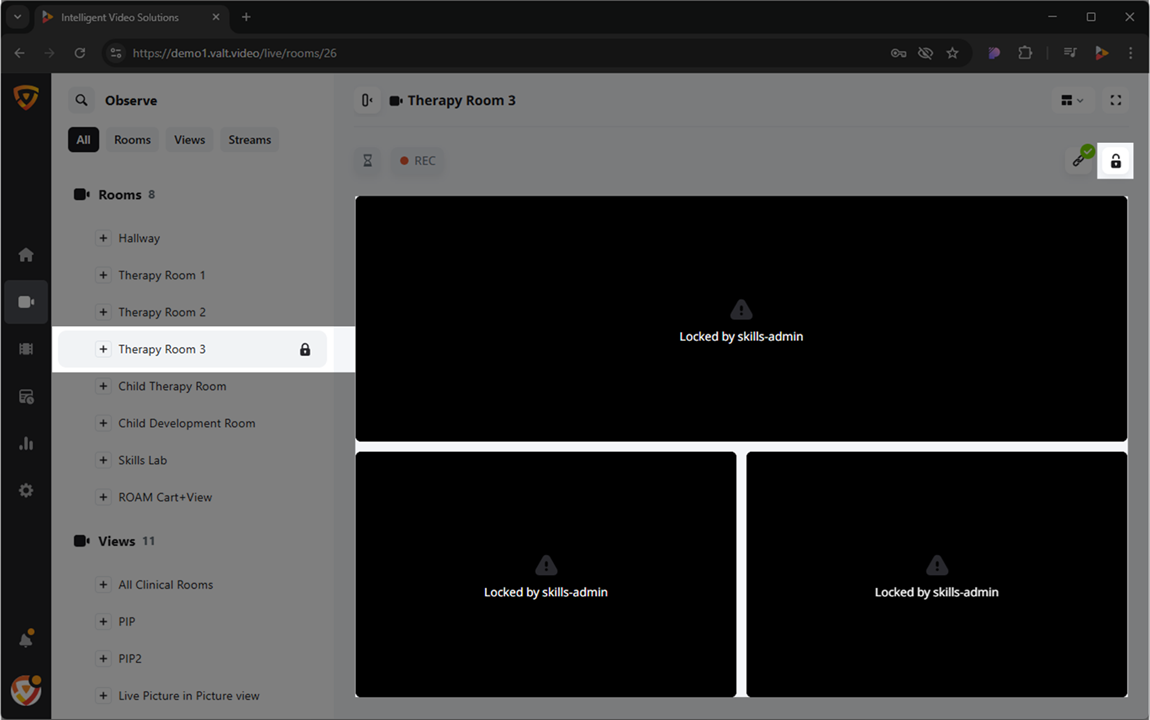
Locking Rooms
The lock feature is used to prevent viewing and recording of a room. When a room is locked, the user will be greated with a message indicating that the room is locked, and by which user.
When a room is locked, a ![]() lock icon will display next to the room.
lock icon will display next to the room.
Lock Room
- Open the room which you would like to lock.
- Click the
 lock icon.
Unlock Room
- Open the room which you would like to unlock.
- Click the
 unlock icon.
Views
Views allow users to customize how they watch or observe camera streams. A view can combine streams from multiple rooms or focus on a single camera within a multi-stream room. While camera streams are typically assigned to rooms, users may want personalized arrangements.
These views are unique to users and can be saved and deleted, per user.
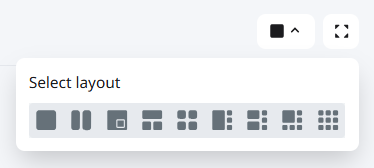
Matrix Views
Matrix views offer flexible layout options for displaying multiple streams within a single view. A user can arrange up to 9 cameras in an assortment of different ways for live observation using the built-in matrix.
Save View
- Open a unique combination of streams.
- Click 'Save View' in the top left.
- The view will now show up under Observe → Views for that user.
Delete View
- Click on 'Views'.
- Hover over View to delete.
- Click the Delete icon.
Hide Left Panel
The left panel on the left can be hidden to maximize usable space for video content.
- Click the
 Hide Panel icon to hide the Rooms/Views/Streams selection panel and to expand the camera streams to the left.

Recording
There are several ways to initiate a recording using the VALT software. Recordings can started while observing a room through the software, using a physical start/stop button, RFID card readers, a built in scheduler, or our API.
Recording occurs at the room level.
⚠The ![]() REC button will not be available if you are only viewing a stream or a new view.
REC button will not be available if you are only viewing a stream or a new view.
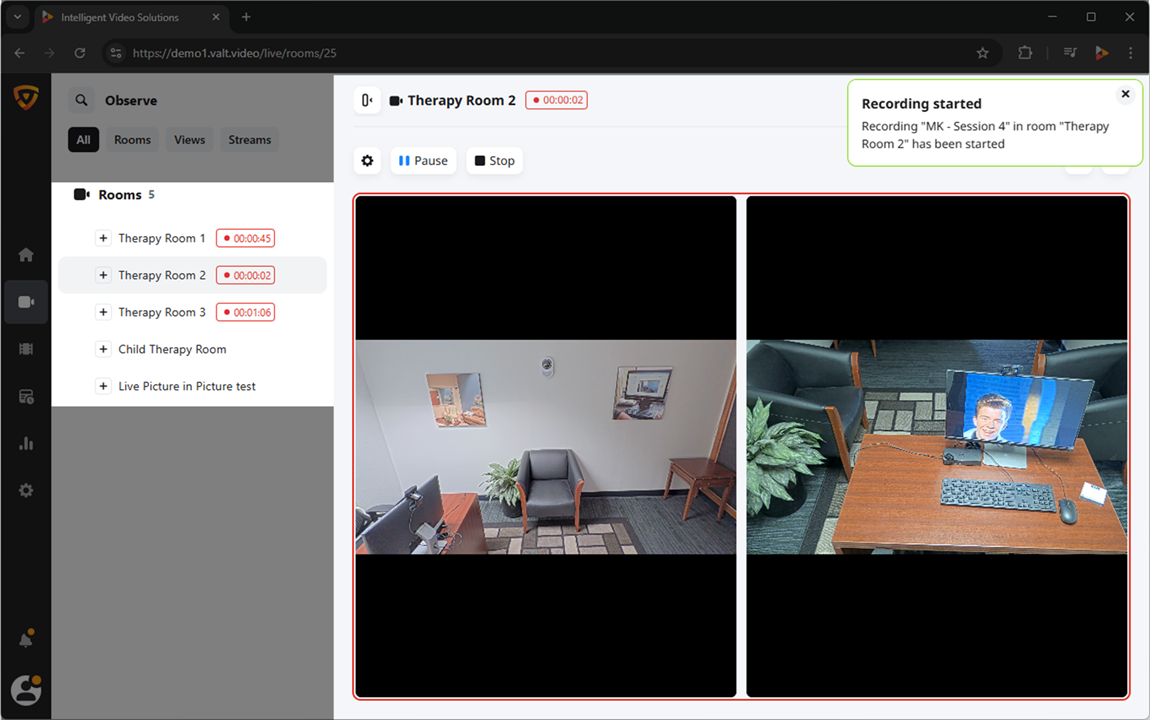
Start a Recording
The ![]() REC button is used to initiate an ad-hoc recording. Pressing this button will bring up the information template.
REC button is used to initiate an ad-hoc recording. Pressing this button will bring up the information template.
- Hover over a room.
- Click the
 REC icon.
 - Enter in the appropriate information for the recording.
- Click the REC button.
Try it out!
Start Multiple Recordings
You can also start recordings in multiple rooms at the same time.
✎All the recordings started in this way will share the same information. This can be changed later.
- Click 'Select' next to the room count.
- Check the boxes for all the rooms you wish to record in.
- Click the record button in the bottom left.
- Enter in the appropriate information for the recording.
- Click the REC button.
Try it out!
Prepare a Recording
The ![]() Prepare button is used to arm a room for an active recording. This option allows you to fill in all the information fields ahead of time and then use a physical button or start recording button to initiate the recording.
Prepare button is used to arm a room for an active recording. This option allows you to fill in all the information fields ahead of time and then use a physical button or start recording button to initiate the recording.
Recording Settings
When starting, preparing, or watching a recording in progress, users can modify various settings for the reocrding.
These settings are allow the user to manipulate the following items.:
Information
The Information tab allows users to assign data to a recording. This data can later be used to search for the recording.

This is the same template used when preparing or scheduling a recording. Each template can have multiple data fields, but at least one field is required. Users can be assigned multiple templates as needed.
🕮Want to learn more about Information Templates?
Evaluation
This button pulls up the evaluation menu. Evaluation templates are typically used during a recording, or after a recording is completed. Numeric values can be assigned to the fields within an evaluation form. This allows scoring to be done on each item and the overall form.
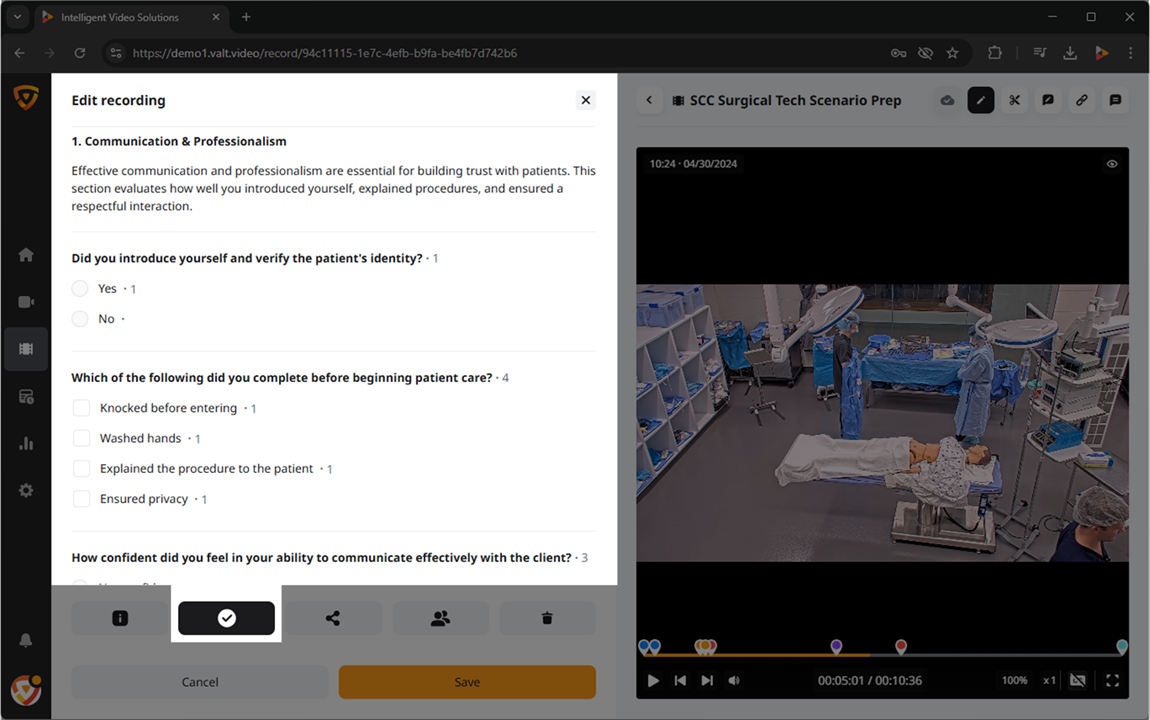
🕮Want to learn more about Evaluation Templates?
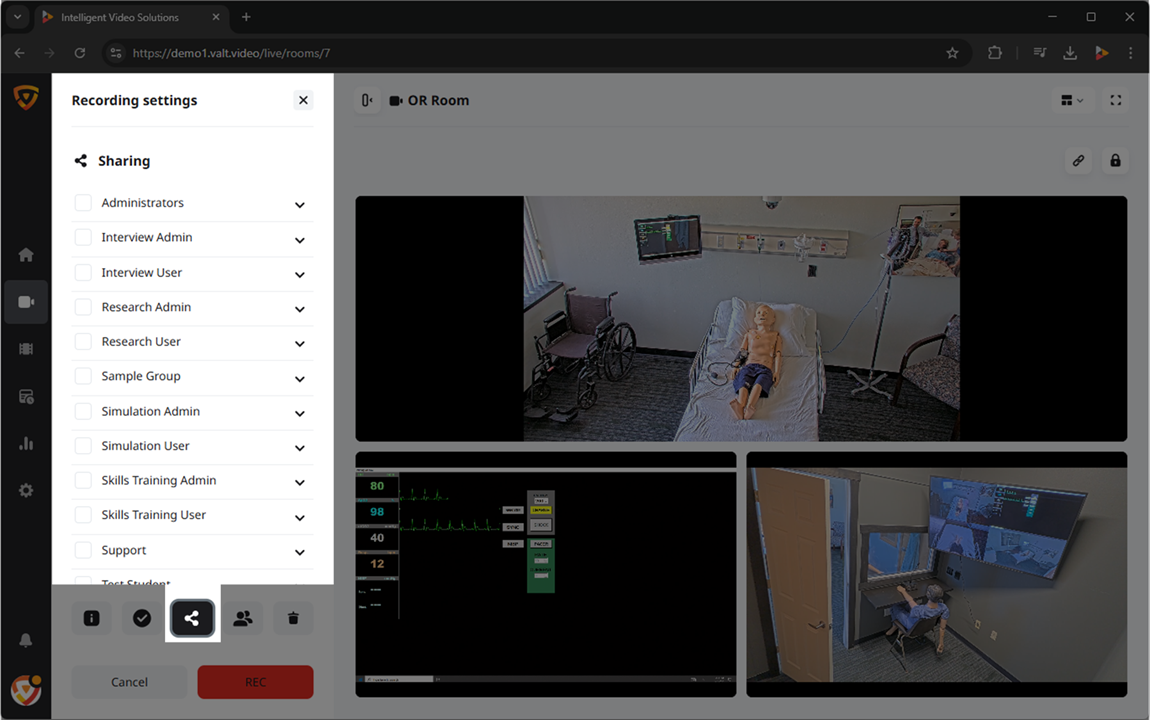
Sharing
Allows the user to share the recording with users / user groups that normally would not have access to it.
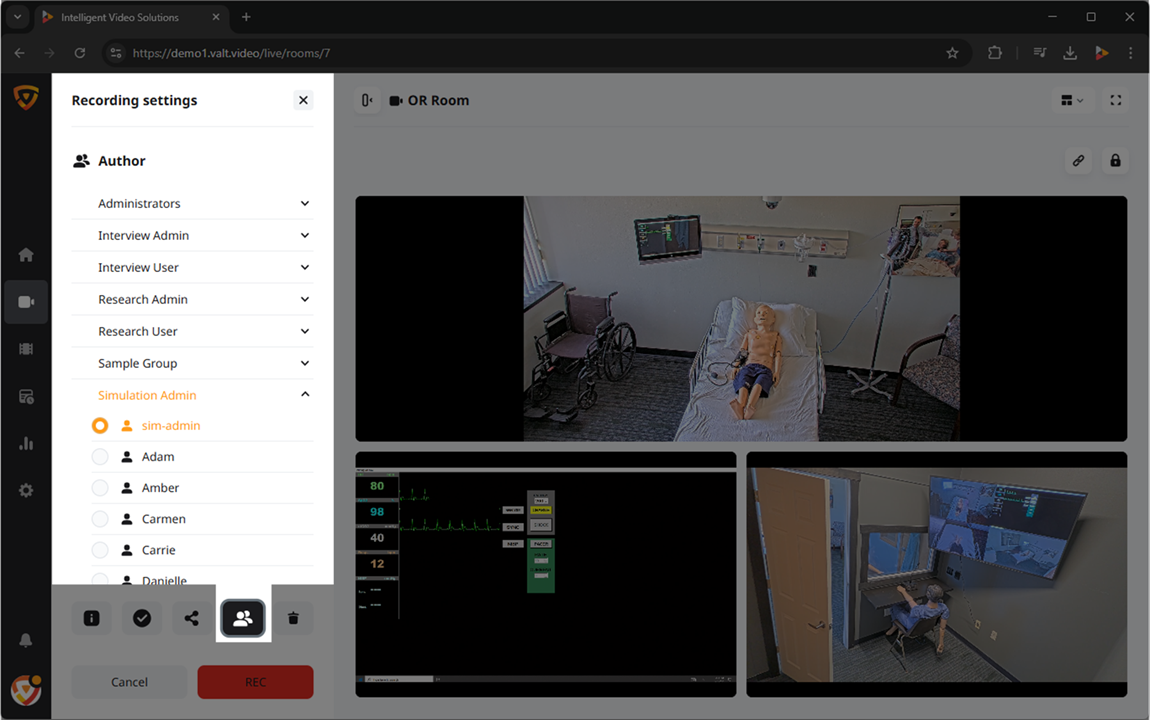
Author
Allows the user to change the author of the recording. Changing the author will also change all the permissions associated with who has access to the recording (that is all based on author).
Retention
Allows the user to change how long this recording is stored for before automatically being deleted.

- Default:
- Whatever the author's user group retention settings are set to will be automatically used.
- Keep For:
- Allows a user to define a number of days, hours, or minutes to keep a recording for.
- Keep Until:
- Allows users to select a future date that the recording will be deleted on.
- Keep Forever
- Leaves the video on the system until it is manually deleted.
⚠Once a video is deleted from the system, it cannot be recovered.
Pause a Recording
The ![]() Pause icon will temporarily stop a live recording.
Pause icon will temporarily stop a live recording.
- Hover over a room that is currently recording.
- Press the
 Pause icon.
⚠Frequent or long pauses in a recording is not recommended.
Resume a Recording
When a live recording is paused, any events occurring in the room will not be captured. Recording can be resumed to continue video capture. During playback, any paused sections will be seamlessly omitted from the video
- Hover over a room that is currently paused
- Press the Resume icon.
Stop a Recording
Clicking the ![]() Stop icon will end a recording and immediately move it into Review.
Stop icon will end a recording and immediately move it into Review.
- Hover over a room that is currently recording.
- Press the
 Stop icon.
Try it out!
Stop Multiple Recordings
You can also stop recordings in multiple rooms at the same time.
- Click 'Select' next to the room count.
- Check the boxes for all the rooms you wish to stop recordings in.
- Click the Stop All button in the bottom left.
Try it out!
Comments
Users are able to leave comments in the video. These comments are attached to the user leaving the comment and are timestamped in the videos timeline.
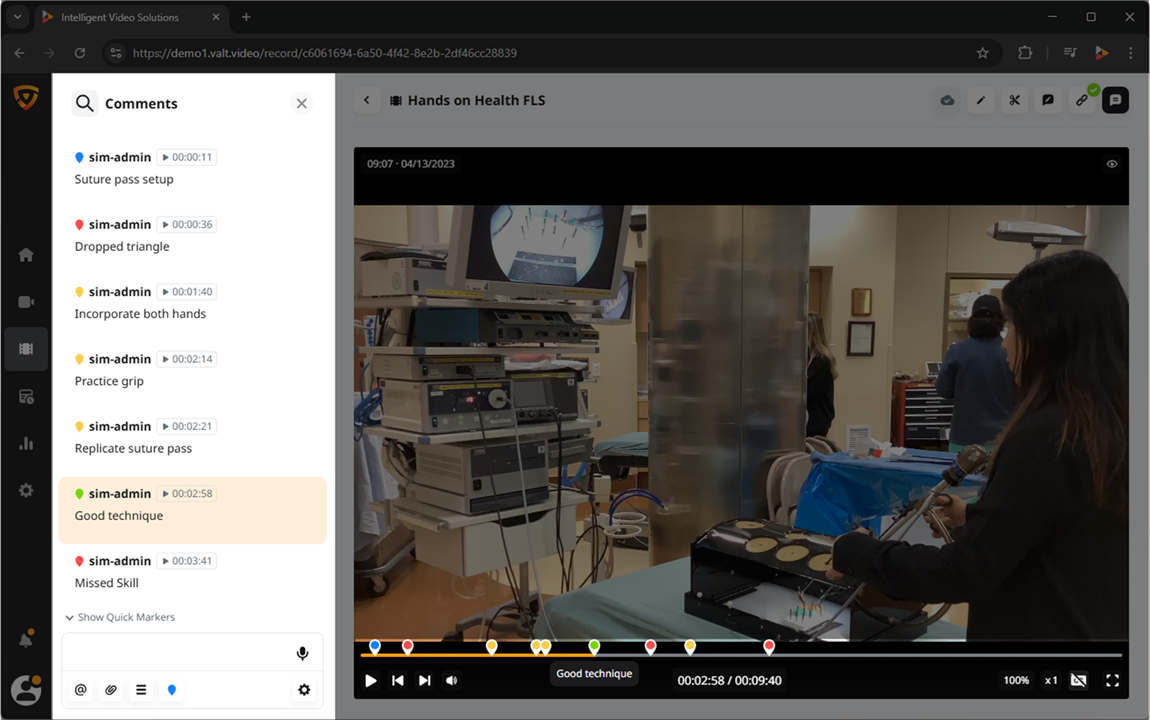
Add
Comments can be added in many ways. The most simple, is a standard comment.
- Go to a room that is recoding.
- Click on the
 Comments button.
 - Click on the text field in the bottom left of the screen.
- Enter the text for your comment.
- Press Enter or click on the
 Send comment button.
🕮Admins can grant access to comments in the User & Groups settings.
Quick Markers
Selection of pre-defined comments for adding to a recording, set up in the Templates section of the VALT Settings.
Enable Audio Mode
This feature allows a user to record an audio comment instead of free text.
Add Mention
Use the ![]() Mention icon to direct a comment towards another VALT user.
Mention icon to direct a comment towards another VALT user.
✎Only the tagged user or group will see this comment.
Attach a File
The attach file icon allows users to include a file in the comments for others to download.
Open Comment Template
The ![]() hamburger button allows users to fill in pre-set fields, created in the comments template section of the VALT Settings.
hamburger button allows users to fill in pre-set fields, created in the comments template section of the VALT Settings.
Select Color
You can use the ![]() color button to change the color of the marker on the timeline.
color button to change the color of the marker on the timeline.
Reset Timestamp
During live observation of a recording, when typing a comment, the timestamp will correlate to the time the comment was started. Click the Reset Timestamp button to update the time to the current time.
Reply
Hover over a comment and click the ![]() Reply icon to direct a response that a specific post.
Reply icon to direct a response that a specific post.
Edit
To make a change to an existing comment, hover over the comment and click the ![]() Edit icon.
Edit icon.
Delete
Hover over a comment and click the ![]() Delete icon to delete the comment.
Delete icon to delete the comment.