VALT Manual Review
Review
The review section is used to find and manage recordings. Only recordings the active user has access to will show up under the review section.
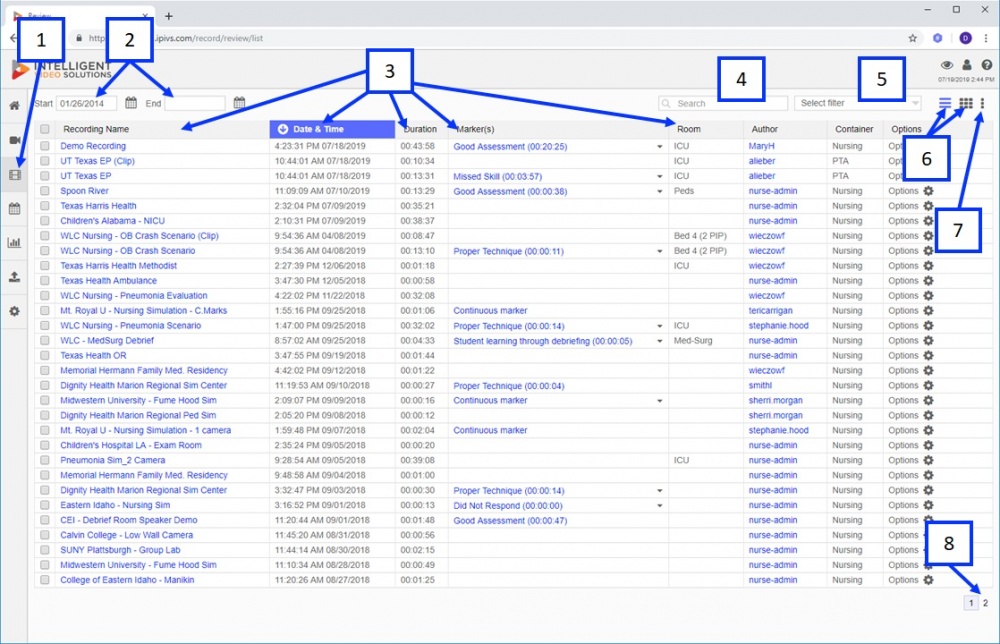
- ) Navigation pane: the navigation pane will collapse depending on browser width as shown above. To navigate to a different section, click the Section icon.
- ) Date range: this is used to define the range to display results. The default start range is a definable setting in the Admin section.
- ) Sortable Column Headers: clicking on any of these will sort results on the selected column.
- ) Search: This is used to narrow results. The search box applies to all information / marker fields associated with recordings.
- ) Search Filter: This section allows users to create and apply filters to the results. Filters are specific search queries that can be generated and saved.
- ) View Mode: this allows users to switch between list and thumbnail view for results.
- ) Export Options: Export results to pdf or cvs using the button.
- ) Paginator: if multiple pages of results are present (30 per page), you can use this to navigate between pages.
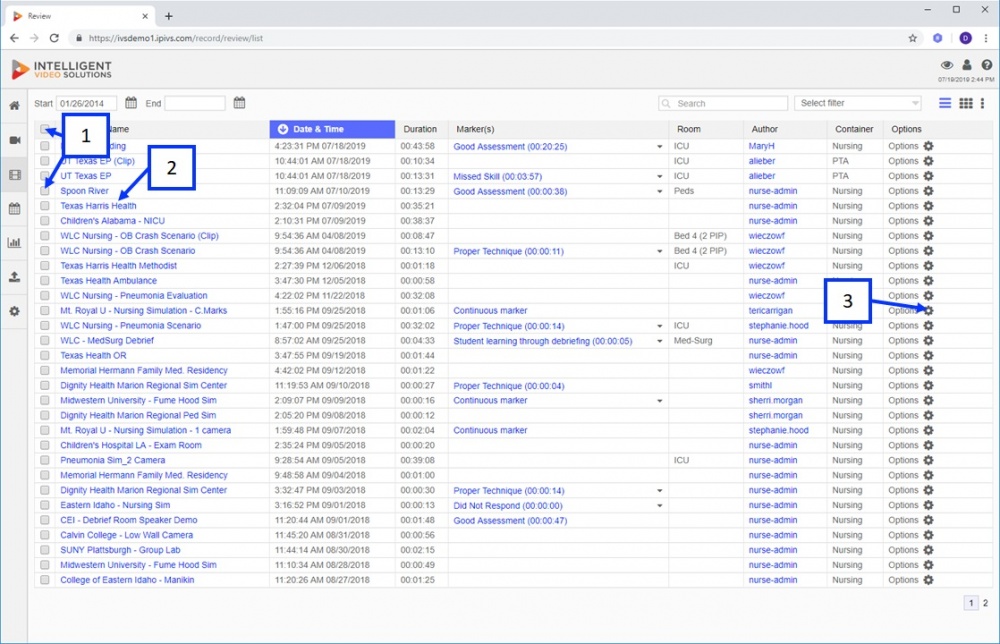
- ) Multi-Select: this is used to select multiple items at once.
- ) Recording Name: clicking on this will launch the video player.
- ) Options Button: clicking this will bring up a sub menu listing options the user can perform on this recording based on the users rights.
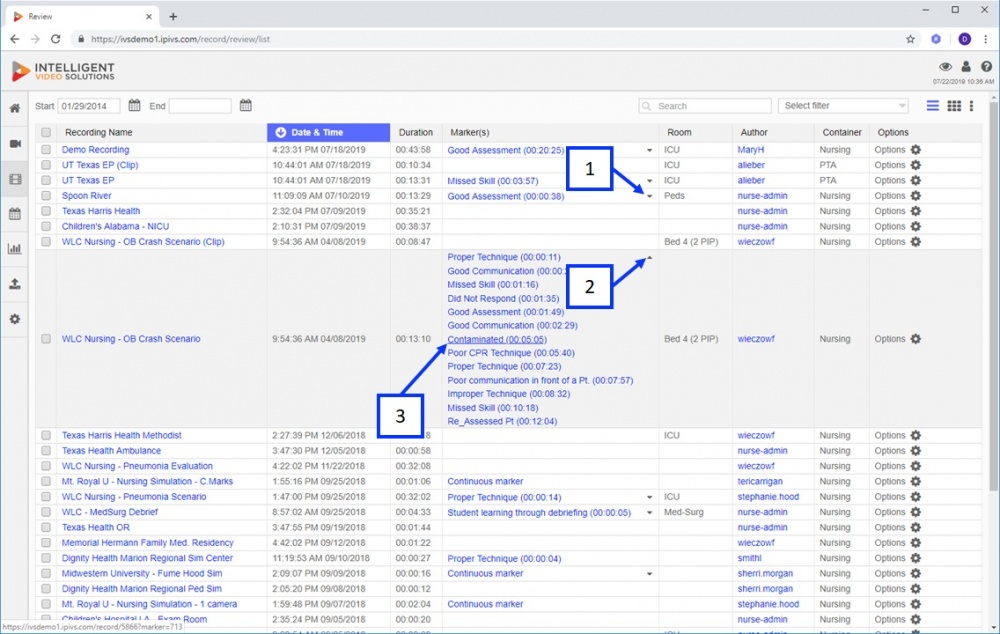
- ) Marker Expand: clicking on the down arrow will expand the selection and reveal all the additional markers associated with the recording.
- ) Marker Decrease: clicking on the up arrow will hide additional markers associated with the recording.
- ) Markers: clicking on a marker will launch the video player and automatically take the user to that point in the recording.
Options
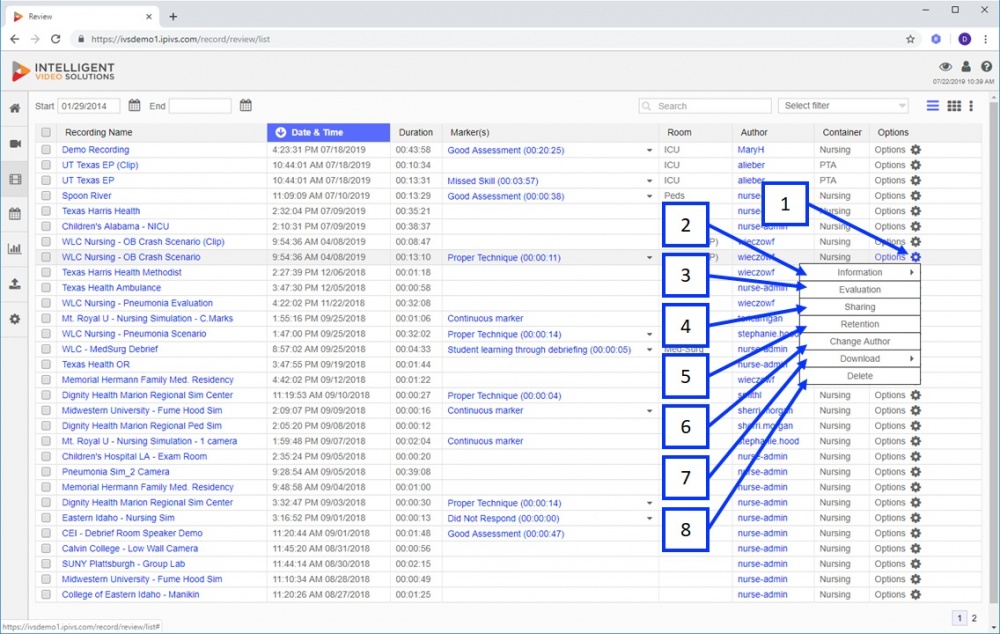
- ) Options: clicking on options will bring up a sub menu of options based on user rights as shown above.
- ) Information: selecting this will allow the user to view / edit information associated with the recording. Clicking the arrow and choosing pdf will make a pdf and download it to the users download folder, including the information & markers associated with the recording.
- ) Sharing: allows the user to share the recording with users / user groups that normally would not have access to it.
- ) Retention: allows the user to change how long this recording is stored for before automatically being deleted.
- ) Change Author: allows the user to change the author of the recording. Changing the author will also change all the permissions associated with who has access to the recording (that is all based on author).
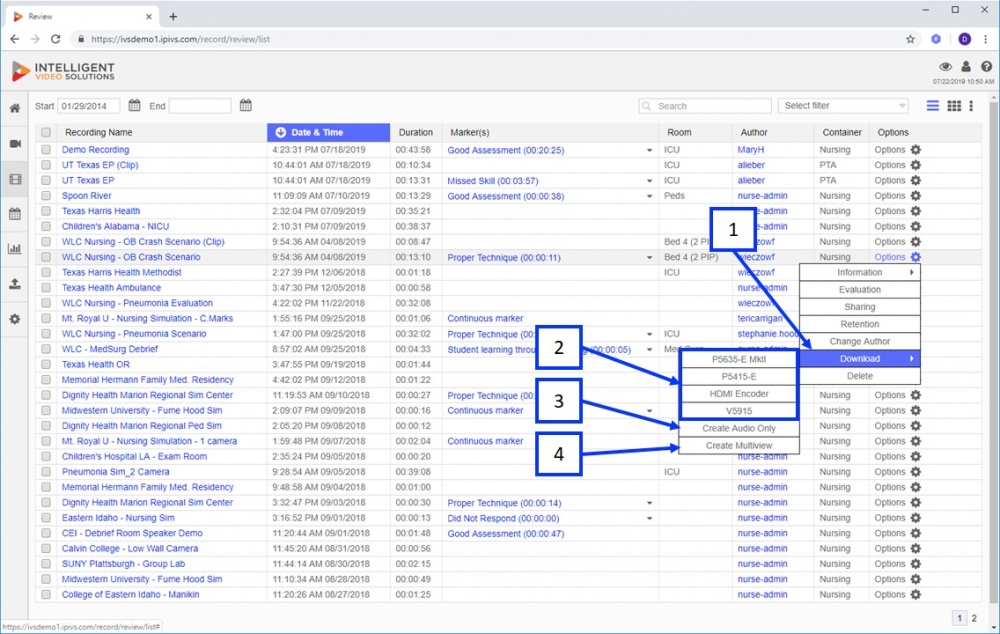
- ) Download: will bring up a sub menu with download options.
- ) Delete: will delete the recording.
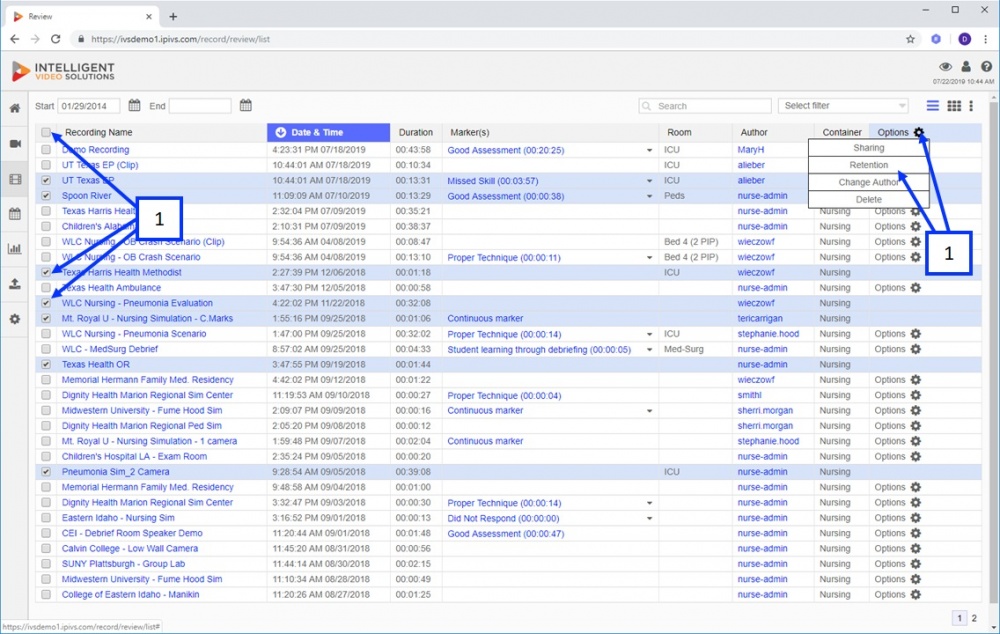
- ) Mult-Select: checking the checkbox to the left of a recording will select (highlight) the recording. Checking the top checkbox will select all the recordings on the page.
- ) Multi-Options: when one or more recordings are selected, the options button in the top column header will highlight. Clicking on that button will bring up a sub menu of actions that can be applied to all selected recordings.
Download
- ) Download: selecting Download will pull up a list of sub options as shown in the image above.
- ) Selecting a camera (if multiple cameras are associated each one will have its own link) will download that camera's video directly to the user's download folder. It is saved as a standard .mp4 file.
- ) Create Audio Only: this option will strip out the audio and convert it to an .mp3 file. Clicking this will launch a progress bar when the file has been generated this option will change from Create Audio Only to Audio. Clicking on Audio will download the .mp3 file.
- ) Create Multiview: this option will merge up to 4 video files together (the videos associated with the recording) to create a single mp4 file. Clicking this will launch a progress bar, when the file has been generated it will change from Create Multiview to Multiview clicking on Multiview will download the merged mp4 file.
Thumbnail View
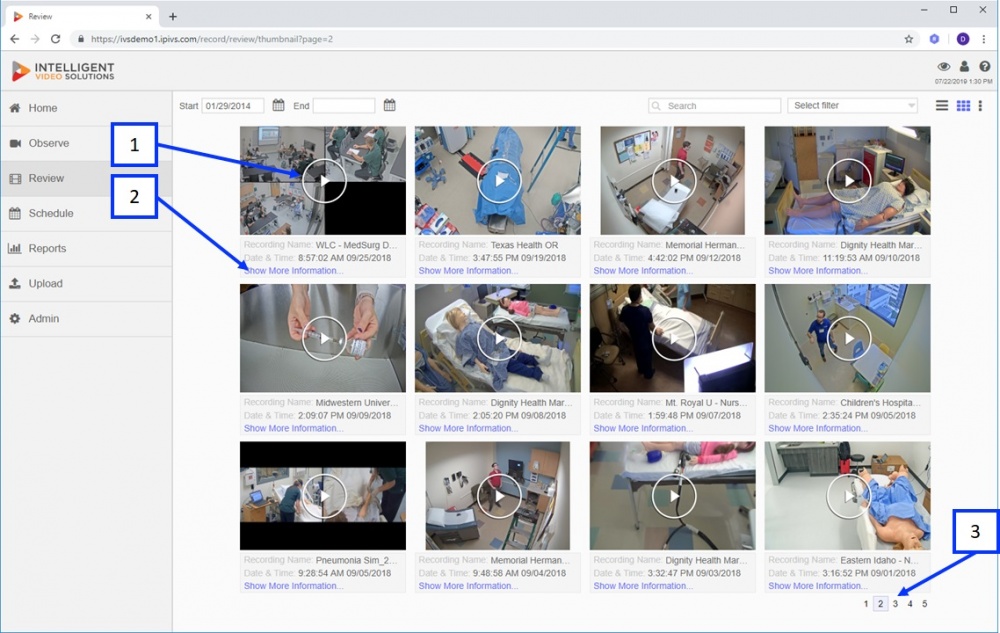
- ) Play: clicking the image will launch that recording in the video player.
- ) Show More Information: clicking this link will reveal additional information and options associated with the recording.
- ) Paginator: switch to another page of recordings
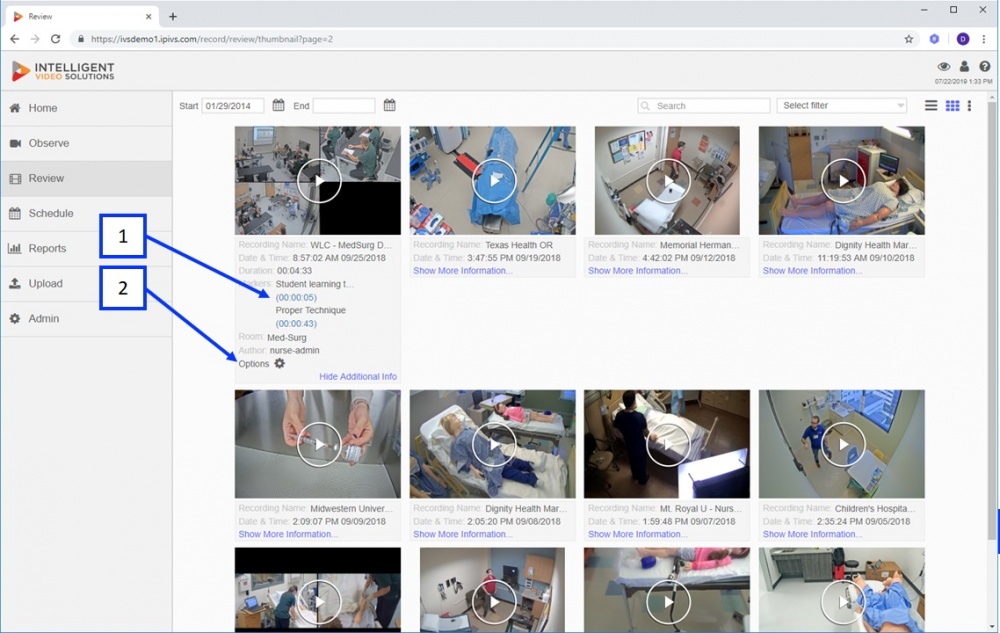
- ) Markers: after Show More Information is clicked, if any markers are present in the video, they will show up as shown above. Clicking on a marker will take the user to that point in the video.
- ) Options: clicking options will pull up a menu of actions that can be performed on the selected recording.
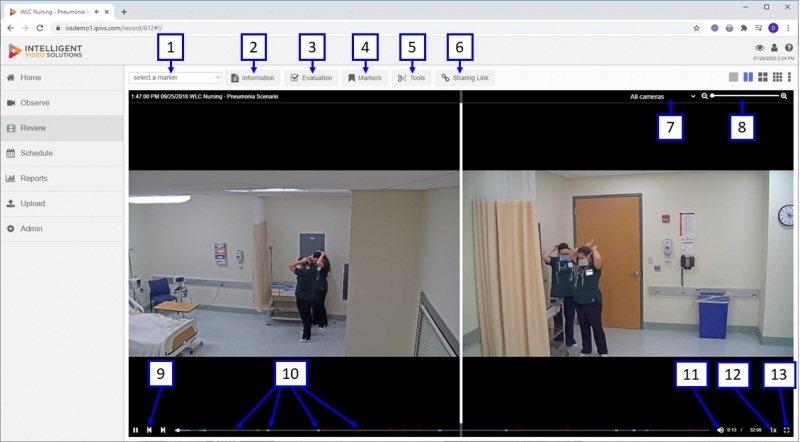
Video Player
The Valt Video Player launches whenever a recording name is clicked within the Valt interface.
- ) Marker Dropdown: all markers associated with the recording will appear in the dropdown list. Selecting a marker name will jump the video to that specific marker.
- ) Information: clicking this button will pull up the information associated with the recording and allow the user to edit the information template, if they have the proper rights.
- ) Evaluation: this button pulls up the evaluation menu.
- ) Markers: this button pulls up the marker menu.
- ) Tools: this button pulls up the tools menu.
- ) Sharing Link: this button enables a direct sharing link that can be copied and shared.
- ) Camera Selection: using this drop down menu, the user can switch to a specific camera or view all cameras as shown above.
- ) Digital Zoom: this slider allows the user to digital zoom on the image. To adjust the view area, the user can click and drag around the image.
- ) Player Controls: play button (will change to pause when playback is enabled), step back (goes back 10 seconds), step forward (goes forward 10 seconds).
- ) Marker Indicators: markers are plotted on the timeline with the designated marker color as shown above.
- ) Audio Level: this icon is used to control / mute the audio level.
- ) Playback Speed: this button can be used to change the playback speed.
- ) Full Screen: clicking this icon will pull up the video in full screen mode.
