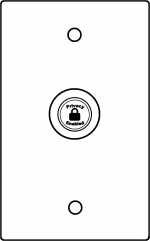
Privacy Button 2020-Present
Contents
Overview
From time to time an IVS customer may have the need to use one of their VALT Rooms without the capacity to view live or record. Or, they may run sessions that contain sensitive information from time to time, which they do not captured in a recording. In this case, we can configure cameras for Privacy Mode, which blankets the screen with a black video overlay and omits all audio from the stream.
The Privacy Switch is a customizable solution for placing VALT cameras in Privacy Mode - a physical button to engage this option.
These instructions are written for use with a camera with 4 I/O ports (6 pin phoenix connector). Port 1 and 2 (pins 3 and 4) are reserved for use with the VALT Recording Start/Stop button.
Compatible Cameras and Wire Diagrams
The privacy switch should be usable with any AXIS camera with at least one free input and one free output. The camera must be running firmware version 5.50 or higher.
Click on the  icon to see the diagram.
![]() Axis P1364/65
Axis P1364/65
![]() Axis P3235-LVE
Axis P3235-LVE
![]() Axis P3245
Axis P3245
![]() Axis P3301
Axis P3301
![]() Axis P3304
Axis P3304
![]() Axis P3364/P3365*
Axis P3364/P3365*
![]() Axis P3374-V/P3375-V*
Axis P3374-V/P3375-V*
![]() Axis Q3504/05 MK II
Axis Q3504/05 MK II
![]() Axis Q3518
Axis Q3518
![]() Axis P3935-LR
Axis P3935-LR
![]() Axis F41
Axis F41
![]() Axis P5414-E/P5415-E
Axis P5414-E/P5415-E
![]() Axis M5525
Axis M5525
![]() Axis P5635-E MK II
Axis P5635-E MK II
![]() Axis P5655
Axis P5655
![]() Axis Q8414-LVS*
Axis Q8414-LVS*
* These cameras can only be used with a single ancillary device (ie: Button or privacy switch). To use these with a camera that does not have 4 I/O ports, you will need to adjust the event rules.
Required Parts and Tools
- VALT Privacy Switch and Face Plate
- Mud Ring or Single Gang Box
- Wire Cutters/Strippers
- 22/4 solid unshielded plenum cable
- Jab Saw (used to cut hole)
- Wire fishing poles or tape
Installation Instructions
- Cut a hole in the wall where the privacy switch will be mounted.
- Insert the mud ring into the hole, and attach it.
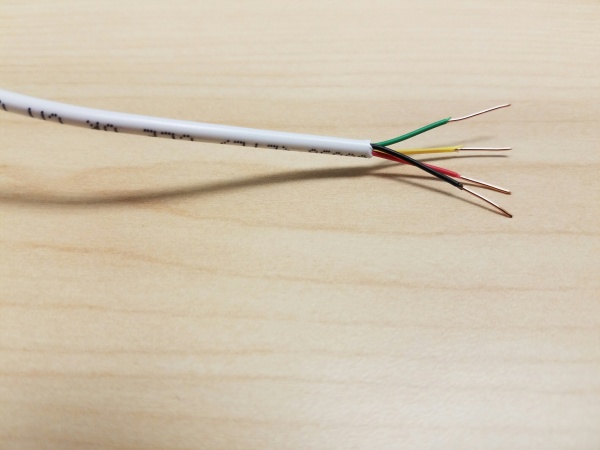
- Run 22/4 from the camera to the hole.
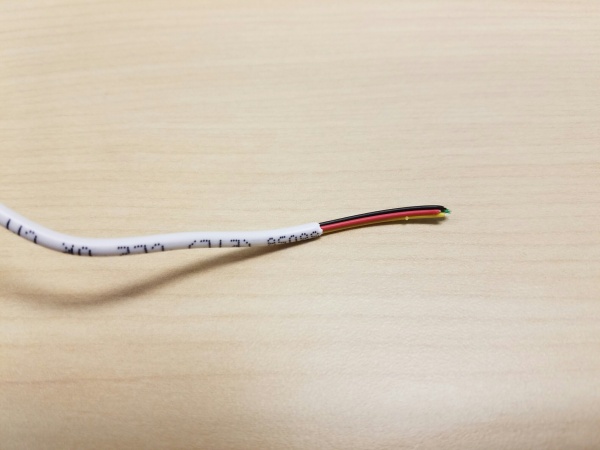
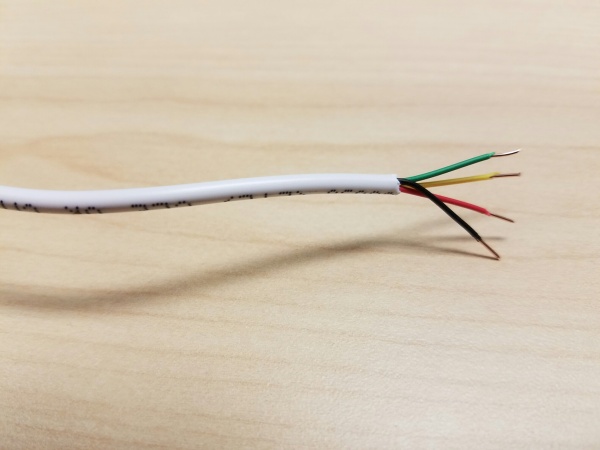
- Strip the outer insulation from both ends of the 22/4.
-
- Strip approximately 1/4 inch of insulation off of each wire in the 22/4 on the camera side
-
- Insert the wires into the IO connector on the camera according to the chart below. (For a camera with a 4-pin I/O phoenix connector, use pins 3 and 4 instead of 5 and 6.)
-
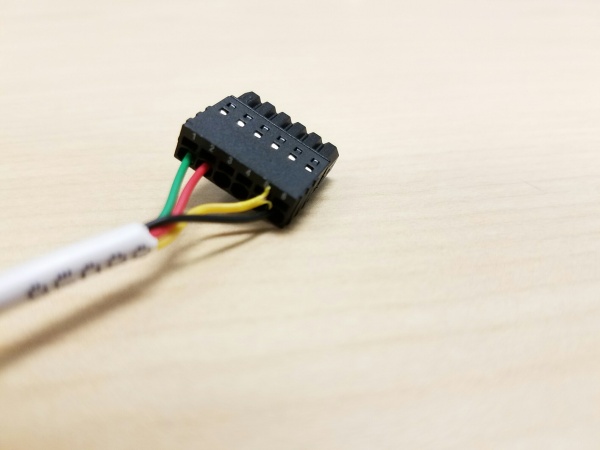
- Pin 1: Green
- Pin 2: Red
- Pin 5: Yellow
- Pin 6: Black
- See the chart at the end of this section for a direct mapping between the switch and I/O connector
-
- Strip approximately 1/2 inch of insulation off each wire in the 22/4 on the switch side.
-
- Splice the wires to the switch according to the chart below.
-
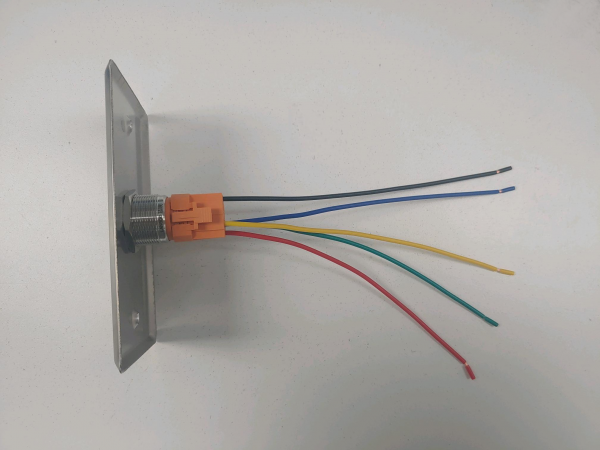
* Connections should be made with B connectors
- Attach the switch to the mud ring.
Wiring Map
Privacy Switch Lead Color Phoenix Connector Switch Green Pin 1 + Red Pin 2 Switch Blue Pin 5 - Black Pin 6
Configuration
Prior to configuring the cameras for use with the privacy switch, make sure that the cameras have already been set up with a valid IP address, and are configured according to VALT Specifications.
Add Privacy Events/Rules
Load Rules
Below are instructions to load privacy rules to the camera with a config file. If you prefer to configure the camera for Privacy manually, skip to: Set Privacy Location
Click on the  icon to download the privacy rules for your camera.
- Axis P1365 Mk II 8.40.1.cfg
- Axis P3245-LV 9.80.1.1.cfg
- Axis P3365 6.50.2.3.cfg
- Axis P3375-V 8.40.4.cfg
- Axis Q3505 Mk II 8.30.1.cfg
- Axis Q3518 9.30.1.cfg
- Axis P3935-LR 9.80.1.cfg
- Axis F41 6.50.2.3.cfg
- Axis P5415-E 6.50.2.3.cfg
- Axis M5525-E 8.30.1.cfg
- Axis P5635-E Mk II 8.40.1.cfg
- Axis Q8414-LVS 6.50.3.cfg
- Launch Axis Device Manager.
- If you do not have AXIS Device Manager go to the website and download it here.
- Click on the Add Device from Address icon or Add Devices from IP Range.
-
- Enter the IP address of the camera. Or, to find multiple cameras, enter the IP range using a * for the last quartet (ie 192.168.10.* or 10.111.5.*).
-
- Click OK.
- Enter the username and password for the camera(s).
-
- Click OK.
- The camera(s) should now appear in the list of devices.
-
- Right click on the camera(s), and select Configure Devices. Configure from the menu.
-
- Click the Configuration File button.
-
- Browse to where configuration file is saved, and select it.
-
- Click Open.
- Click Next.
-
- Click Finish.
- When the rules have successfully loaded, a message will display at the bottom of the window.
-


Manual Set up of Privacy Rules
If you are complete with this page, and you did not use a config file, continue by selecting the firmware of your camera. In the case of multiple cameras, the steps on the following pages should only be done for the main camera; the recipient cameras do not need rules built.
Manually Set Up Privacy Switch Rules for 6.x Firmware
Manually Set Up Privacy Switch Rules for 8.x Firmware
Manually Set Up Privacy Switch Rules for 9.x Firmware
Set Privacy Location for PTZ Camera
If the camera is a PTZ, you need to set a Privacy Location. This can be done through the API or through the web browser of the camera.
Via API
- Open a web browser.
- Copy and paste the following link into the address bar. Replace ipaddress with the ip address of the camera:
- http://ipaddress/axis-cgi/com/ptzconfig.cgi?setserverpresetname=Privacy&home=yes
- Press Enter to submit the address.
Via Web Interface
Perform these steps only if configuring the mask via API fails.
- Open a web browser.
- Navigate to the IP address of the camera.
- If prompted, enter the username and password for the camera.
- Click on Setup in the upper right hand corner of the window.
-
- Click on PTZ.
-
- Click on Go to to navigate to the home preset.
-
- In "Current position", type "Privacy", then click Add.


Set Privacy Mask
This can be done through the API or through the web browser of the camera.
Via API
- Open a web browser.
- Copy and paste the following link into the address bar. Replace ipaddress with the ip address of the camera:
- http://ipaddress/axis-cgi/privacymask.cgi?action=add&name=mask1&width=100&height=100
- Press Enter to submit the address.
- The mask should now be created. This can verified by browsing to the IP address of the camera. The live view should show a black screen.
-
- Copy and paste the following link into the address bar. Replace ipaddress with the ip address of the camera:
- http://ipaddress/axis-cgi/param.cgi?action=update&Image.I0.Overlay.MaskWindows.M0.Enabled=no
- This should disable the mask created. This can be verified by browsing to the IP address of the camera. The live view should show a live view from the camera.
-


Via Web Interface
Perform these steps only if configuring the mask via API fails.
- Open a web browser.
- Navigate to the IP address of the camera.
- If prompted, enter the username and password for the camera.
- Click on Setup in the upper right hand corner of the window.
-
- Click on Video & Audio.
-
- Click on Privacy Mask.
-
- Click Add.
- Enter Privacy in the Mask name field.
- Expand the box slowly using a mouse until it covers the entire image.
-
- Click Save.
- Click on the Privacy mask just created.
-
- Click Enable/Disable.


Add Recipient(s)
Some of the rules point to a recipient at a specific IP address, so the camera must have a recipient set up, even for itself. In the case of a room with multiple cameras, the master camera will need a recipient set up for all other cameras in the room as well.
- Click on Setup in the upper right hand corner of the window.
-
- Click on Events.
- Click on Recipients.
- Click on Add.
- Add Self in the name field
- In Recipient, type
http://127.0.0.1/axis-cgi/param.cgi
or
http://IPADDRESS/axis-cgi/param.cgi
- Type in the login credentials for the camera.
- Click Test.
- Click Close.